FAQ#
How to create a user?#
Prerequisites: Have "Dealer Manager" rights in Fleetback
- Sign into your account
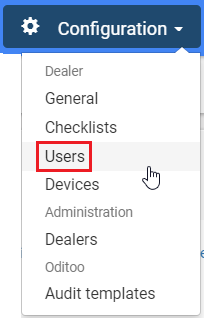
- Click on "Configuration" in the menu
- Click on "Users" in the "Configuration" submenu
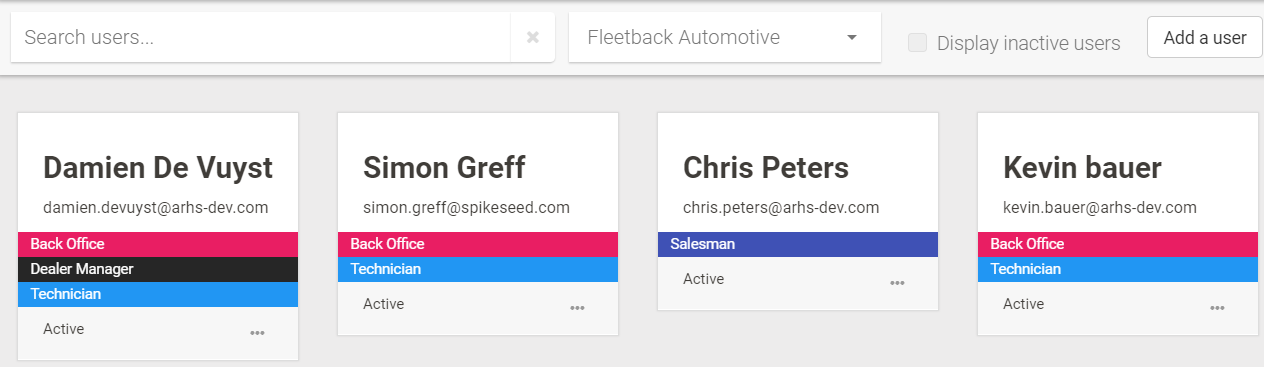
- Click on the "Add a User" button
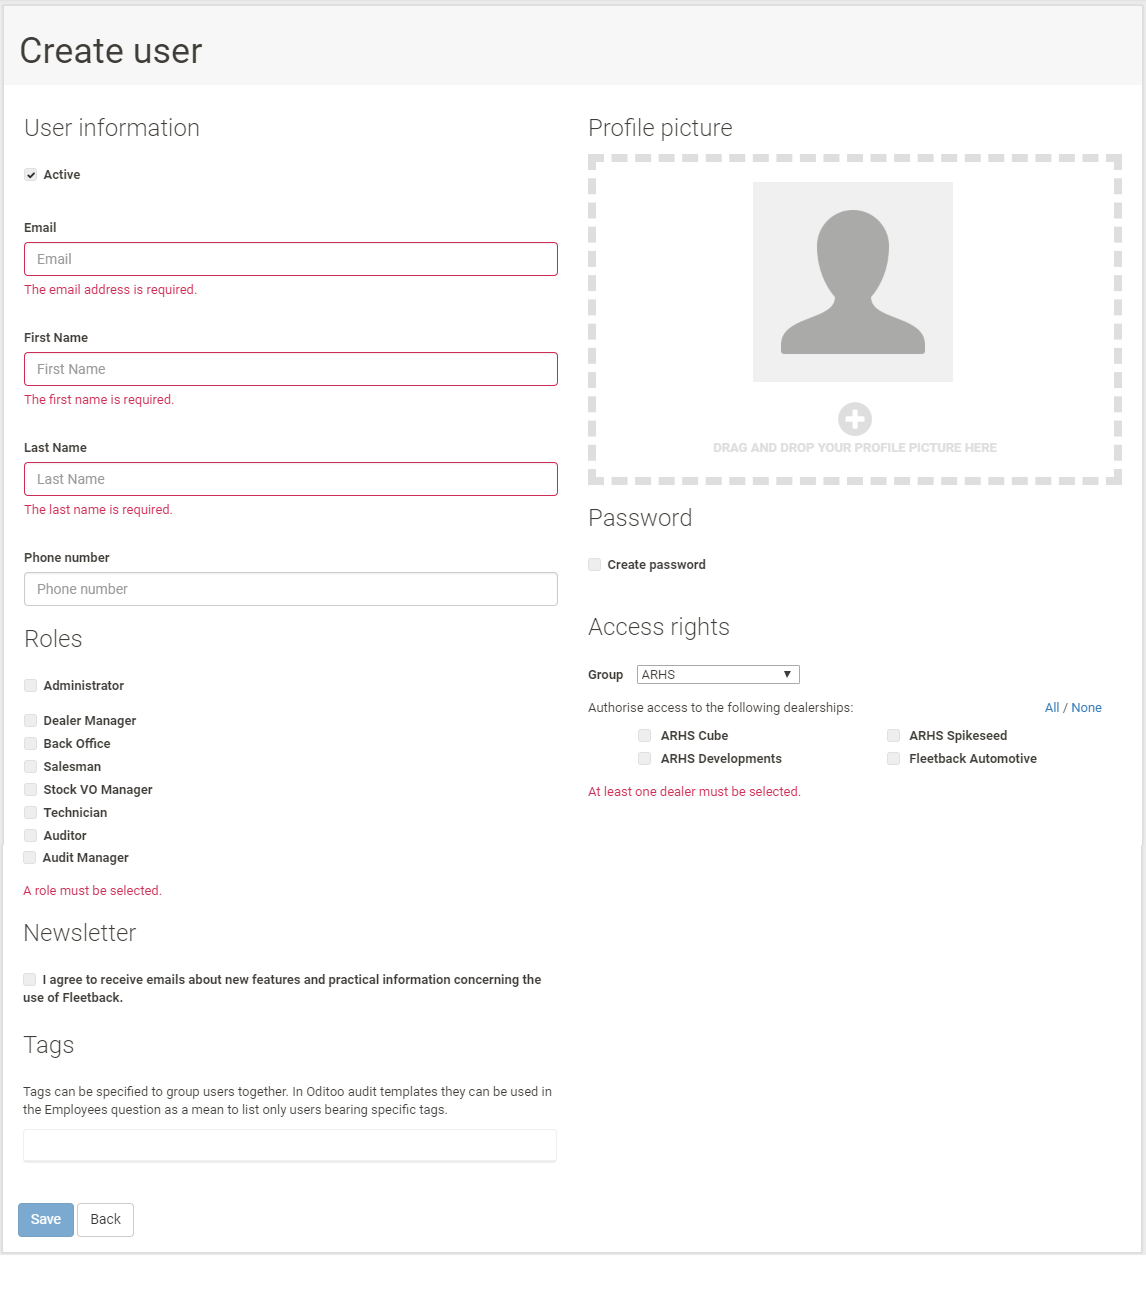
- Enter the information and rights of the user
- Select the dealership(s) concerned
- Click on "Save"
I lost / forgot my password#
- Log in to: https://www.fleetback.com/login
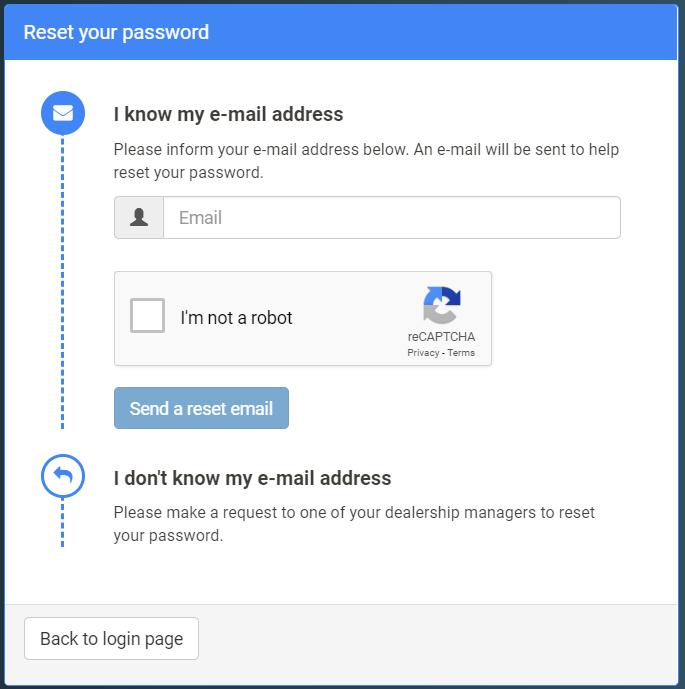
- Click on "Forgot your password?"
- Enter your email address
- Check the "I'm not a robot" box
- Click "Send a reset email"
- Consult your mailbox
How to add a device?#
Prerequisites: Have "Dealer Manager" rights in Fleetback
- Sign in to your account
- Click on "Configuration" in the menu
- Click on "Devices" in the "Configuration" submenu
- Click on the "Add a device" button
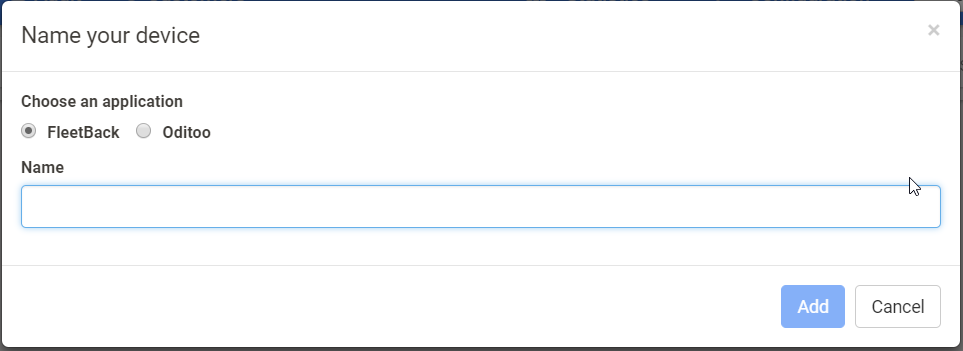
- Select for which application the device should be added
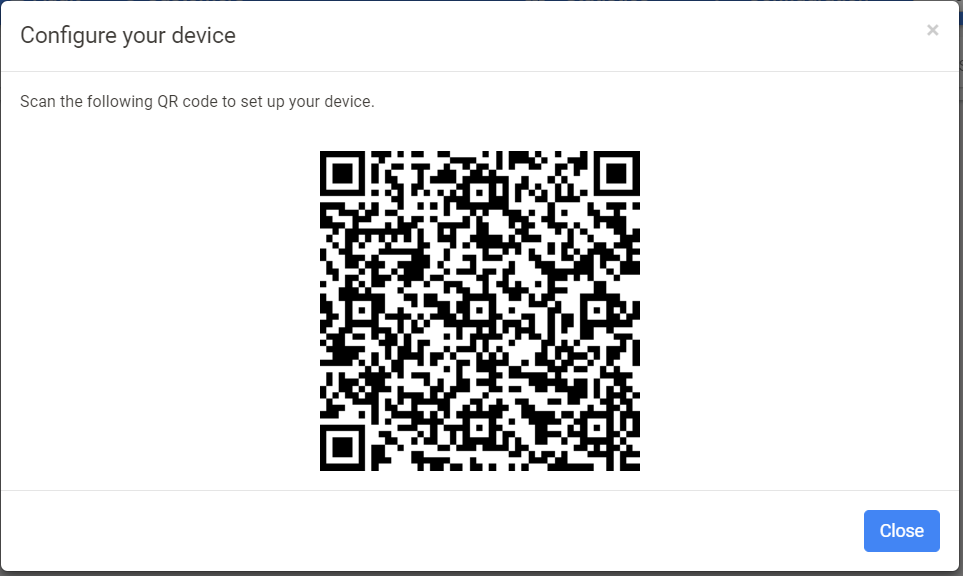
- Enter a name for the device to add and click on "Add"
- Scan the bar code generated with the device to be added
For more information, please refer to the WebApp> Management> Configuration> Add Device section.
My files do not sync#
There are several possible solutions:#
- Check the connection of the device to the Internet
- Check that the device is up-to-date
- Check that the latest version of the application is installed
- Write an email to support@fleetback.com specifying:
- The dealership
- The name of the device
- The blocked file(s)
Application in the background#
It is recommended that you do not close the application before syncing because some devices block the synchronization in the background.
I get disconnected on the web app#
This can be caused by an unstable Internet connection. If this happens often, contact your IT department.
Can I use my personal phone?#
Yes:
- The interventions are not stored on the device
- Interventions are not sent with your personal data (except in case of sharing files
For more information, see Mobile App> History> Sharing a file
How can I contact support?#
- Either by email at support@fleetback.com
- Or by phone by calling +32 2 80 80 828 (be aware that this is a Belgian number, please do not forget the extension +32)
Can I send a file to several people?#
It is currently not possible to send an intervention simultaneously to several people, however you can duplicate your file and send it to different people or share the link and transmit it to different people.
What can I do with my Fleetback profile?#
Here are the different roles available in Fleetback along with their rights:
Dealer Manager#
- Accesses the various configuration menus of the application
- Accesses the various statistics menus of the application
Back office#
- Logs in to https://www.fleetback.com
- Creates a new intervention
- Sends an intervention created on the mobile app
- Views the intervention history
- Accesses the CRM / Customer functionality
Salesperson#
- Logs in to https://www.fleetback.com
- Creates a new intervention in Sales mode
- Sends an intervention created on the mobile app
- Views the intervention history in sales mode
- Uses the app in sales mode
Technician#
- Uses the app in after-sales mode
Auditor#
- Uses the Oditoo app
Audit Manager#
- Logs in to https://www.fleetback.com
- Consults completed Audits
- Creates new audit templates
- Views audit statistics
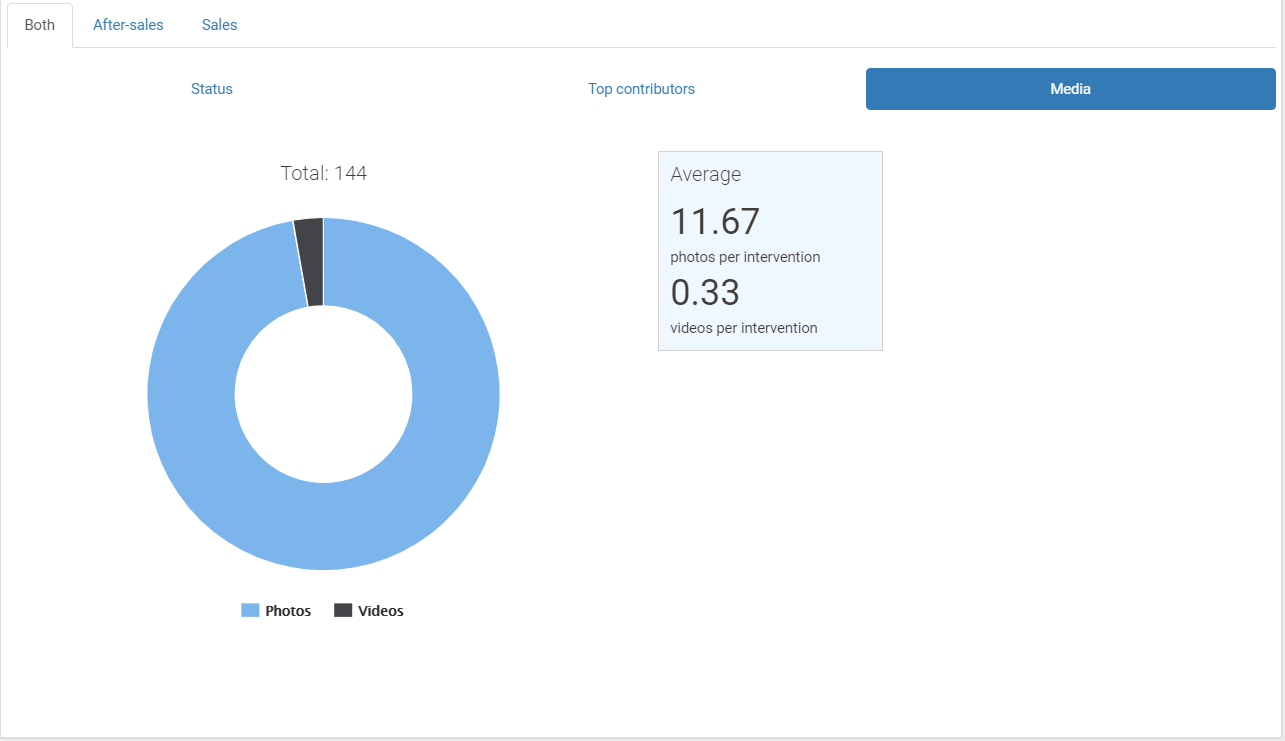
What statistics can I consult?#
- Average number of photos per intervention
- Average number of videos per intervention
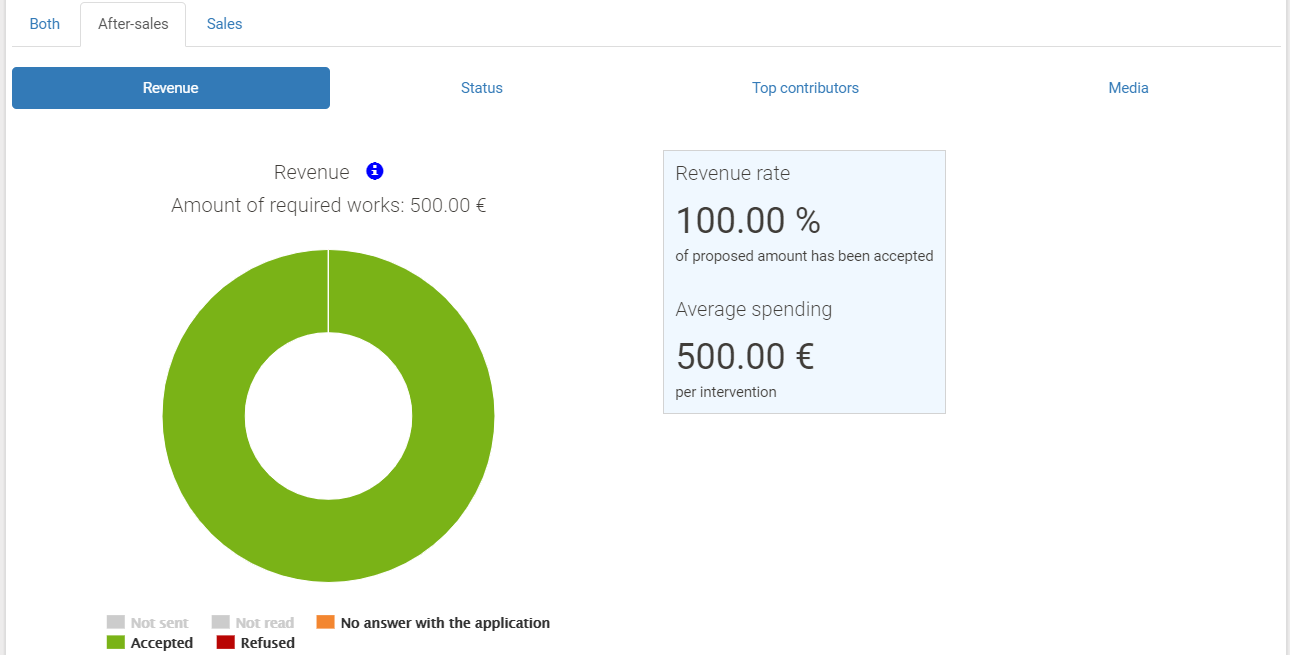
- Proposed amount
- Accepted amount
- Revenue rate
- Average shopping cart
- Conversion rate
- Status of interventions
- Top contributors
For more information, please see the Web App> Management> Statistics section
What should I check before sending a file?#
You are strongly advised to:
- Check your customer's contact information
- Check the vehicle's information
- Check your message
- Check your imported quotes and your Fleetback quote
- Use the "Preview" feature to consult the final intervention sheet that your customer will receive.
Tips for taking photos or videos#
Before:
- Unlock the orientation of your device (do not leave it in portrait / landscape)
- Hold your device in landscape mode.
During:
- Start by filming the license plate (in order to identify the vehicle) in the case of an intervention in after-sales mode.
- Turn off the sound if you do not need it
- Use the flash wisely because it can be reflected on metal parts
After:
- Play your video / view your photos before sending the intervention
How to add a brand to my dealership#
You can consult the list of brands available in the application: https://www.fleetback.com/w/en/clients/ and write to support@fleetback.com to request adding a brand to your dealership.
User Guide#
Intro#
Fleetback in a few words#
Fleetback App is a web and mobile application that allows dealers to communicate transparently and responsively with their customers through photos and videos sent via SMS and email.
Goals#
With Fleetback:
- Increase your sales
- Improve your internal procedures
- Keep your customers loyal
- Save time
Some examples of use cases
- Response to a customer following a question about a used/new car (UC/NC)
- Explanation of the work performed on a vehicle
- Recommendation of additional work
- Approval of works and of the quote
- Reducing time spent on the phone
- Improving internal communication
- Performing a complete and transparent follow-up
Components#
Mobile App
- Identifying the intervention
- Taking videos / photos
- Checklist
- Sending to the customer / reception
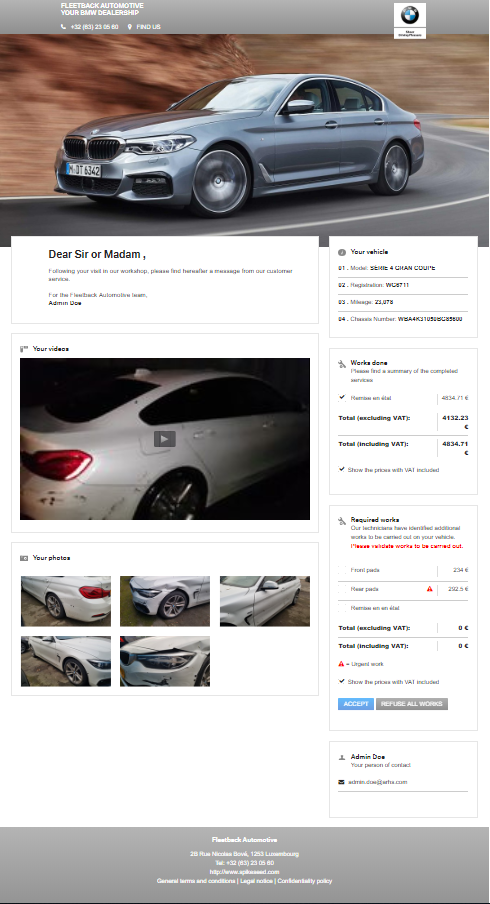
Customer page
- Consulting the intervention
- Approval of additional work
- Customer feedback
Back Office (Web application / desktop)
- Consulting the intervention
- Editing data
- Sending to the customer
- Statistics
Mobile App#
Quick Start#
Downloading the app#
First of all#
- Make sure you are connected to the Internet
- Make sure the device has the latest available updates (Settings> General> Software Update)
- Make sure you have an iTunes or Google Play account

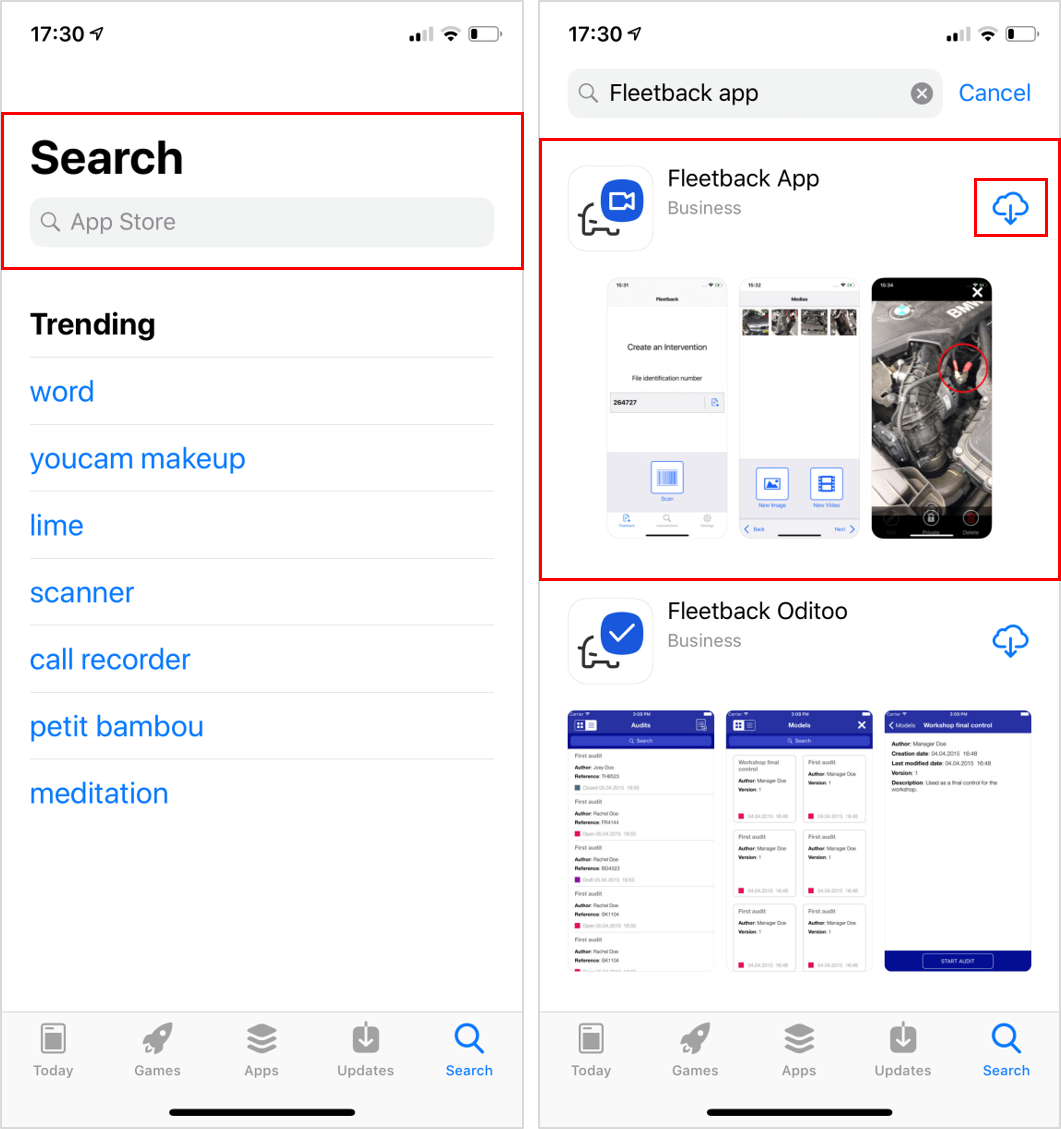
App Store#
Visit the Apple App Store or the Google Play Store and search for "Fleetback." Select the application published by "ARHS Spikeseed" and install it.
Configuring the application#
First launch of the application#
Search for the app named "Fleetback App" among your installed apps, or click directly on "Open" after downloading the app from the Apple Store or Google Play Store. Start the application.
Adding the new device on the Back Office (website / desktop)#
Please contact the person who has the dealership administrator role in Fleetback.
More details can be found in the Web App> Management> Add Device section

Pairing the application#
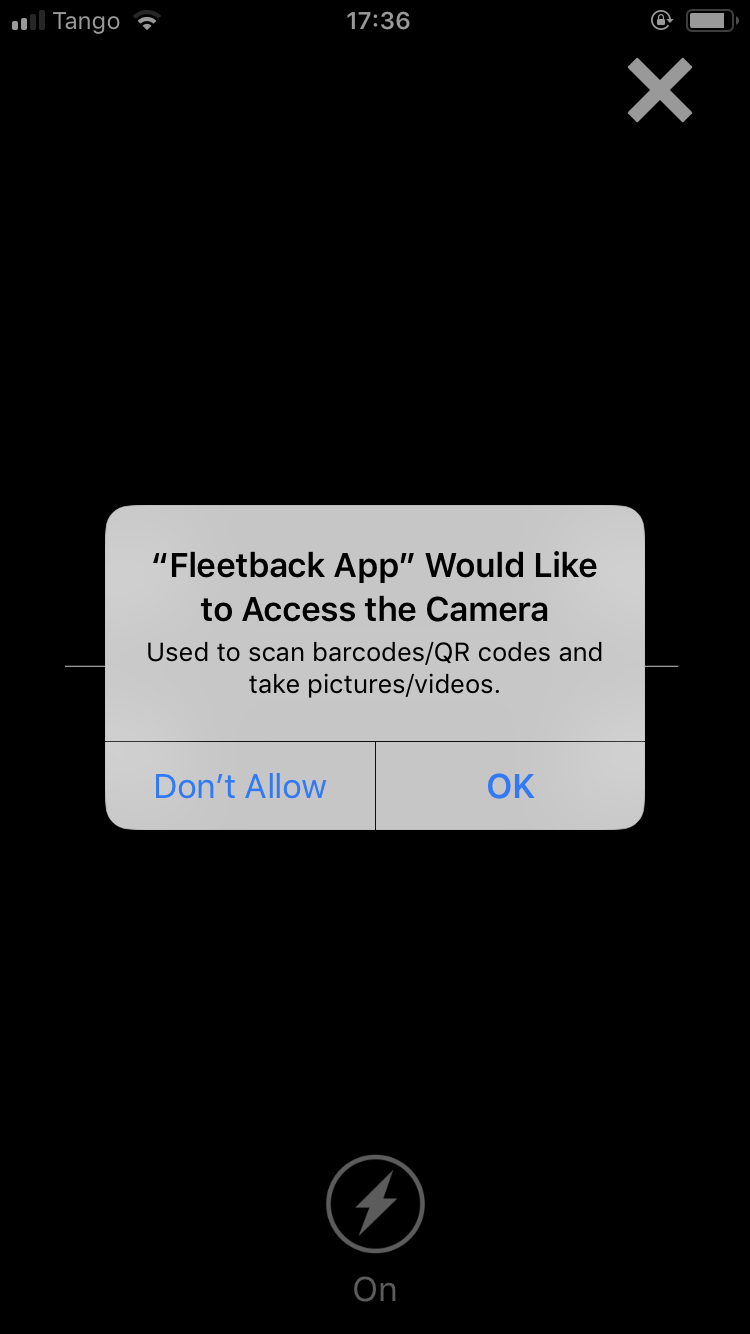
Return to your Fleetback App. You can now click on "Scan." Allow the app to access the camera on your mobile device.
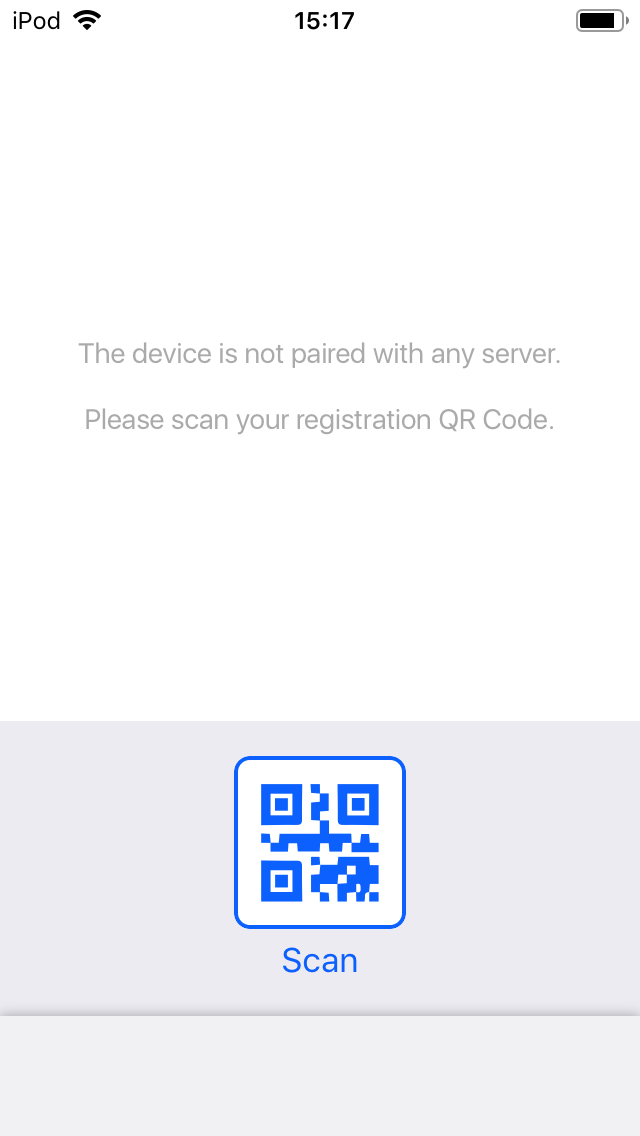
Then scan the QR code generated in the previous step, making sure to focus the lens of your camera on the QR code.
Your mobile app is now paired with your dealership!
Presentation of the menus#
Bottom menu#

New
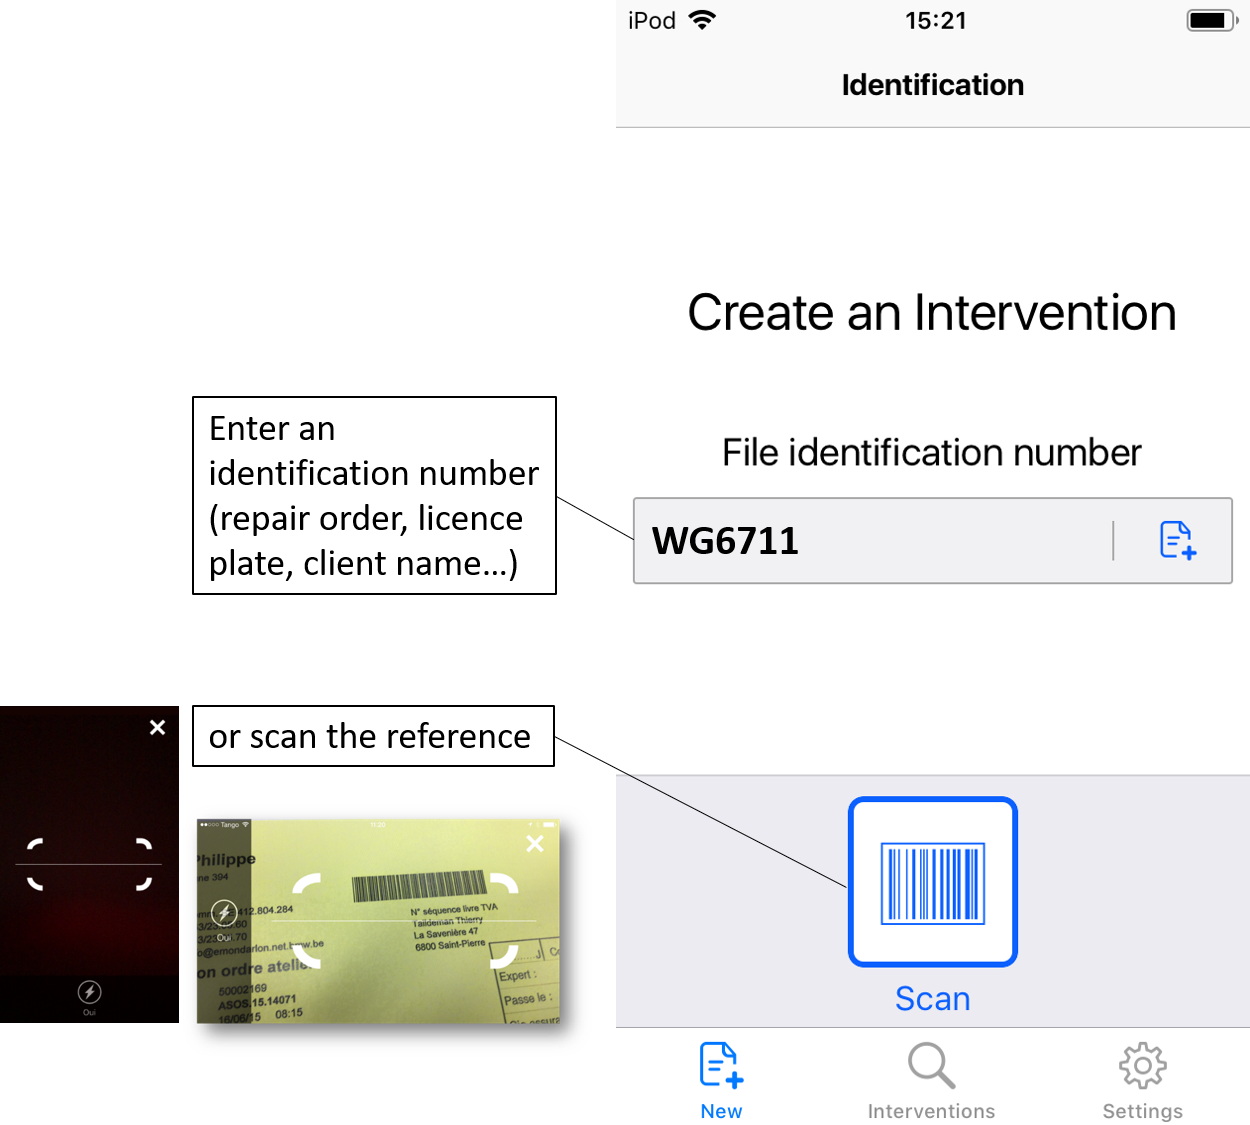
In the "New" menu, you have the option to create a new Fleetback intervention. To do this, enter a file identification number. You can also scan an identifier as a bar code.
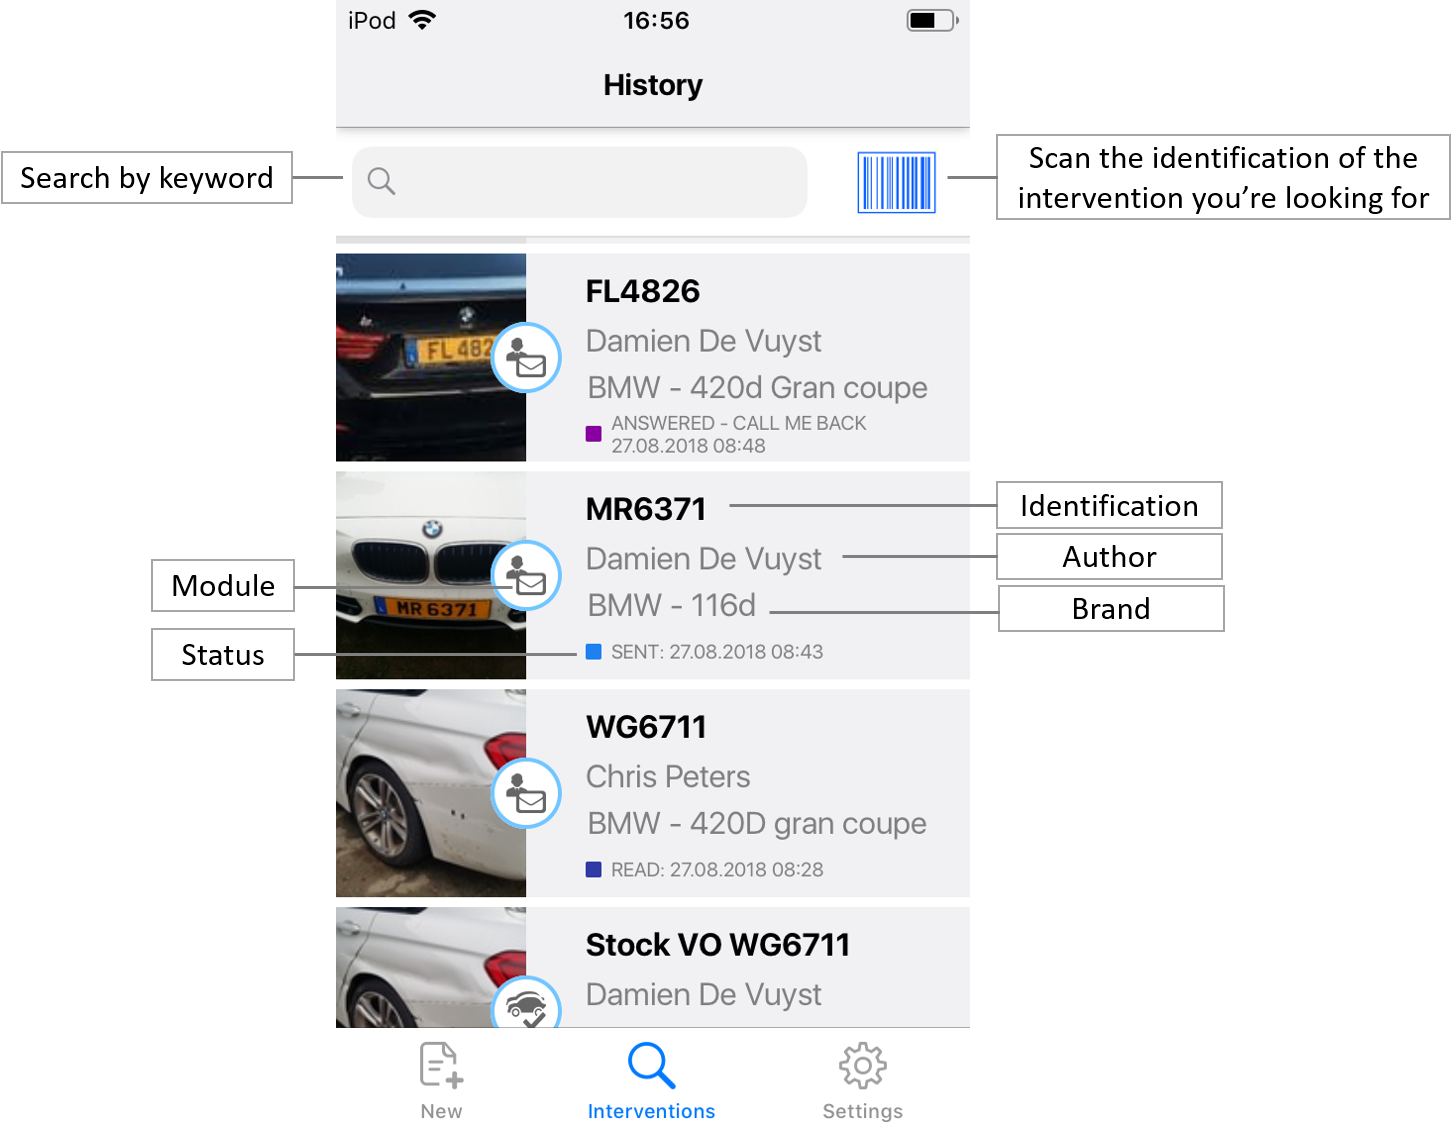
Interventions (history)
In the "Interventions" menu, you can access the history of the interventions created within your dealership. They are sorted by creation date, from the most recent to the oldest.
In addition, the intervention category is indicated by five different logos corresponding to the usage modules available in the two modes. The "After-Sales" mode includes three modules: "Mechanics," "Bodywork," and "Warranty," and the "Sales" mode includes two modules: "UC Stock" or "Direct message."
For more information, please refer to the section Mobile App> After-Sales Mode> The Three Modules
A search bar is also available at the top of the screen, in which it is possible to search for an intervention via its file identification number, which you can scan, or by any other keyword entered in the intervention's fields.
Settings
In the "Settings" menu, you can view information about your application and you can change the language or the mode.
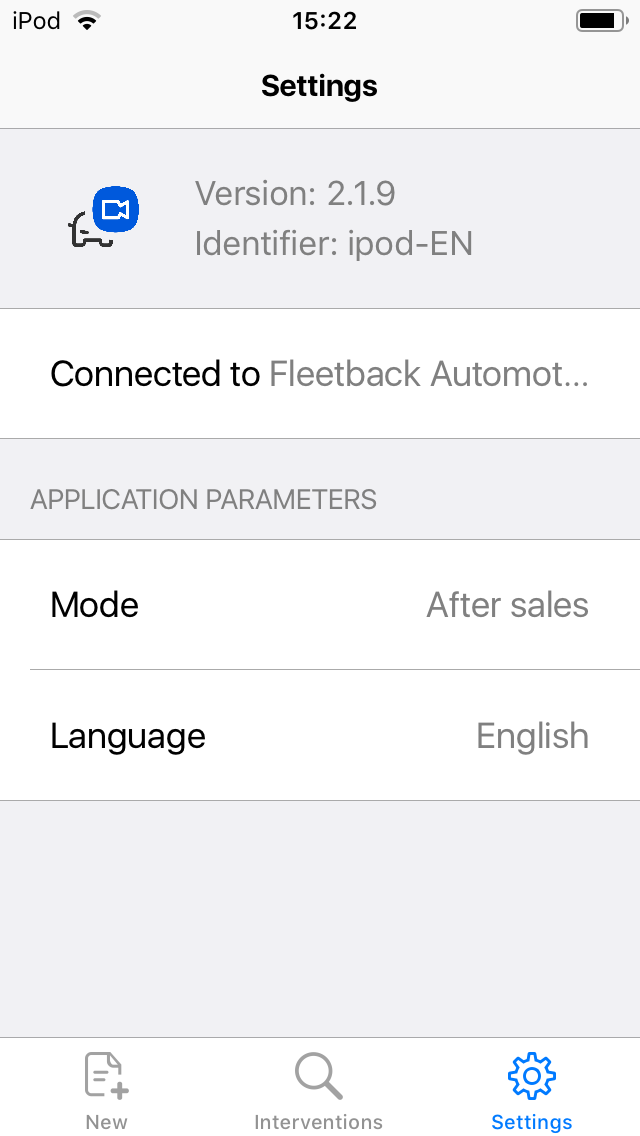
Version
You can check the version of the Fleetback App you are currently using.
Identifier
The identifier corresponds to the name assigned to your mobile device during its pairing with the dealership.
Pairing the device
The submenu "connected to" displays the name of the dealership that was paired with your mobile device using the Fleetback App.
Mode (sales / after-sales)
The two available modes are "After-Sales" and "Sales." The ability to activate these modes depends on your dealership administrator.
If you have access to each of these modes, you can click on the current mode of use, and then select the desired mode.
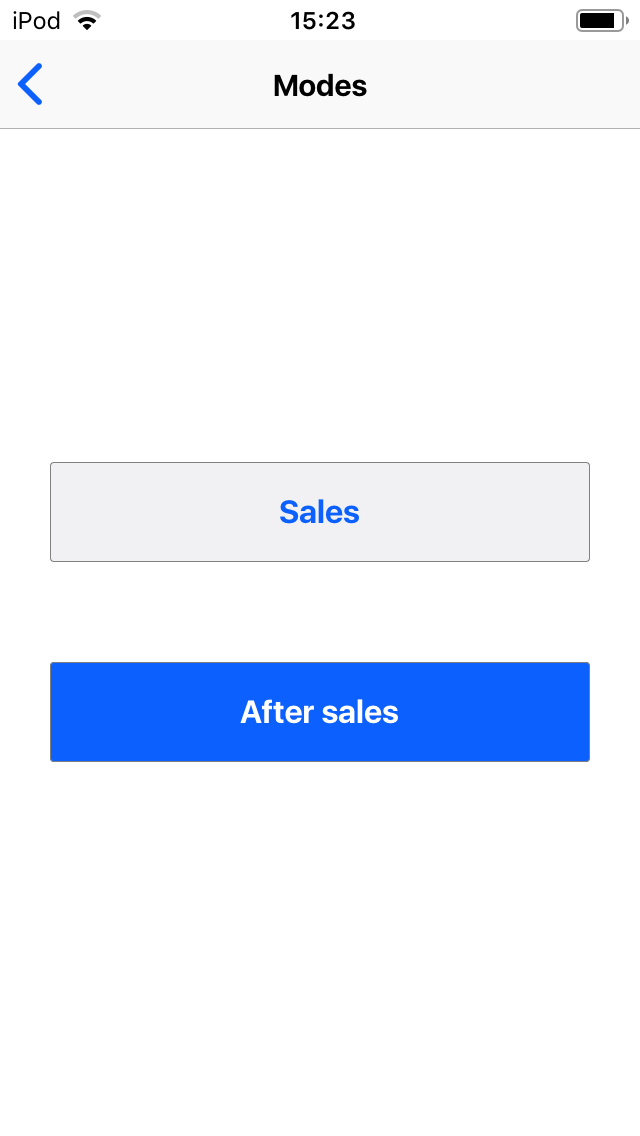
For more information on the Sales Mode, please refer to the Mobile App> Sales Mode section
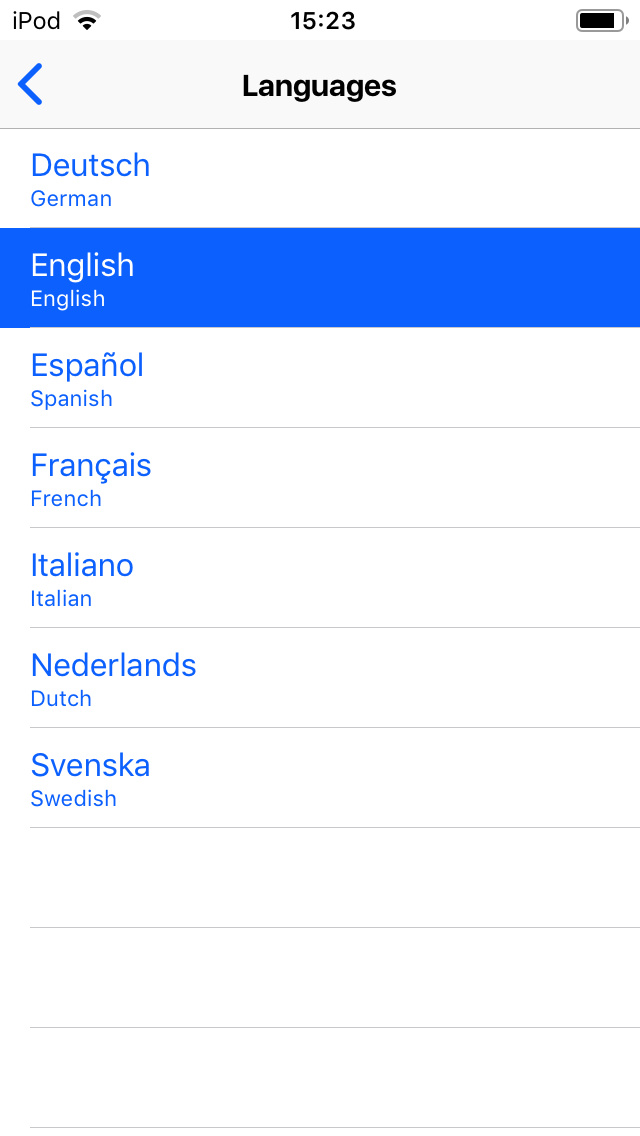
Language
Here you can select the language of your choice from the many languages available for the Fleetback App.
Wi-Fi / 3G / 4G connection#
Required for:
- Starting the application for the first time
- Sending interventions to the Back Office
- Retrieving a new configuration from the Back Office
With no Internet connection:
- One or more interventions can be performed
- The sending to the Back Office will be done when the connection is re-established
The use of the application outside the dealership is then possible but synchronization will take place when you have an Internet connection once again.
To prevent the use of cellular data for the app: Settings> Cellular Data> Fleetback (only on iPhone)
The After-Sales mode#
The three modules#
When you use the Fleetback App in "After-Sales" mode, you have access to three modules once a new intervention is created
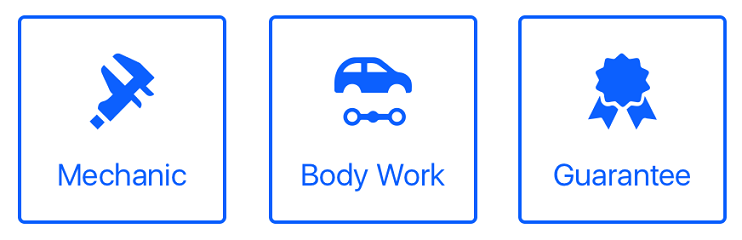
The "Mechanics" and "Bodywork" modules let you perform a vehicle overview and communicate with your customers about the work to be done on their vehicle.
The "Warranty" module lets you store relevant elements in a warranty file, for direct or subsequent communication with a professional (expert, insurer, etc.).
Creating an intervention (mechanics / bodywork)#
Manual identification or via scan#
In the "New" menu, you have the option to create a new Fleetback intervention. To do this, enter a file identification number (e.g.: RO number, plate number, or customer name)
You can also scan an identifier (e.g., the bar code of a work sheet or a QR code).
To do this, simply click on the "Scan" button.
The camera function of your mobile device will then activate and you can scan the desired code.
Choosing the module#
Choose the type of intervention you want to create: "Mechanics" or "Bodywork."
See Mobile App> After-Sales Mode> The Three Modules
Capturing media#
Once the type of intervention has been selected, the camera function will automatically activate in video mode. (The authorization of the microphone and the camera are required for the first launch)
You can now take an explanatory video of the problem found on the vehicle. You can also take pictures by clicking on the "Picture" button.
For best results, Fleetback recommends you always film or take snapshots in landscape mode. Once your media items are saved, click on the icon with an "X" at the top right.
To see all the camera options on the mobile app, please refer to the section: Mobile App> Media
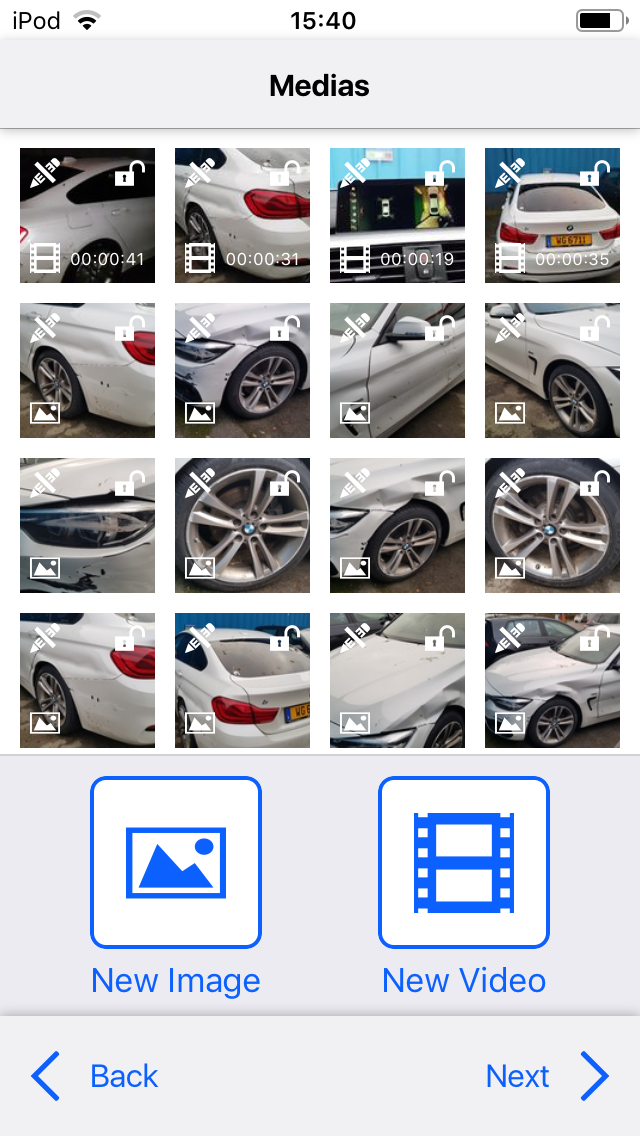
Gallery#
You have the option to edit and delete your current media items, as well as to make them private or public. You can also add media by clicking "new picture" or "new video"
When you are satisfied with your media items, click on the "Next" button.
To see all the camera options on the mobile app, please refer to the section: Mobile App> Media
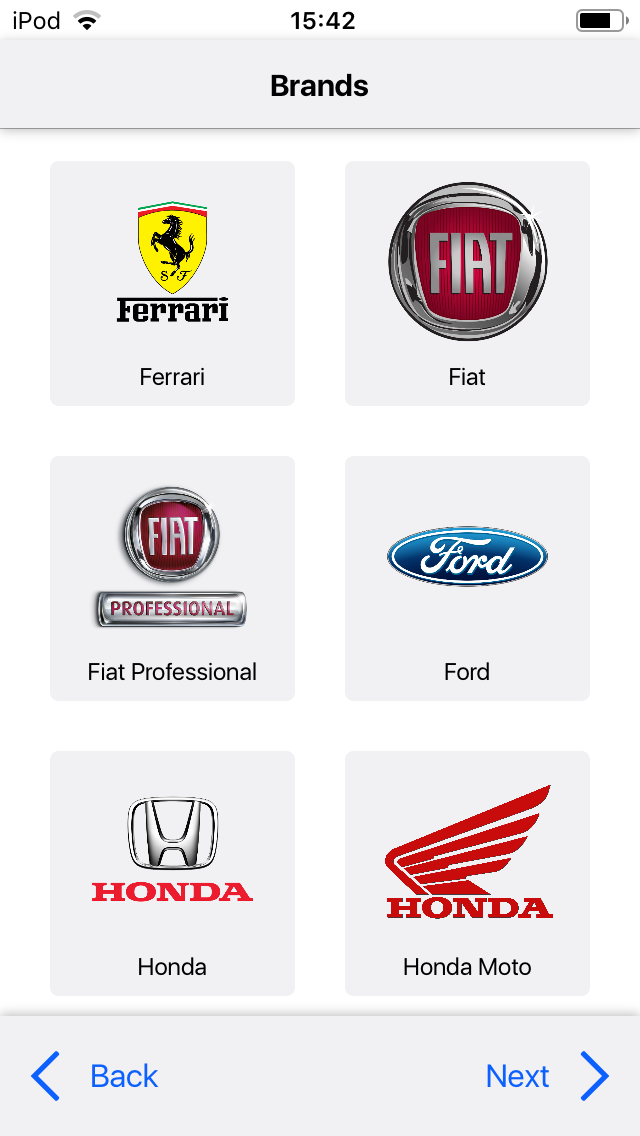
Brand#
You can now select the manufacturer's brand corresponding to the vehicle concerned by the intervention. This will generate a customer page corresponding to the brand's visual identity.
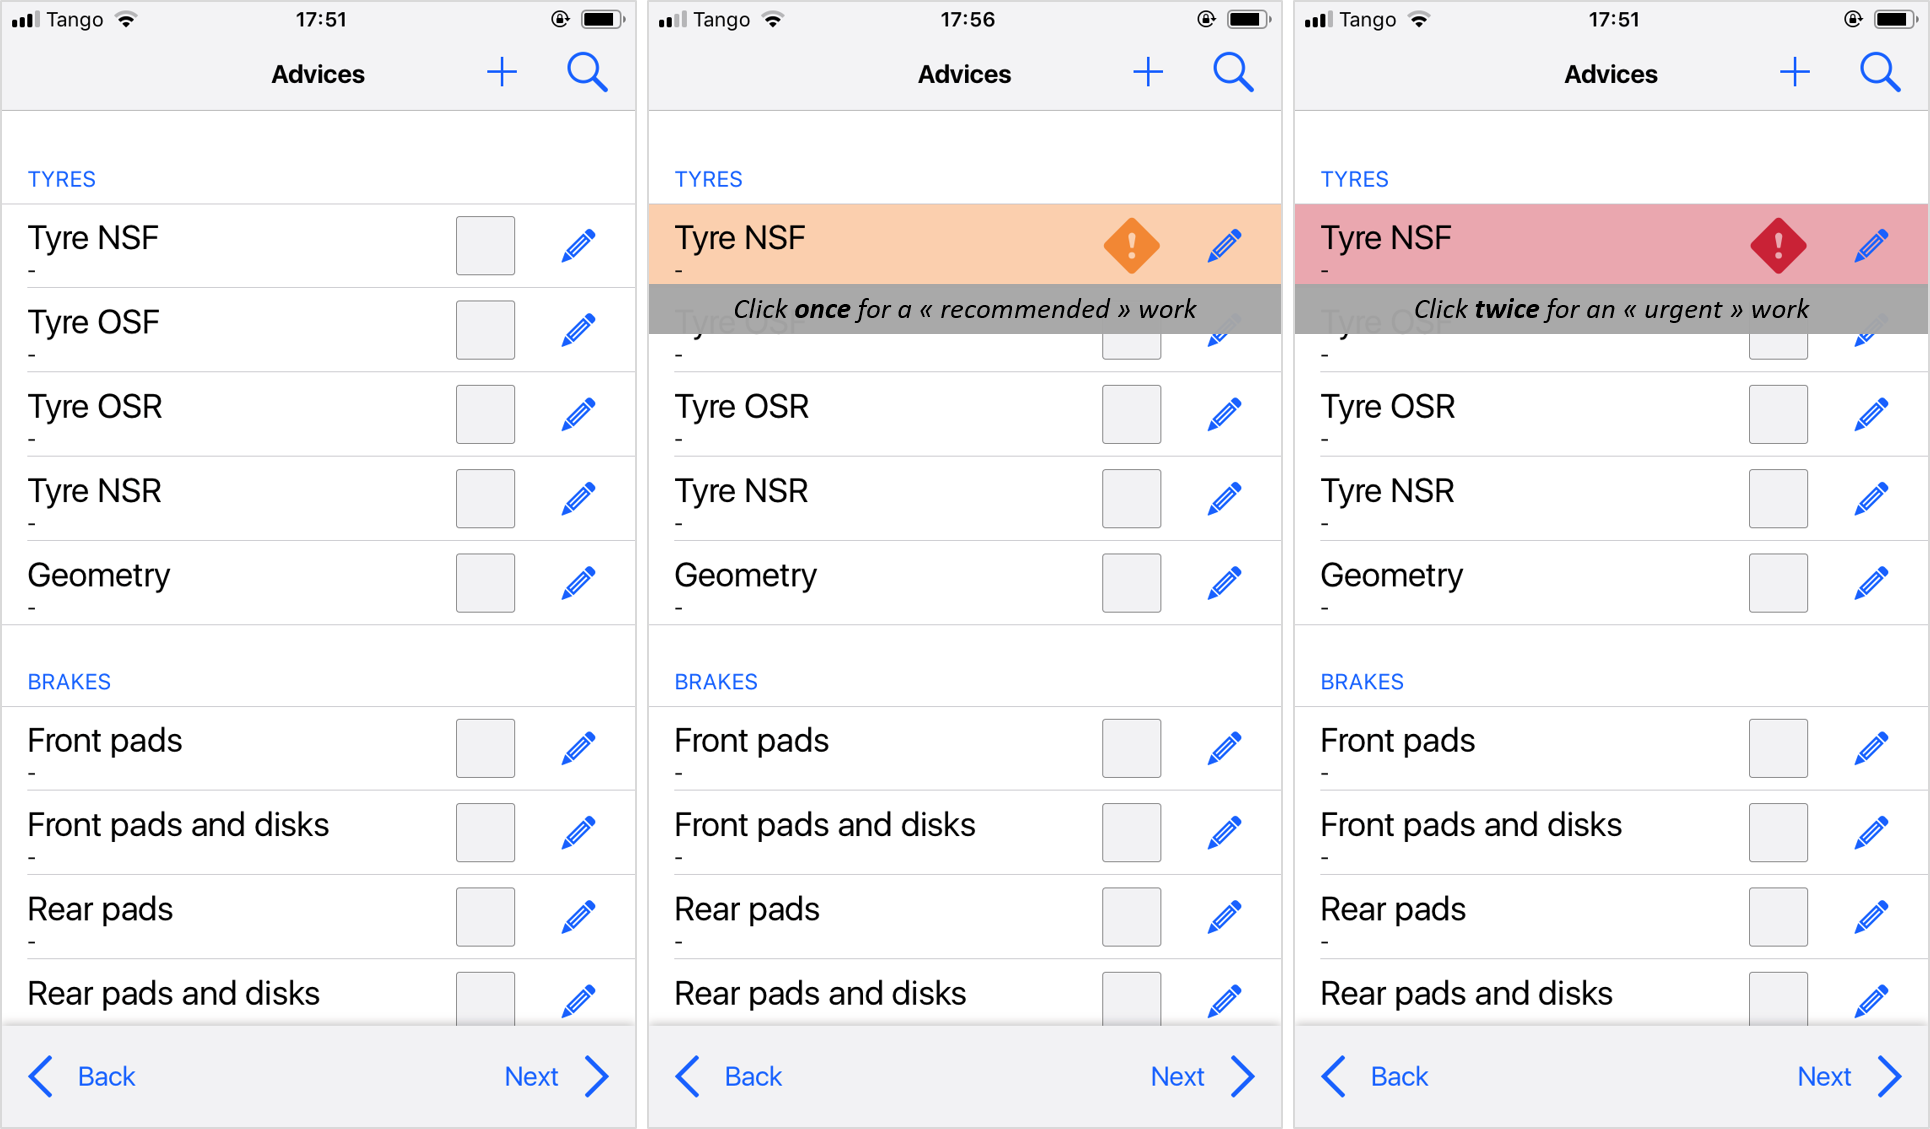
Recommendations#
You then have access to a list of recommendations predefined by your dealership administrator. You can select a recommendation by clicking on it. The line concerned will change to orange, indicating the "Recommended" status.
If you wish to inform the customer that some work must be performed urgently on the vehicle, click a second time on the recommendation. The entire line then changes to red, indicating the "Urgent" status.
To cancel your selection of a recommendation, click a third time on it.
You can also "search" for a recommendation in the search bar / magnifying glass.

To add a recommendation that is not on the list, click the "+" button (on iOS) / or "add an item" (on Android).
A free text field appears where you can name your custom recommendation.
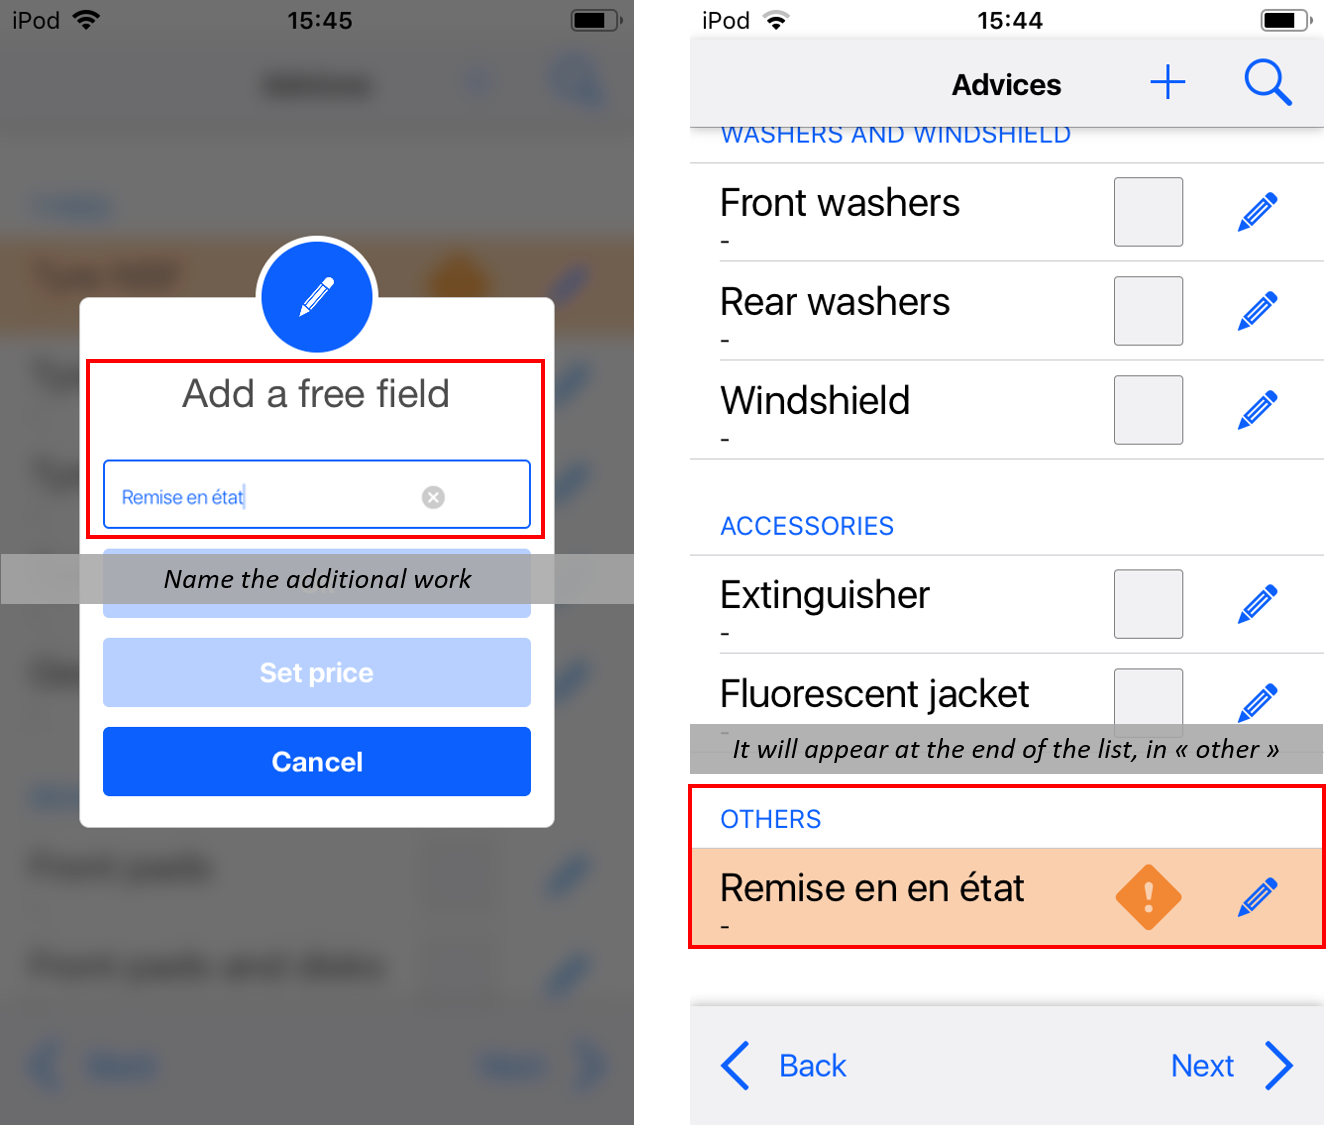
The number of selectable recommendations is not restricted.
When you have selected all the desired recommendations, click "Next."
Reception#
You can then include a private video message for the reception.
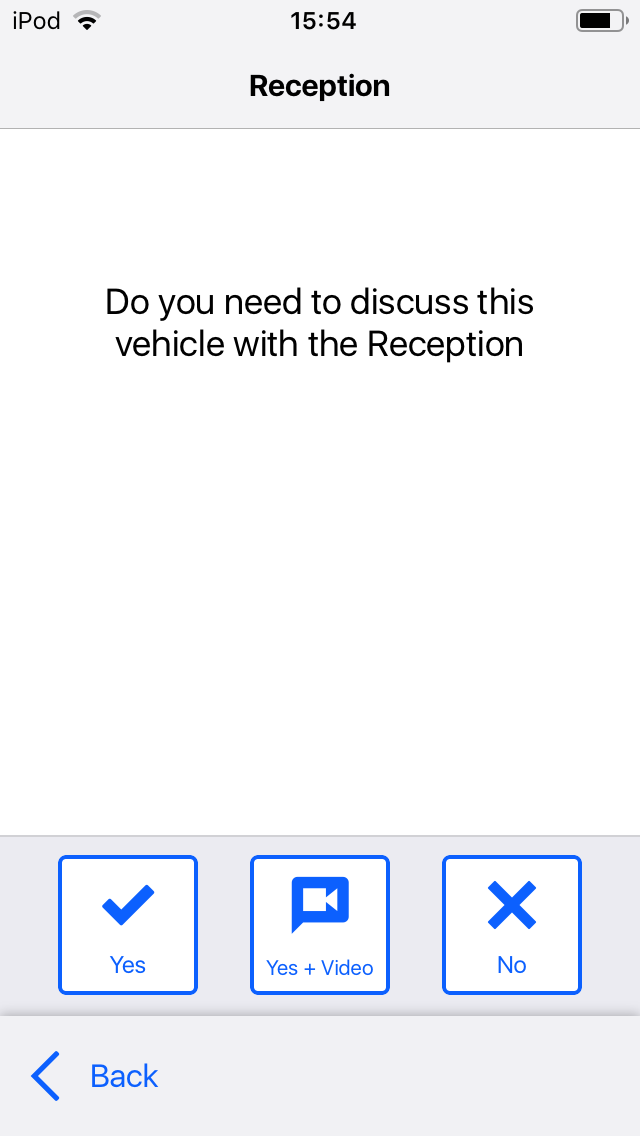
You can select:
- "Yes," so that the person who completes the file via the website (e.g., Service Advisor) will contact you,

- "Yes + Video" to leave him/her a private video message
- or "No," if you do not want to include any particular communication for the reception.
When done, click the "Next" button.
Summary#
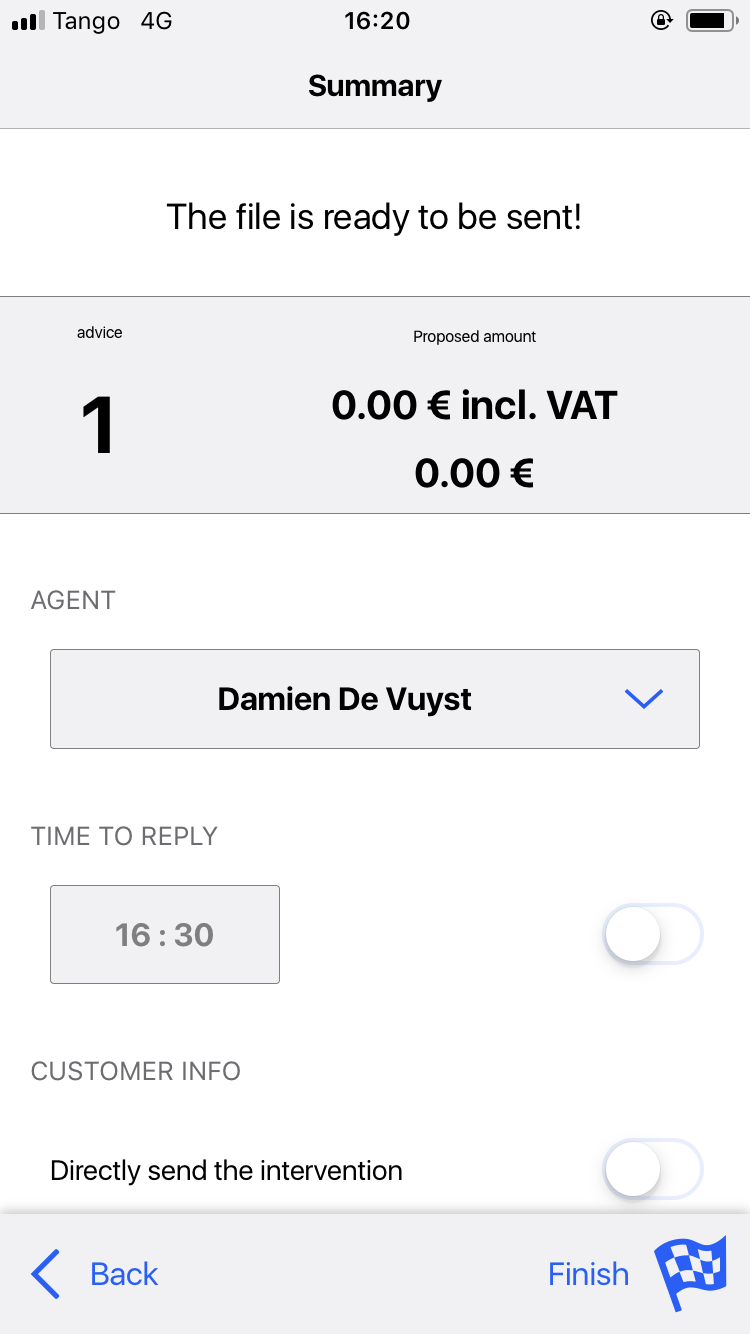
You are in the final stage of creating a mobile intervention.
The Summary page displays the number of recommendations selected and the total price, if available.
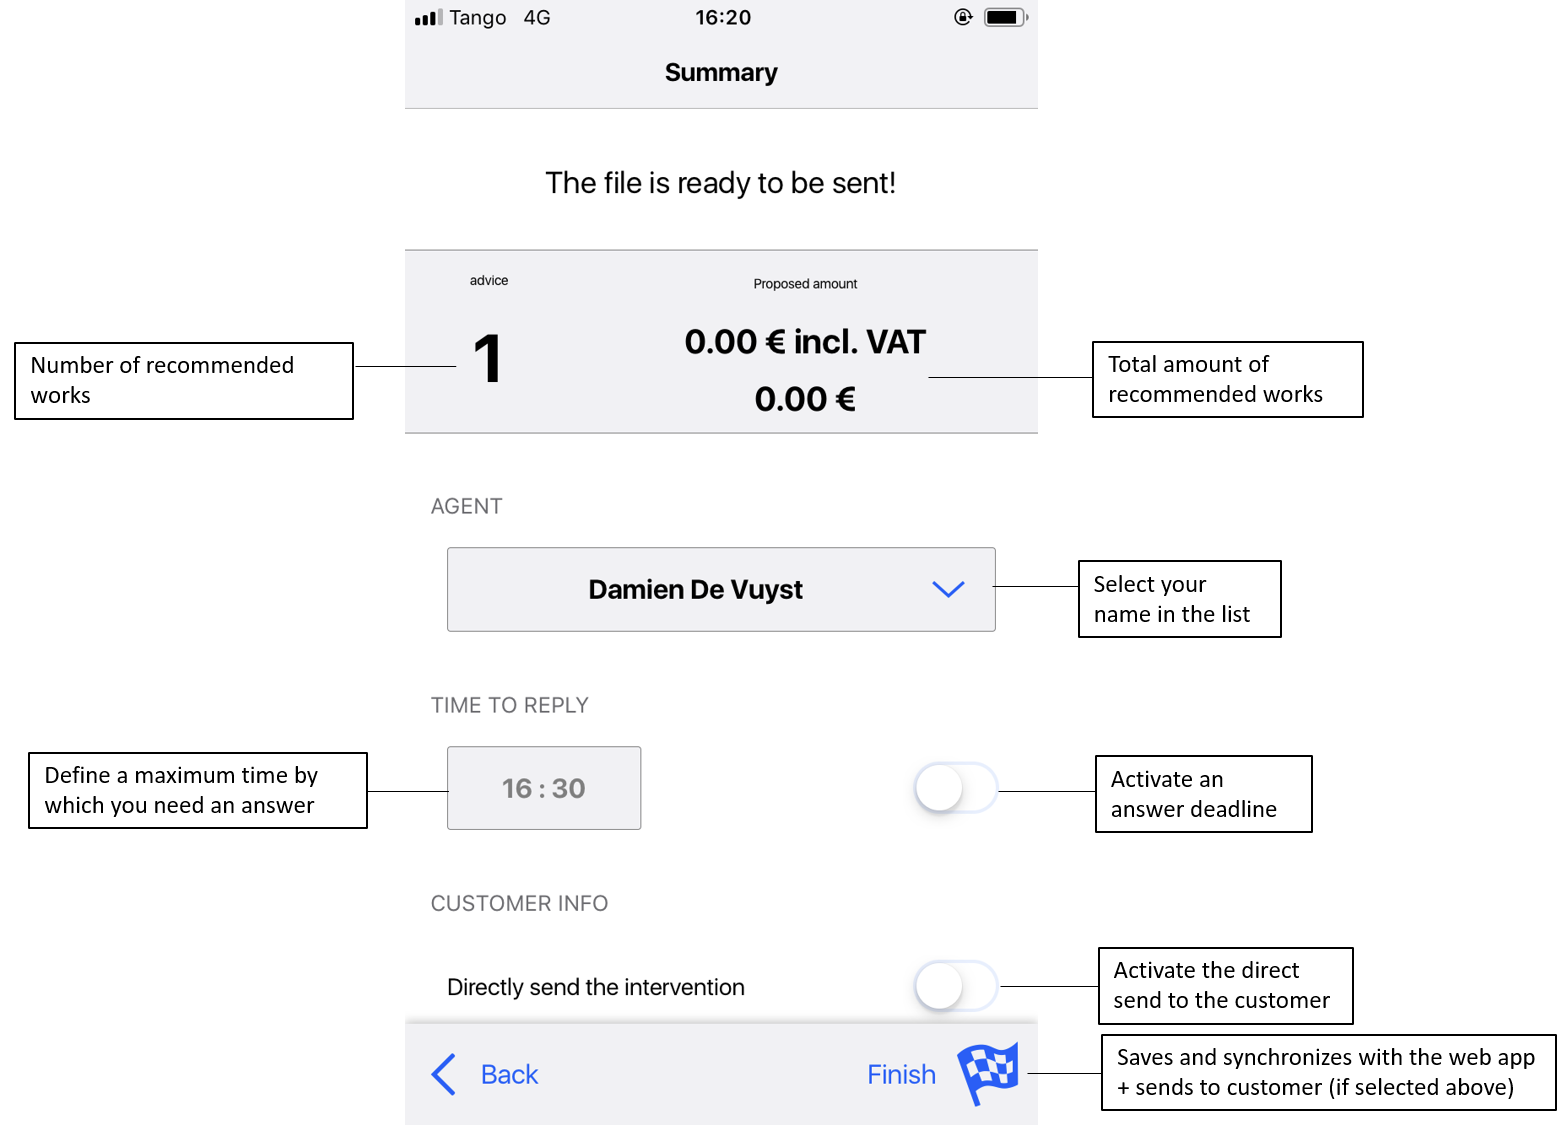
Proposed amount
This is the total price amount for the work proposed in the "recommendations." If no price is entered, the person in charge of the billing must complete it manually.
User
Choose your name from the drop-down menu by clicking on the box.
Time available for an answer
This is a deadline for an expected response. You can activate it or not. This indicates to the customer the deadline for them to respond in order for the necessary work to be performed so that the vehicle is returned at the originally scheduled time.
Click on the currently indicated time and select the desired time.
Finish
This is used to create the intervention and to synchronize it on your dealership's web application where the person concerned can then finalize it and send it to the customer.
It is recommended that you do not close the application before syncing because some devices block the synchronization in the background.
This process can take a few seconds depending on the bandwidth available on your Internet network and the number of videos and photos taken.
The progress status is displayed at the top of your screen or in the "Interventions" menu. (only on iPhone)
Creating a (warranty) intervention#
The process is the same as to create a previously described "mechanics / bodywork" intervention. The only differences in this "warranty" module are:
- The "list of recommendations" is not available in this module
- The "internal message" screen only offers the "Yes + Video" or "No" options
Here are all the steps required to create a warranty intervention:
Manual identification or via scan#
In the "New" menu, you have the option to create a new Fleetback intervention. To do this, enter a file identification number (e.g.: RO number, plate number, or customer name)
You can also scan an identifier (e.g., the bar code of a work sheet or a QR code).
To do this, simply click on the "Scan" button.
The camera function of your mobile device will then activate and you can scan the desired code.
Choosing the module#
Choose the "Warranty" type of intervention.
Capturing media#
Once the type of intervention has been selected, the camera function will automatically activate in video mode. (The authorization of the microphone and the camera are required for the first launch)
You can now take an explanatory video of the problem found on the vehicle. You can also take pictures by clicking on the "Picture" button.
For best results, Fleetback recommends you always film or take snapshots in landscape mode. Once your media items are saved, click on the icon with an "X" at the top right.
To see all the camera options on the mobile app, please refer to the section: Mobile App> Media
Gallery#
You have the option to edit and delete your current media items, as well as to make them private or public. You can also add media by clicking "new picture" or "new video"
When you are satisfied with your media items, click on the "Next" button.
To see all the camera options on the mobile app, please refer to the section: Mobile App> Media
Brand#
You can now select the manufacturer's brand corresponding to the vehicle concerned by the intervention. This will generate a customer page corresponding to the brand's visual identity.
Internal message#
You then have the option to leave an internal message (for a warranty expert / advisor) in the intervention.
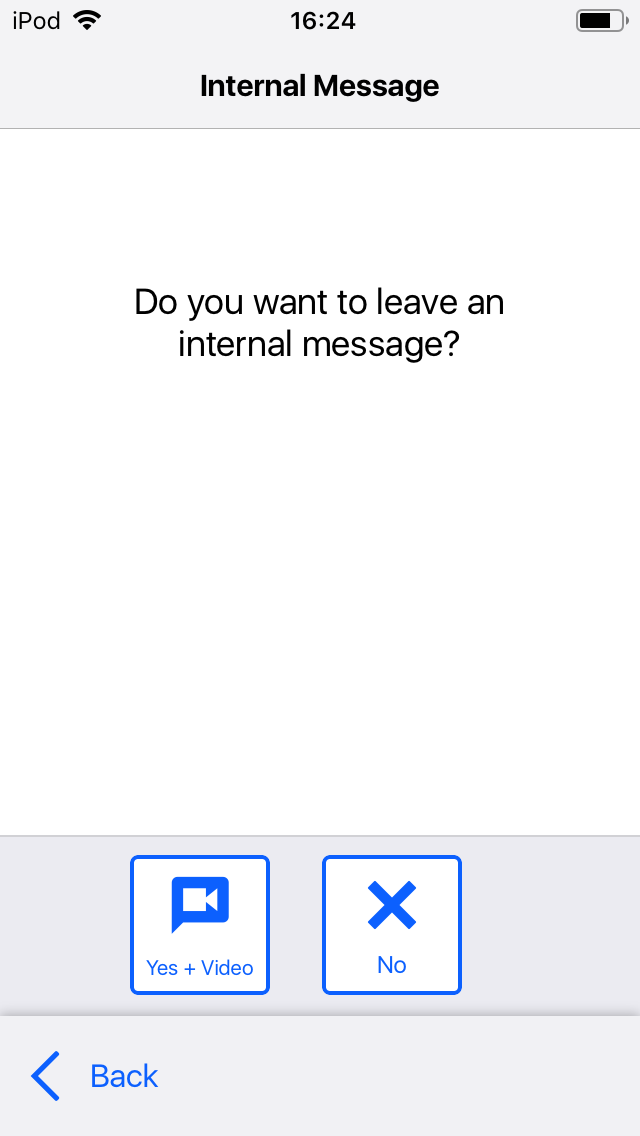
- Choose "Yes + Video" to leave a private video message to the person who will complete the file
- or "No" if you do not want to include any particular message for the reception.
When done, click the "Next" button.
Summary#
You are in the final stage of creating a mobile intervention.
The Summary page displays the number of recommendations selected and the total price, if available.
Proposed amount
This is the total price amount for the work proposed in the "recommendations." If no price is entered, the person in charge of the billing must complete it manually.
User
Choose your name from the drop-down menu by clicking on the box.
Time available for an answer
This is a deadline for an expected response. You can activate it or not. This indicates to the customer the deadline for them to respond in order for the necessary work to be performed so that the vehicle is returned at the originally scheduled time.
Click on the currently indicated time and select the desired time.
Finish
This is used to create the intervention and to synchronize it on your dealership's web application where the person concerned can then finalize it and send it to the customer.
It is recommended that you do not close the application before syncing because some devices block the synchronization in the background.
This process can take a few seconds depending on the bandwidth available on your Internet network and the number of videos and photos taken.
The progress status is displayed at the top of your screen or in the "Interventions" menu. (only on iPhone)
Sales mode#
To put the Fleetback App in "Sales" mode, refer to: Mobile App> Quick Start> Menu Overview> Bottom Menu> Settings> ModeThe two modules#
When you use the Fleetback App in the "Sales" mode, you can access two modules once a new intervention is created
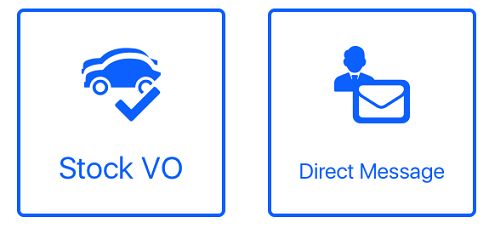
You can choose one of the two modules:
- The "UC Stock" module is intended, among other things, to create "generic" files that can be used by different salespeople in your group. These may include tutorials, vehicle presentations, event invitations, and more. To send a file to a customer, simply duplicate it and convert it to a "direct message"
More details can be found in Mobile App> Sales Mode> Create a "Direct message" intervention
- The "Direct message" module is intended for marketing use, aiming to highlight a vehicle for a particular prospect, as part of a personalized and direct communication with the customer.
Creating a "UC Stock" intervention#
The process is similar to the "After-Sales" mode.
Please refer to the section: Mobile App> After-Sales> Create an intervention
The only differences in the Sales module are:
- The choice of the "UC Stock" or "Direct message" module depending on the type of intervention you want to create.
- The vehicle information is to be completed only in the "UC Stock" module
- The "direct sending" option is only available in the "direct message" module
Here are all the steps required to create a "UC Stock" intervention:
Manual identification or via scan#
In the "New" menu, you have the option to create a new Fleetback intervention. To do this, enter a file identification number (e.g.: RO number, plate number, or customer name)
You can also scan an identifier (e.g., the bar code of a work sheet or a QR code).
To do this, simply click on the "Scan" button.
The camera function of your mobile device will then activate and you can scan the desired code.
Choosing the module#
Choose the "UC Stock" module.
For more details on the modules, please see the section: Mobile App> Sales Mode> The Two Modules
Capturing media#
Once the type of intervention has been selected, the camera function will automatically activate in video mode. (The authorization of the microphone and the camera are required for the first launch)
You can now take an explanatory video of the problem found on the vehicle. You can also take pictures by clicking on the "Picture" button.
For best results, Fleetback recommends you always film or take snapshots in landscape mode. Once your media items are saved, click on the icon with an "X" at the top right.
To see all the camera options on the mobile app, please refer to the section: Mobile App> Media
Gallery#
You have the option to edit and delete your current media items, as well as to make them private or public. You can also add media by clicking "new picture" or "new video"
When you are satisfied with your media items, click on the "Next" button.
To see all the camera options on the mobile app, please refer to the section: Mobile App> Media
Brand#
You can now select the manufacturer's brand corresponding to the vehicle concerned by the intervention. This will generate a customer page corresponding to the brand's visual identity.
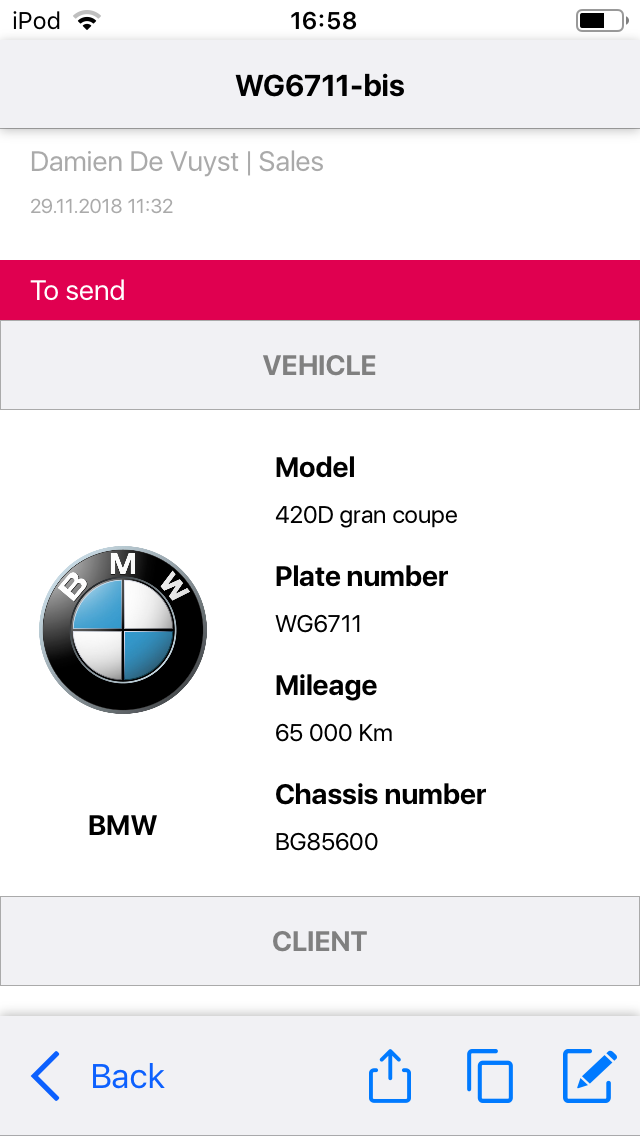
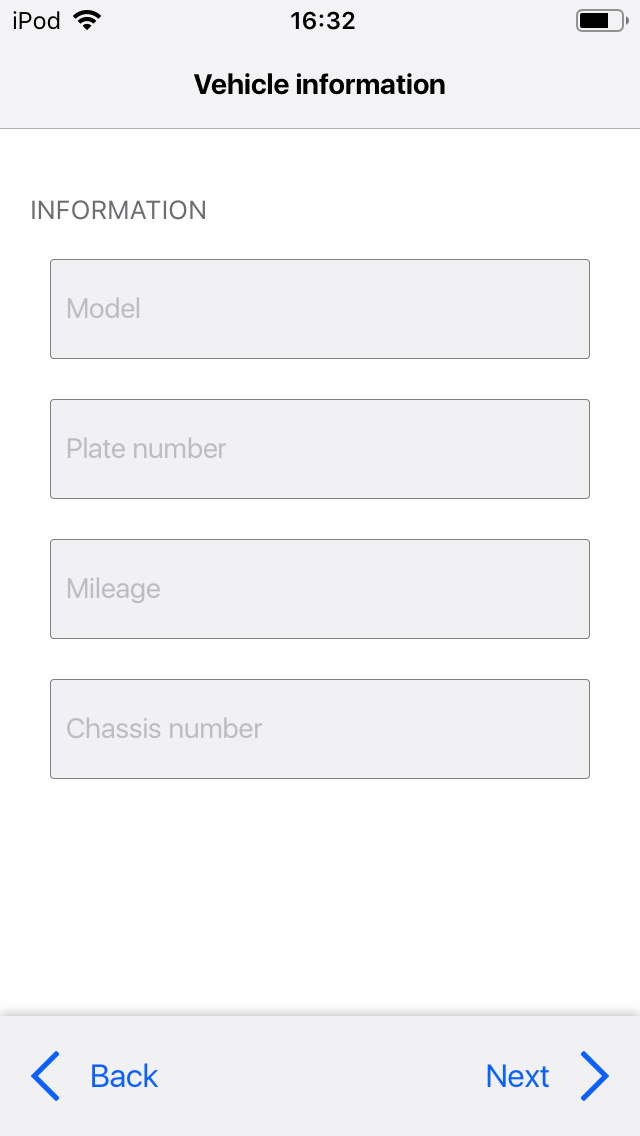
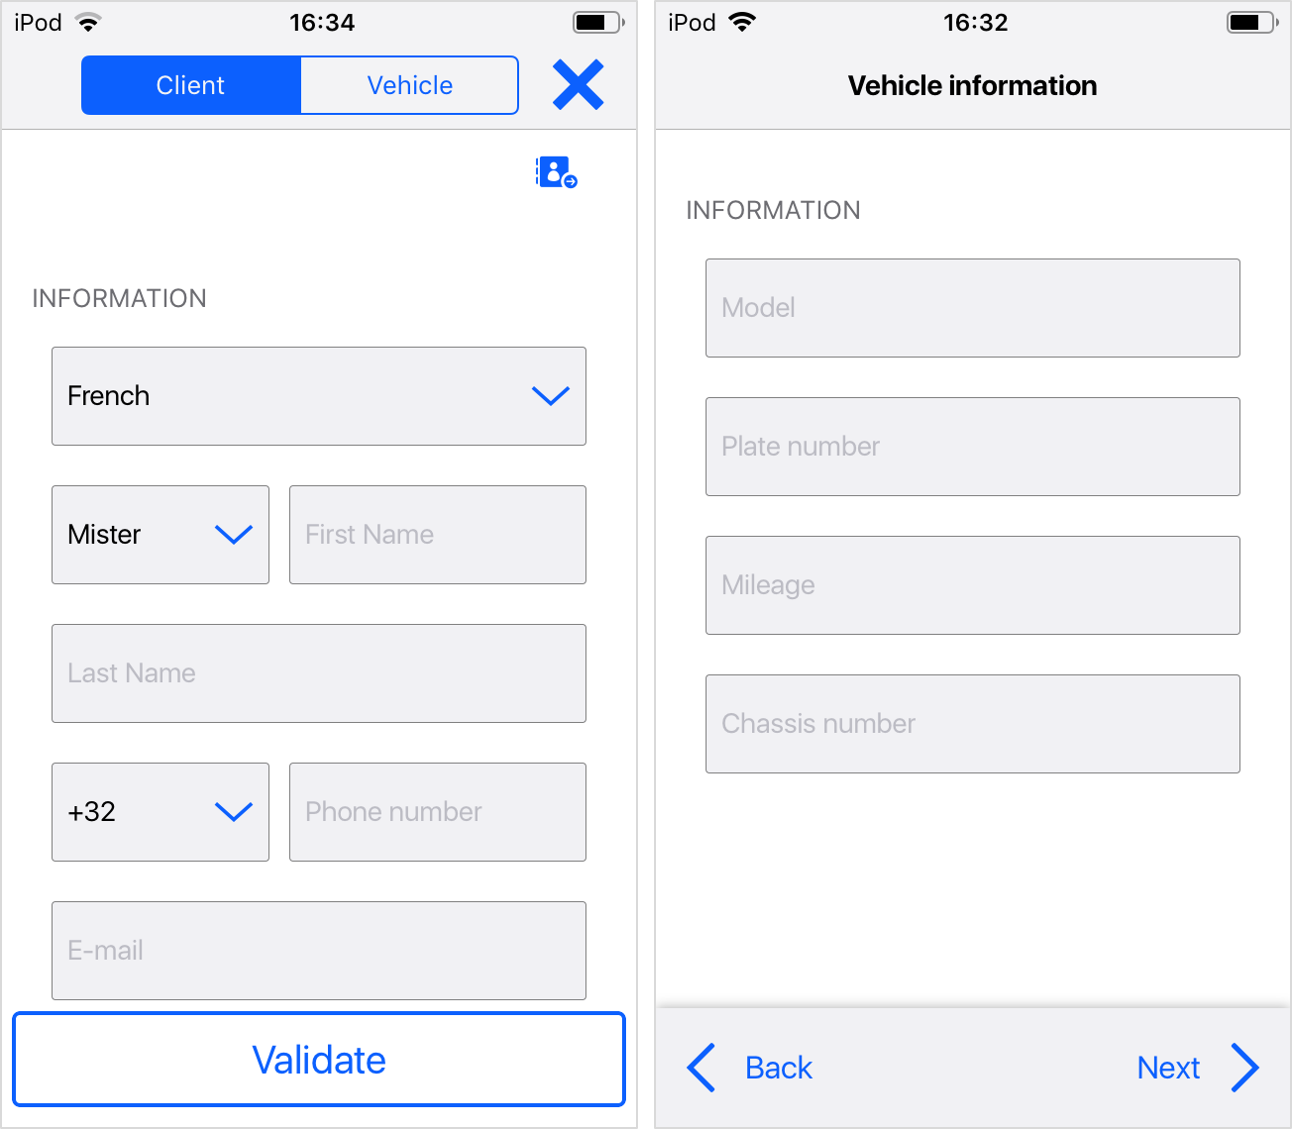
Vehicle Information#
Enter the information of the vehicle you wish to register.
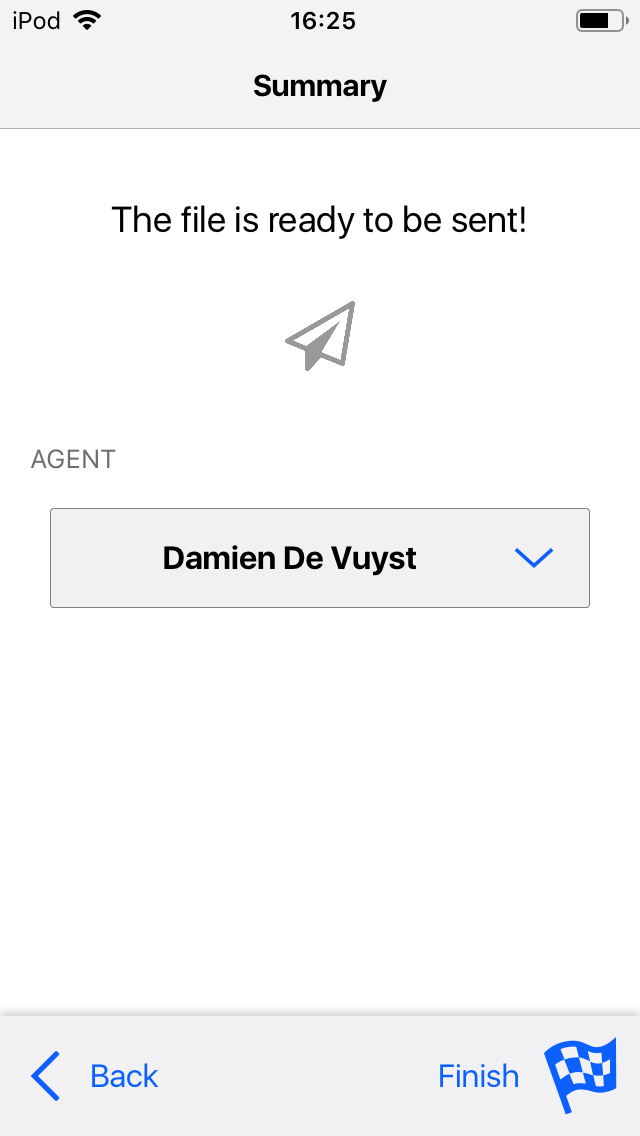
Summary#
You have arrived at the last step of creating a mobile intervention: the "Summary" page
User
Choose your name from the drop-down menu by clicking on the box.
Finish
This is used to create the intervention and to synchronize it on your dealership's web application where the person concerned can then finalize it and send it to the customer.
It is recommended that you do not close the application before syncing because some devices block the synchronization in the background.
This process can take a few seconds depending on the bandwidth available on your Internet network and the number of videos and photos taken.
The progress status is displayed at the top of your screen or in the "Interventions" menu. (only on iPhone)
Creating a "Direct Message" intervention#
The process is similar to the "After-Sales" mode.
Please refer to the section: Mobile App> After-Sales> Create an intervention
The only differences in the Sales module are:
- The choice of the "UC Stock" or "Direct message" module depending on the type of intervention you want to create.
- The vehicle information is to be completed only in the "UC Stock" module
- The "direct sending" option is only available in the "direct message" module
Here are all the steps required to create a "Direct Message" intervention:
Manual identification or via scan#
In the "New" menu, you have the option to create a new Fleetback intervention. To do this, enter a file identification number (e.g.: RO number, plate number, or customer name)
You can also scan an identifier (e.g., the bar code of a work sheet or a QR code).
To do this, simply click on the "Scan" button.
The camera function of your mobile device will then activate and you can scan the desired code.
Choosing the module#
Choose "Direct message."
For more details on the modules, please see the section: Mobile App> Sales Mode> The Two Modules
Capturing media#
Once the type of intervention has been selected, the camera function will automatically activate in video mode. (The authorization of the microphone and the camera are required for the first launch)
You can now take an explanatory video of the problem found on the vehicle. You can also take pictures by clicking on the "Picture" button.
For best results, Fleetback recommends you always film or take snapshots in landscape mode. Once your media items are saved, click on the icon with an "X" at the top right.
To see all the camera options on the mobile app, please refer to the section: Mobile App> Media
Gallery#
You have the option to edit and delete your current media items, as well as to make them private or public. You can also add media by clicking "new picture" or "new video"
When you are satisfied with your media items, click on the "Next" button.
Brand#
You can now select the manufacturer's brand corresponding to the vehicle concerned by the intervention. This will generate a customer page corresponding to the brand's visual identity.
Summary#
You have arrived at the last step of creating a mobile intervention: the "Summary" page
User
Choose your name from the drop-down menu by clicking on the box.
Customer information
To send directly to the customer, select this option (if it is not already the case) and then enter their contact information as well as the vehicle information. You can deselect this option and finalize the online intervention on the web application.
Finish
This is used to create the intervention and to synchronize it on your dealership's web application where the person concerned can then finalize it and send it to the customer.
More information is found in the section: Web App> Sales> Create / edit an intervention
It is recommended that you do not close the application before syncing because some devices block the synchronization in the background.
This process can take a few seconds depending on the bandwidth available on your Internet network and the number of videos and photos taken.
The progress status is displayed at the top of your screen or in the "Interventions" menu. (only on iPhone)
Media#
Camera: options#
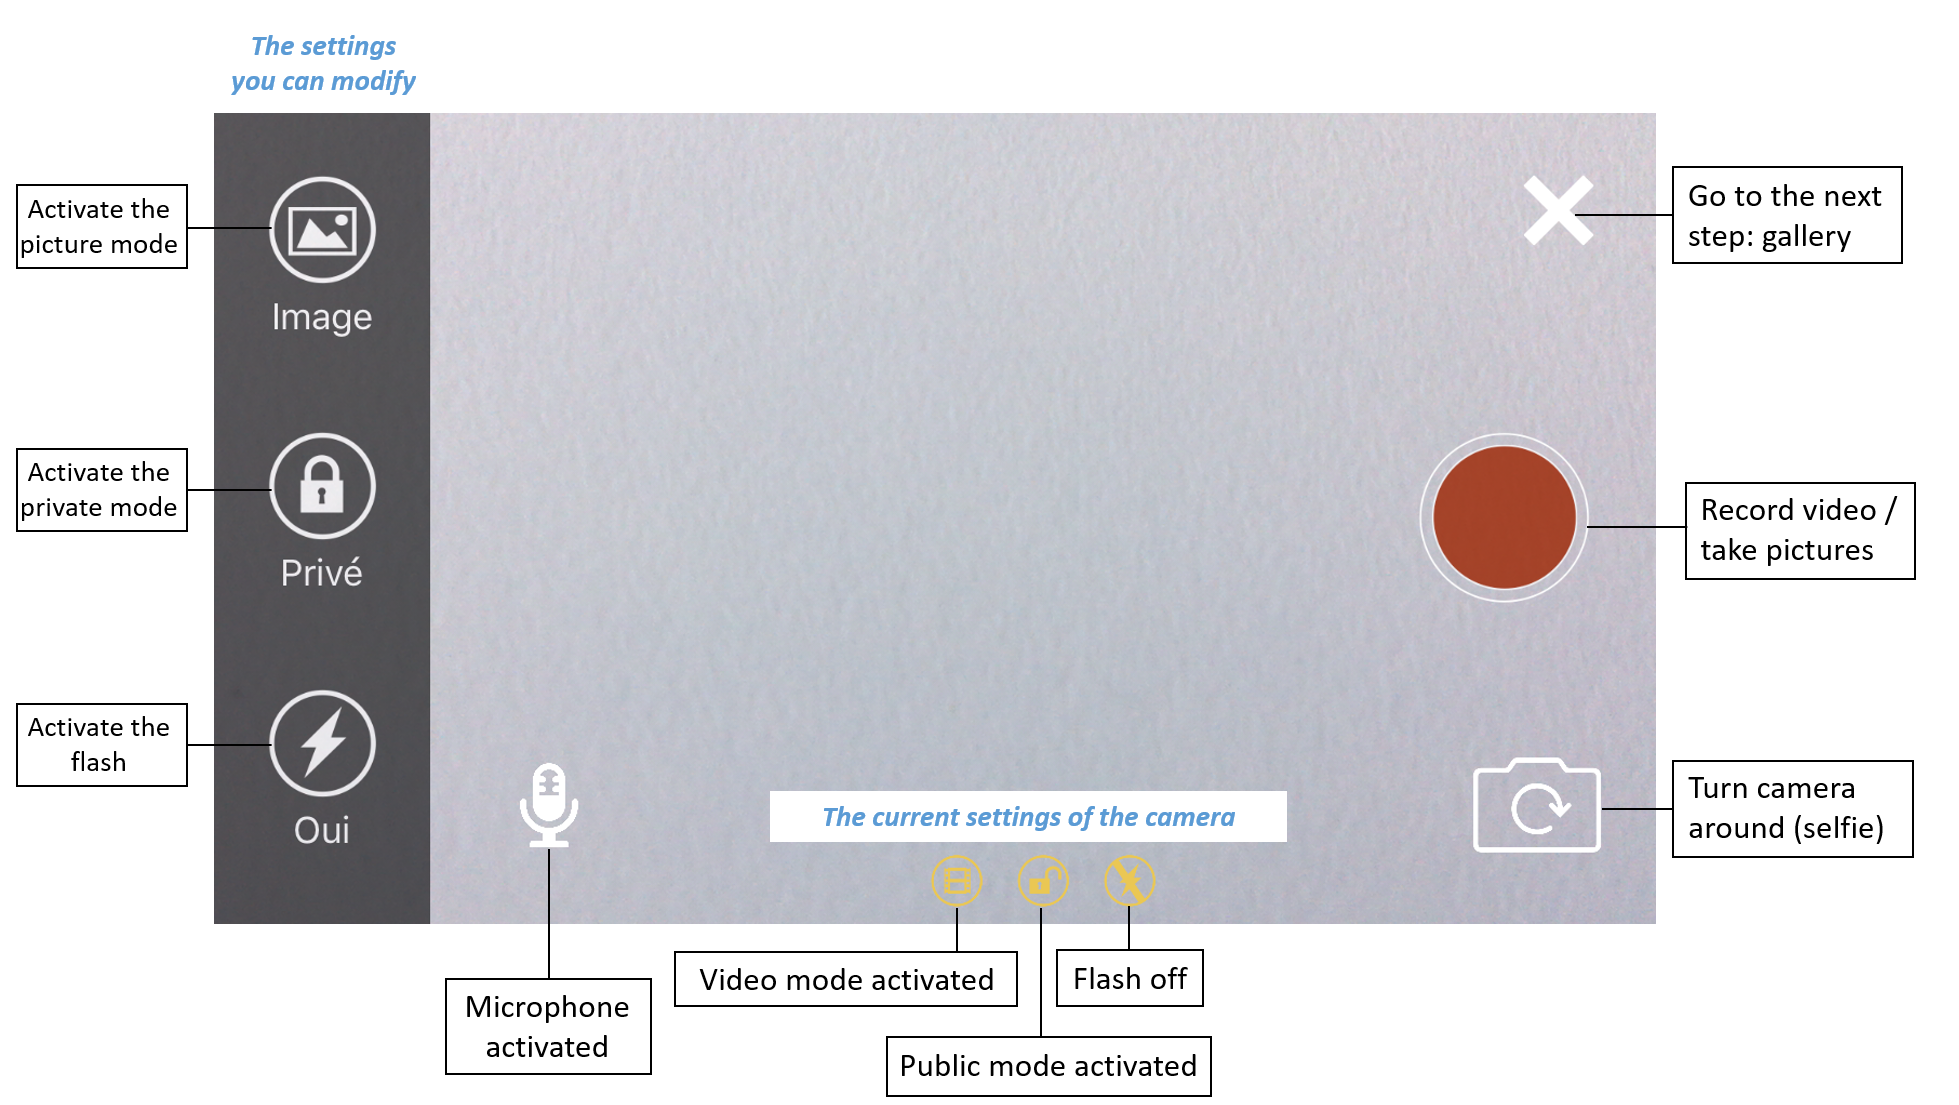
Permissions
At the first launch, a request for accessing the microphone is made.
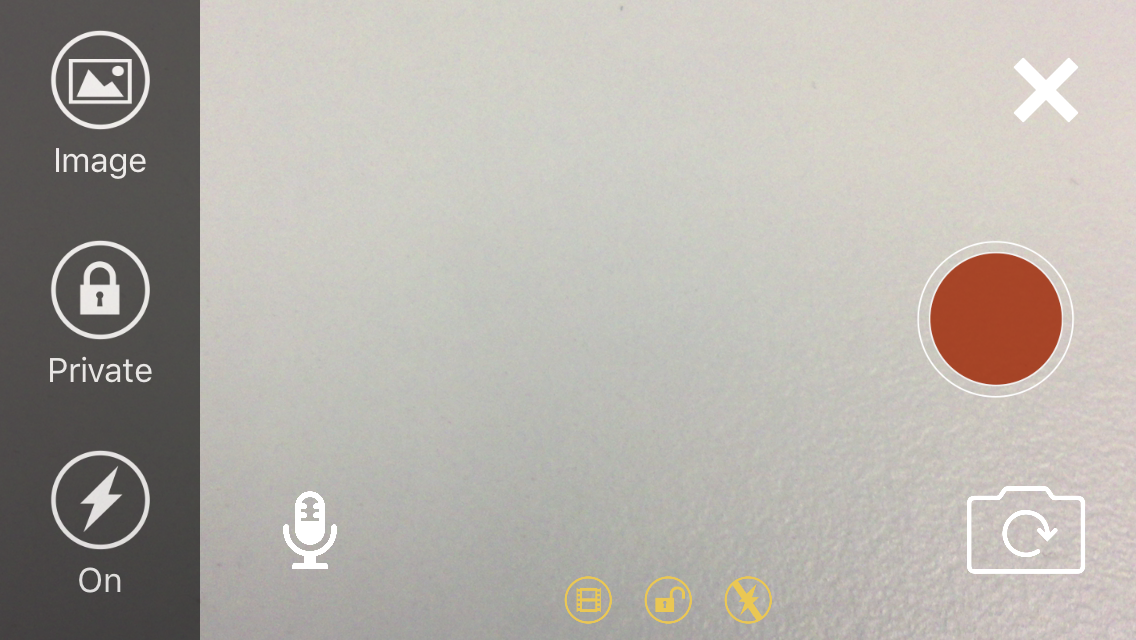
Video / photo mode
Once the type of intervention has been selected, your cell phone's camera function will automatically activate in video mode.
You can now shoot a descriptive and/or marketing video of the vehicle concerned.
On the black banner, three buttons appear. By clicking on "Picture," you switch to photo mode. Re-click the "Video" button to disable the "Picture" mode. A message appears to indicate which mode you are in.
Private / public mode
A message appears to tell you which mode you are in. The private mode is used to add photos / videos to the file for internal use, without sending them to the client.
You can click on the "private" button to activate or deactivate it.
The flash
The "Yes" flash button permanently activates your mobile device's flash (if available on your device). Re-click the "Yes" flash button to disable it.
Attention: in video mode, it is impossible to turn the light on or off after the recording has started. You must click the button before starting the recording.
Sound
By clicking on the microphone button, you can disable / enable the sound for the video. The microphone is crossed out when disabled.
Attention: in video mode, it is impossible to enable or disable the microphone after the recording has started, it is necessary to click the button before starting the recording.
Front / rear camera
The camera reversal button (if available on your camera) allows you to film or take a picture with the front camera (selfie). Press the camera reversal button to switch to back camera mode.
Taking videos / photos
Once you have selected your options, press the red button to start the video, or take a picture if you are in picture mode. Click on the same red button to end your video.
"Picture Saved" or "Video Saved" notifications are displayed respectively.
Click on the icon with an "X" at the top right to view them.
Media editing#
You have the option to add, edit, or delete media.
When you leave the camera mode by clicking on the icon with an "X," you enter the "Media" mode where you can see the photos / videos you have taken.
Clicking on an image or video opens the edit menu.
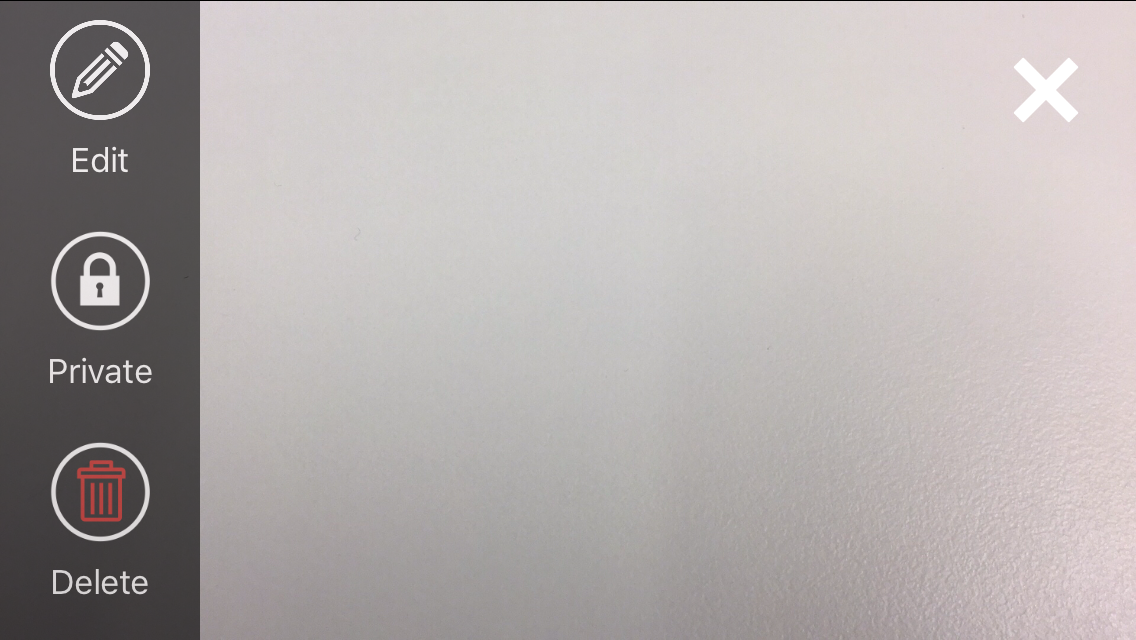
Private / public
Here you can change the "Private" or "Public" mode of the image or video by clicking on the padlock.
- The closed padlock means that the image or video is private (it is visible only internally in the intervention)
- The open padlock means that the image or video is public. (it is visible to the customer)
Delete
You can also delete the selected photo or video.
Edit
You also have the possibility to edit your photos (but not the videos). By clicking on "Edit," you automatically switch to "Drawing" mode.
Here, you have four buttons to edit the photo using simple tools.
- The first two square and round buttons allow you to highlight certain elements in the photo with shapes.
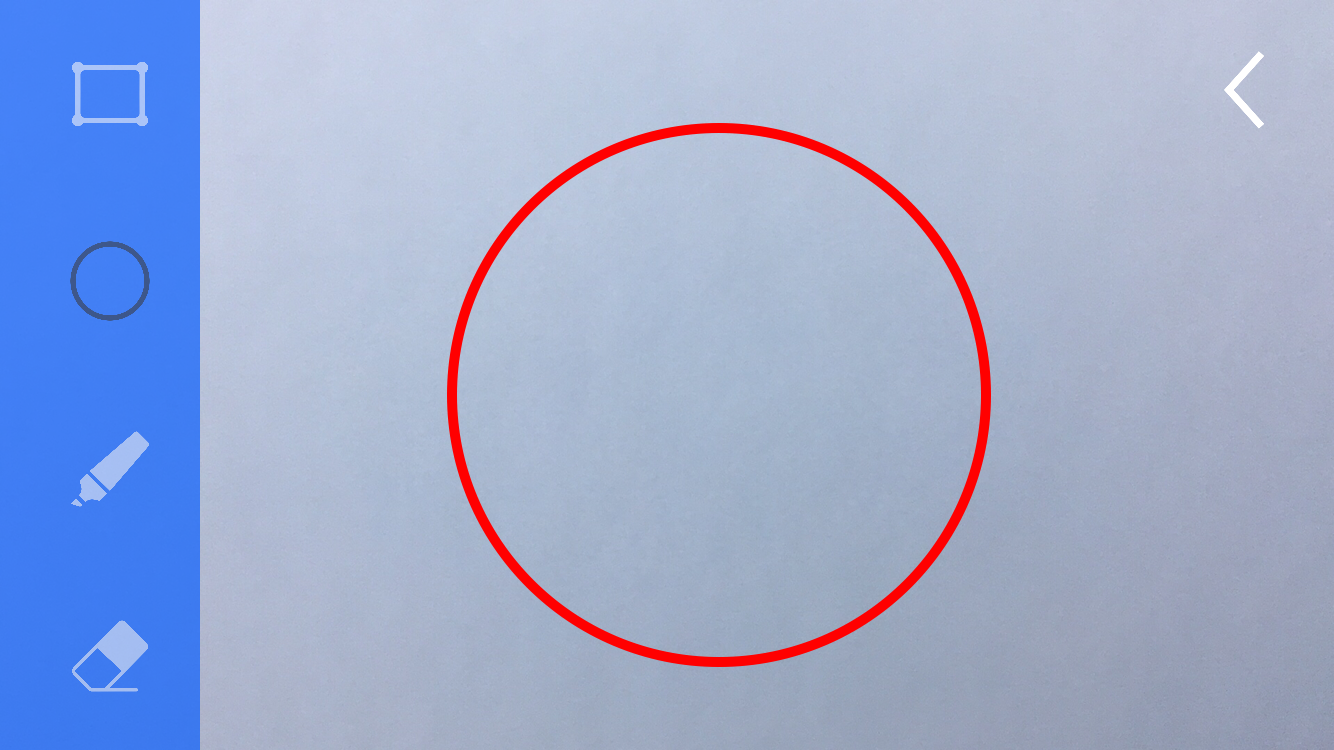

- The pencil button allows you to draw freely on the photo.
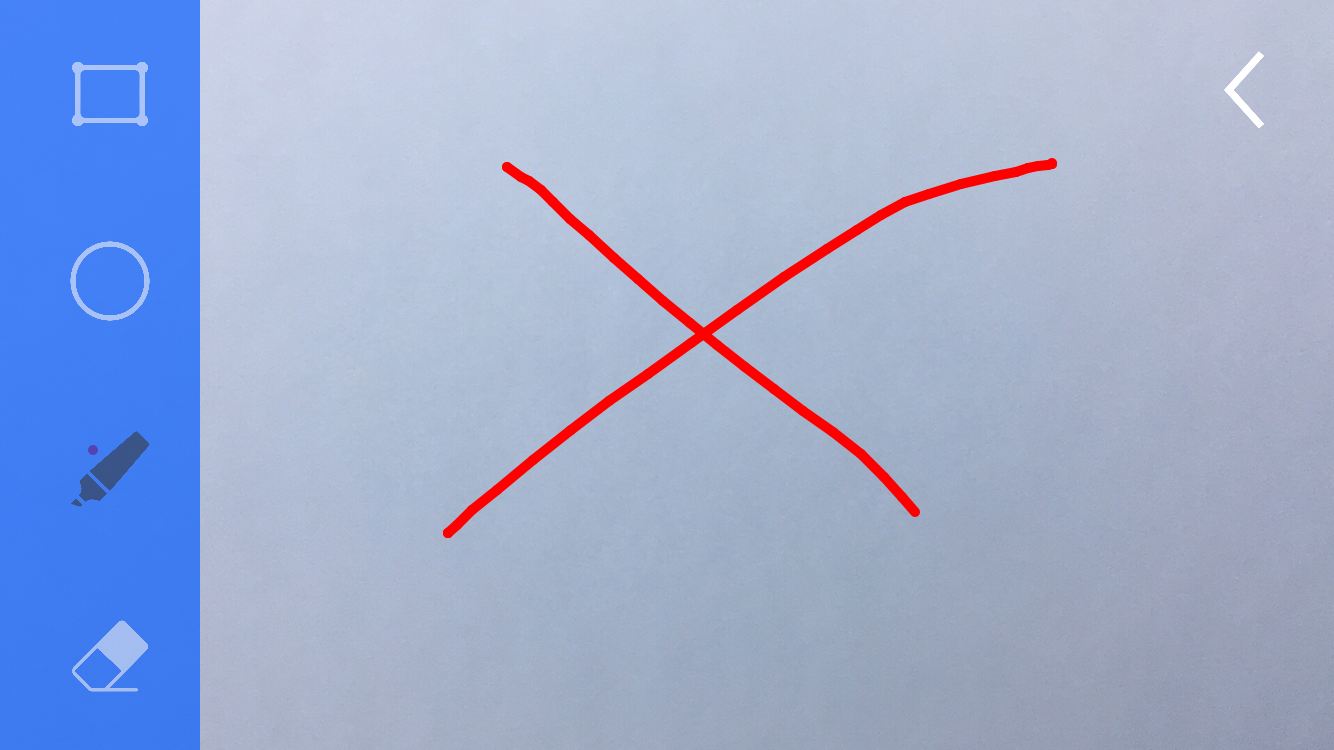
- The eraser button (on the iPhone only) will erase the last action in chronological order for each click.
Once your changes are complete, click on the arrow at the top right to exit.
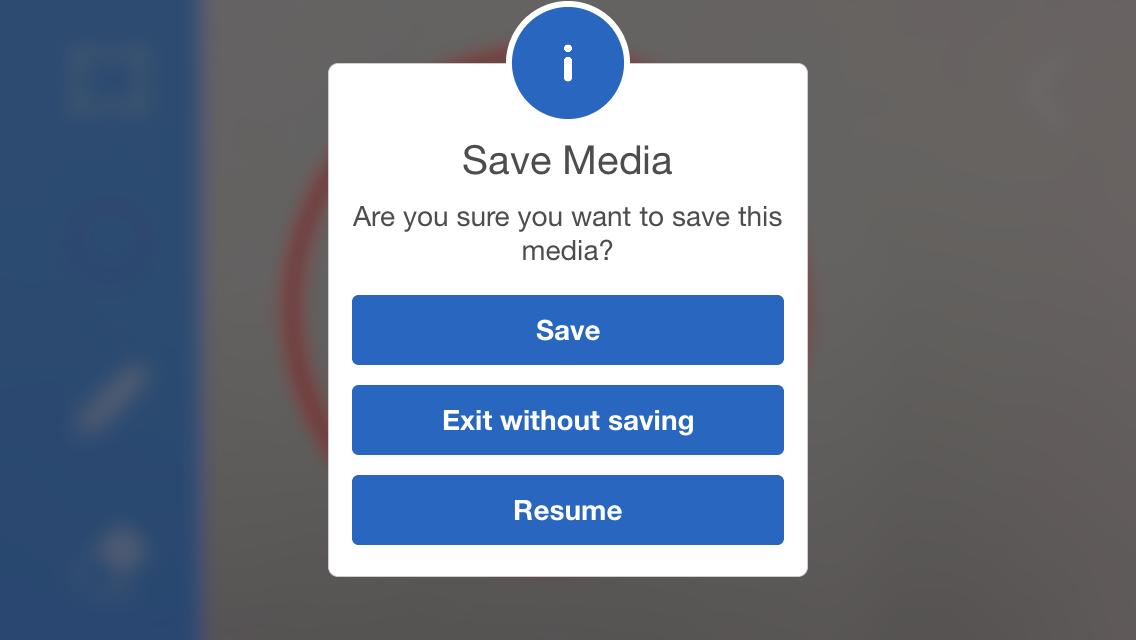
Confirmation is required: you can confirm by clicking on the "Save" button.
Tips for a good photo / video#
You can take several different videos. They will then launch into the customer view.
By default, dealerships are limited to 50 photos and 5 minutes per video with a maximum of 10 minutes of video.
The more photos and videos in your file, the more time it will take to sync your files. (when you are connected to the Internet)
Try to be clear, descriptive, brief, and concise when shooting your videos.
When presenting a defect on a vehicle, Fleetback advises you to shoot the video by starting with the license plate of the car concerned, in order to better identify it.
For best results, Fleetback recommends you always film or take snapshots in landscape mode.
Using the flash may hinder picture or video quality if you shoot metal parts that reflect light.
The overall visual and sound quality of your media depends entirely on the technical equipment of your mobile device.
We recommend you view your media several times to make sure they meet your requirements.
History / interventions#
Search in history#
In the "Interventions" menu, you can access the history of the interventions created within your dealership.
They are sorted by creation date, from the most recent to the oldest.
The intervention category is indicated by five different icons corresponding to the module: mechanics, bodywork, or warranty for After-Sales and UC stock or direct message for Sales.
You can search for an intervention via keywords appearing in the intervention fields. (e.g., chassis, license plate, last name, first name, phone number, etc.). You can also search for an intervention by scanning a file identifier.
When you have found the desired intervention, its summary will be displayed by clicking on it.
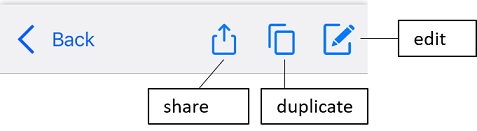
You can edit, duplicate, or share it.
More details are found in the next steps.
Editing a file#
While consulting the summary of the intervention sought in the history, click on the "edit" icon (the square with a pencil). This option is only available if the intervention has a "pending" status.
You can then edit it the same way as when you created an intervention. All the information in the file will be pre-entered, just replace it as desired.
Duplicating a file#
While consulting the summary of the intervention sought in the history, click on the "duplicate" icon (the two interlocking squares).
A new intervention opens based on the selected intervention. You can edit it in the same way as when you created an intervention. All the information already completed in the file will be pre-entered, just edit it as desired.
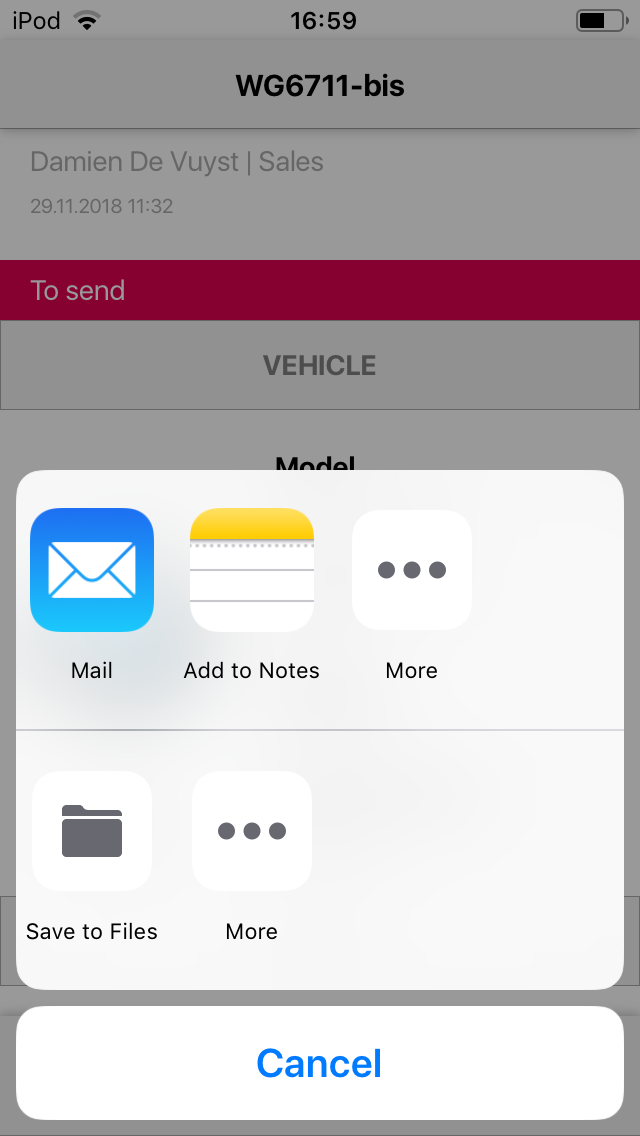
Share a file#
While consulting the intervention summary from the history, click on the "Share" button that has an arrow coming out of a square.
You then have the option to share (via SMS, WhatsApp, Facebook, Messenger, or other applications) the intervention's link (the sheet that the customer receives) available for this intervention.
Attention: if the intervention has a "Pending" or "Sent" status, you only need to share this link with the final customer, who will be able to respond to requests from the salesperson in the context of a "Sales" intervention or to accept additional work as part of an "After-Sales" type intervention.
If the intervention has the "Answered" status, you can then share the link with the final customer or third parties because the option to answer / accept tasks will already be blocked.
Attention: using this mode will send the message via an external app (not through Fleetback) The file will be sent with your personal contact information.
Web App (desktop)#
Quick Start#
Configure the app online#
Open your preferred Internet browser (Chrome, Safari, Internet Explorer, etc.)
Enter the URL: https://www.fleetback.com/login
In order to facilitate access, we advise you to save this address in your favorites or to create a shortcut on your desktop.
Enter your username and password.
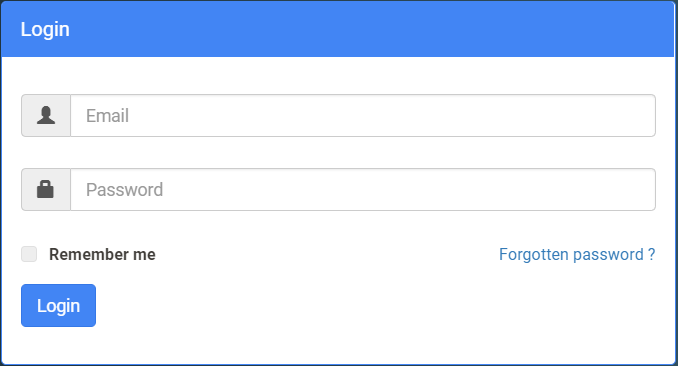
If you select "Remember Me," your login credentials will remain saved even after the browser is stopped and restarted. (This is not recommended if you are using a shared workstation)
Next, click the "Sign in" button to access your online Fleetback interface.
If you have forgotten your login credentials, contact your dealership's administrator or click on the "Forgot your password?" button.
More information can be found in: FAQ> I forgot my password
Presentation of the menus#
The blue bar#

Mode (sales / after-sales)
You can consult the intervention history of the "After Sales" or "Sales" mode by clicking on the buttons with the same name at the top left of the blue menu bar.
By default, "After-Sales" interventions appear on the screen when you connect to the online Fleetback interface.
Audits (only for those who have Fleetback Oditoo)
If your dealership has a Fleetback Oditoo license, you can also check the audit history by clicking the "Oditoo" button at the top left of the blue menu bar.
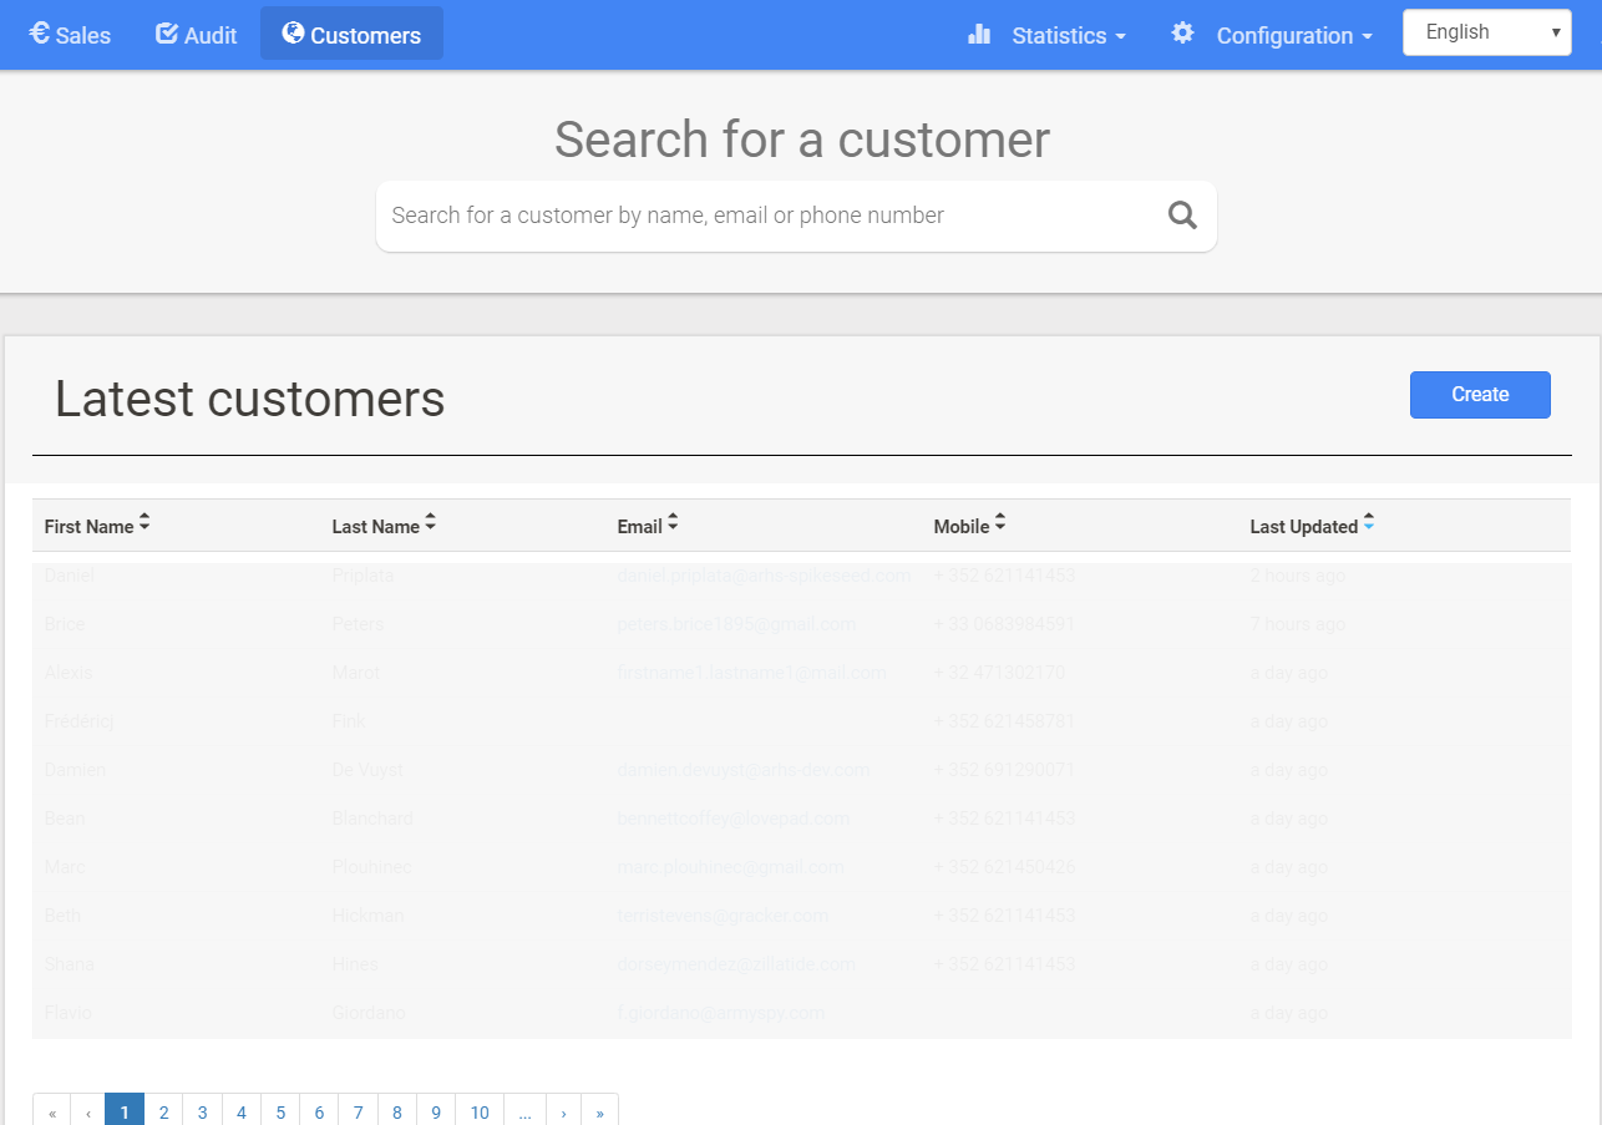
Customers
The "Customers" button serves to access the CRM menu. Here you will find the contact information and the history of your Fleetback customers.
You can:
Search for a particular client's intervention history
To do this, enter their name, email, or phone number in the search bar available in the "Find a customer" tab. Then click on the magnifying glass or hit the "Enter" key on your keyboard.
In the "Interventions" tab, you can consult the intervention history related to the customer.
Click on the line corresponding to the relevant customer.
Edit and/or complete the contact details of your customers
Select the desired fields (communication language, title, last name, first name, email, and phone number) and edit them.
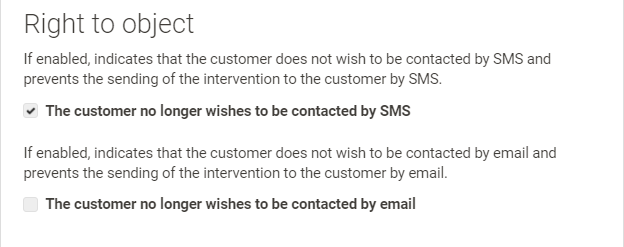
Change your customers' communication preferences
In accordance with EU Regulation 2016/679 (GDPR), you can block the sending of SMSs and/or emails to customers who have expressed this desire, by checking the corresponding boxes. This will automatically disable these options in future interventions created for these customers.
Export and/or delete your customers' personal data
You can export all saved customer data by downloading a file in the required legal format (.jso).
Click on the "delete" button to delete the customer's personal data stored in the entire Fleetback interface.
By deleting the personal information, any intervention concerning the customer will be anonymized. (replaced by Xs)
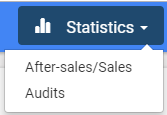
Statistics (only for the "administrator" profile)
The dealership administrator has access to the "Statistics" menu where he/she will be able to consult numerous statistics related to the use of Fleetback.
More details can be found in Web App> Management> Statistics
Configuration (only for the "administrator" profile)
The dealership administrator has access to the "Configuration" menu in which he/she can consult and edit information about the dealership (e.g., the official website, address, etc.) as well as add new users and mobile devices or create and edit checklists.
More details can be found in Web App> Management> Configuration
Language
The "Language" menu lets you select the desired language of use from the many languages available for Fleetback
Profile
By clicking on your name, to the right of the language, you will access the "Profile" menu, which lets you modify your personal information such as your phone number, your password, and your photo.
Sign out
Click the "Sign out" button to sign out.
Help
Click the "Help" button with the question mark symbol to access the contact information for technical support. You can also access this User Guide.
The white bar#


The search bar
The search bar, like a typical search engine, lets you search for an intervention via a keyword (e.g.: RO number, license plate, phone number, etc.) within the available Fleetback intervention history.
Dealership filter (if access)
If you use Fleetback in a group of multiple dealerships, you have the option of filtering the interventions by dealerships by selecting the desired one from the drop-down menu to the right of the search bar.
This menu is only available to group managers who have access to multiple dealerships.
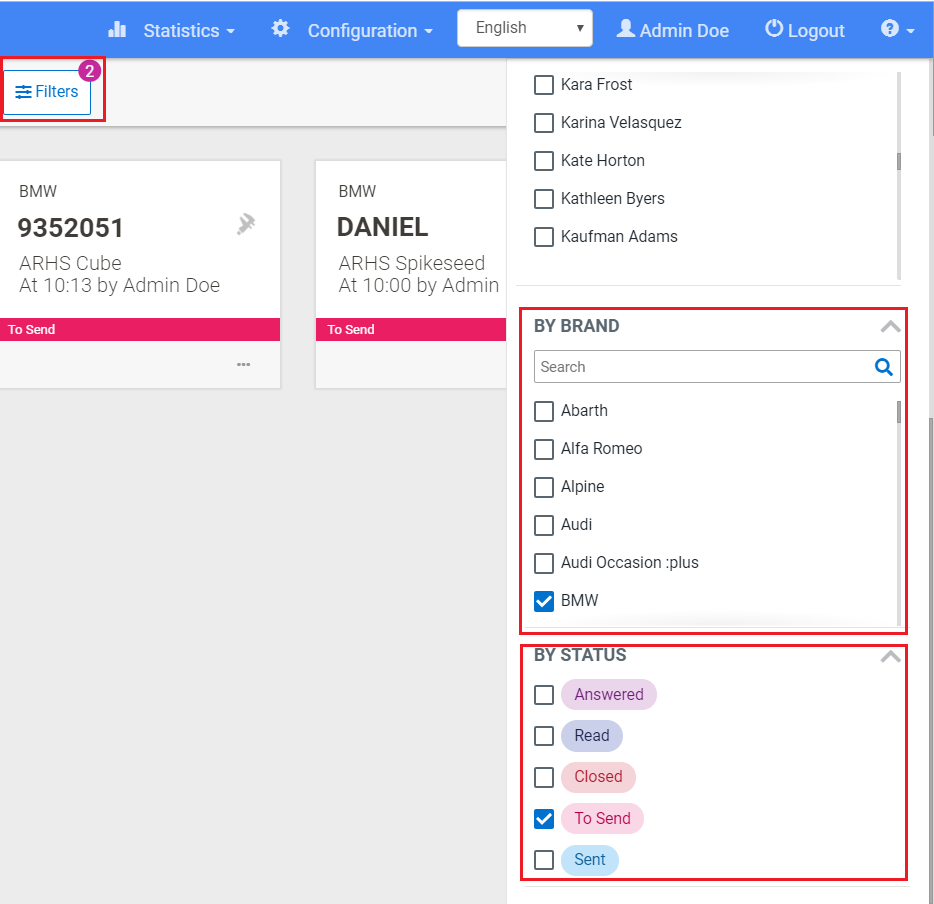
Filter by module
You can also filter the display of Fleetback interventions by module via the corresponding icons.
In "After-Sales" mode, the three available modules are (from left to right) "Bodywork," "Warranty," and "Mechanics."
In the "Sales" mode, the two filters displayed from left to right are "Direct message" and "UC Stock."
Filters
The interventions displayed on your dashboard can be filtered per:
- Author
- Sender (service advisor)
- Brand
- Status
You can select multiple filters and multiple fields inside a filter.
The number next to the "filters" button indicates how many filters are applied.
The filters you select will be saved and applied during your entire session (until you log out from Fleetback.com) even if you change mode (sales/aftersales) or refresh your results.
You can check different options:
- Show only my interventions
- Show closed interventions
- Refresh results automatically
Create a new intervention
To the right of the white menu bar, the "+ New intervention" button lets you create a new Fleetback intervention.
Results / dashboard#
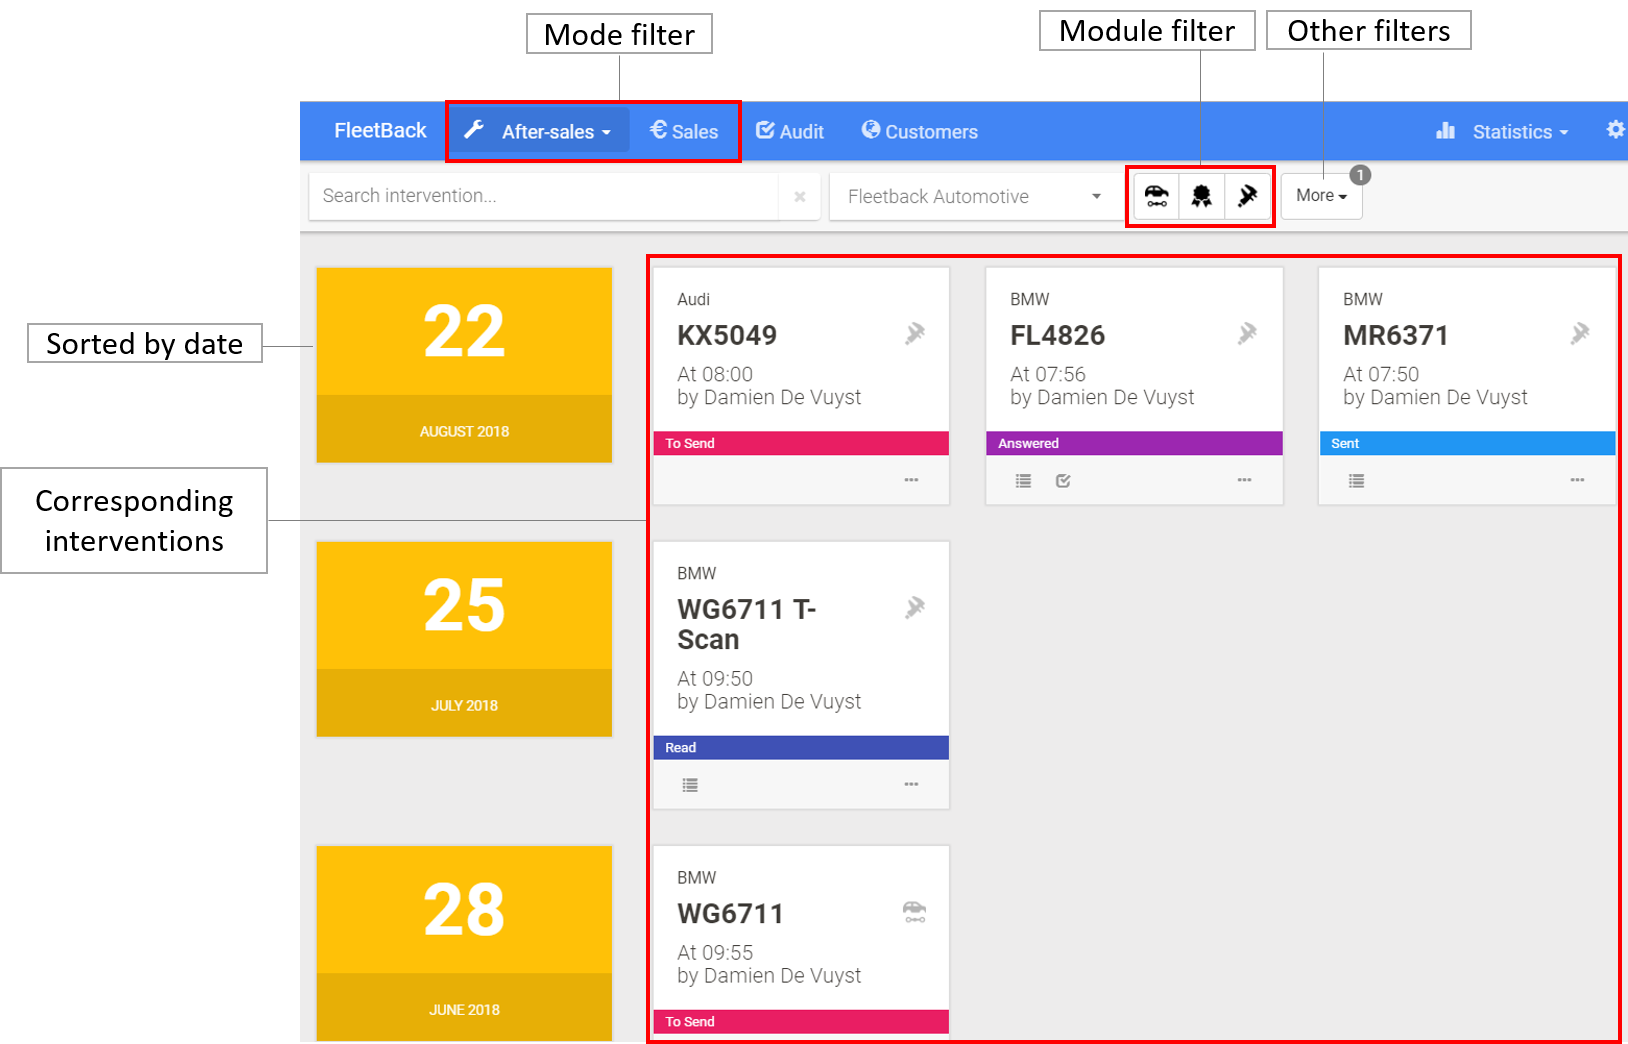
Orange squares / Date: the interventions corresponding to your filters will be sorted by date

In the search results, orange squares indicate the date of the interventions displayed. Fleetback interventions are displayed from the most recent (at the top of the page) to the oldest (at the bottom of the page).
White squares / interventions: the interventions corresponding to your filters and the date
The white squares each represent an intervention, corresponding to your potential filters and to the date indicated in the corresponding orange square.
After-Sales#
Create / edit an intervention (mechanics / bodywork / warranty)#
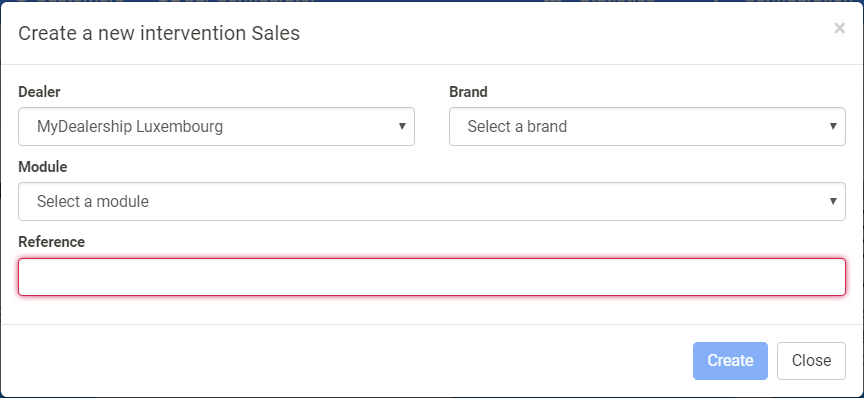
Create a New Intervention#
Click on "new intervention" at the top right of the white bar

Fill in the fields:
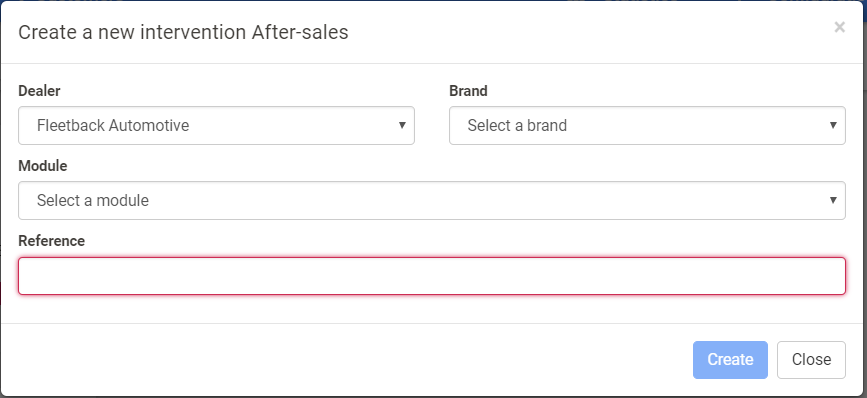
Dealership (if access has been granted)
If you're using Fleetback in a group of multiple dealerships, select yours from the drop-down list.
Brand (required)
Select the vehicle's brand, or by default, the main brand of the dealership from the drop-down list.
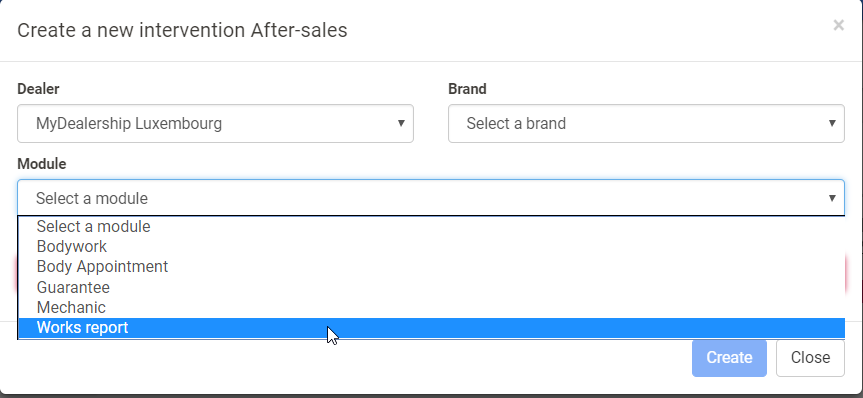
Module (required)
Select one of the three modules in After-Sales:
- The "Mechanics" and "Bodywork" modules let you perform a vehicle overview and communicate with your customers about the work to be done on their vehicle.
- The "Warranty" module lets you store relevant elements in a warranty file, for direct or subsequent communication with a professional (expert, insurer, etc.). In this module, you will not be offered a checklist by default, but you can add works manually.
Reference (required)
Next, enter an identification number for the file (e.g.: RO number, license plate, or customer name).
Or edit an intervention#
You can only edit an existing intervention if it has the status "Waiting to be sent."
- Select the intervention to edit
- Edit the relevant fields
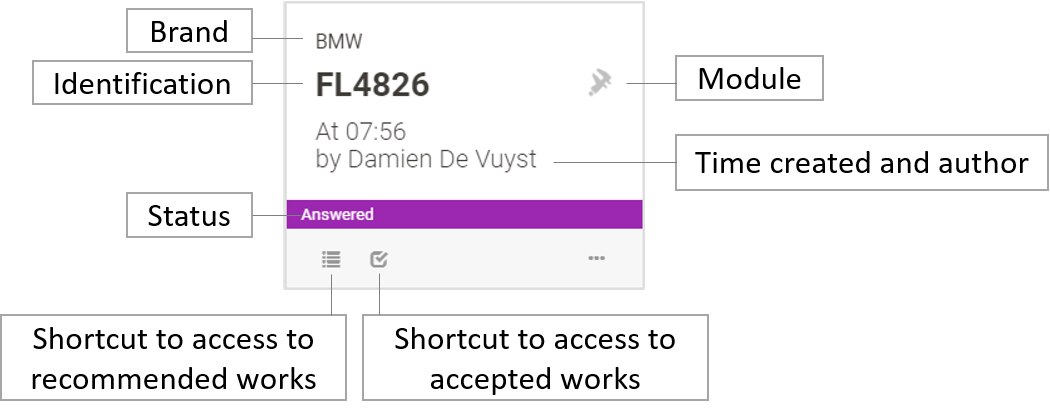
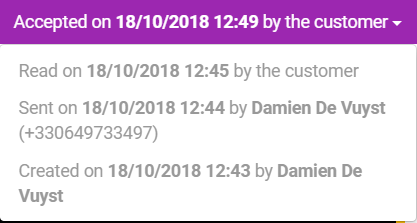
File status
The file status is displayed in the changing color bar

It will appear respectively as red, light blue, dark blue, or gray depending on the status:
- Waiting to be sent: the file has been created but it has not been sent to the customer yet
- Sent: the file has been sent to the customer but has not been read yet
- Read: the customer has read the file but he/she has not yet responded
- Answered: the customer replied regarding the file
- Closed: the file has been archived and no further action is possible. It will be hidden from the dashboard (unless you have checked the "show closed interventions" option) but it remains in the intervention history.
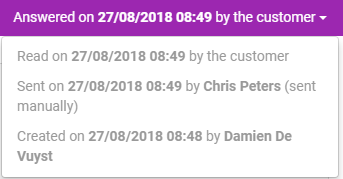
History
To the right of this colored bar is the intervention's history - that is, the users who created, edited, or sent it, the customer's actions, and the date and time of the actions. The most recent action is displayed at the top of the list.
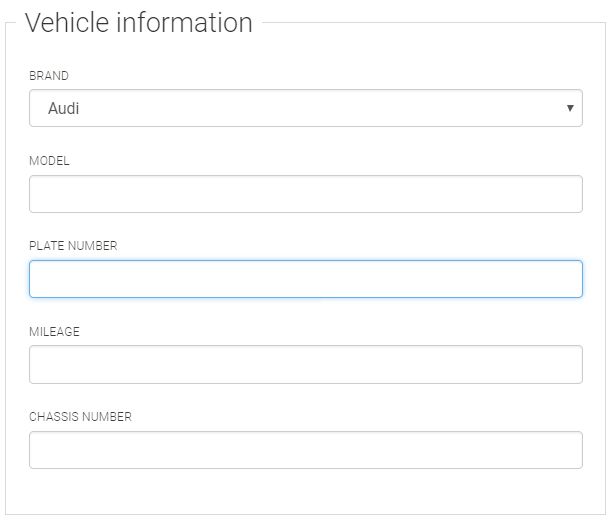
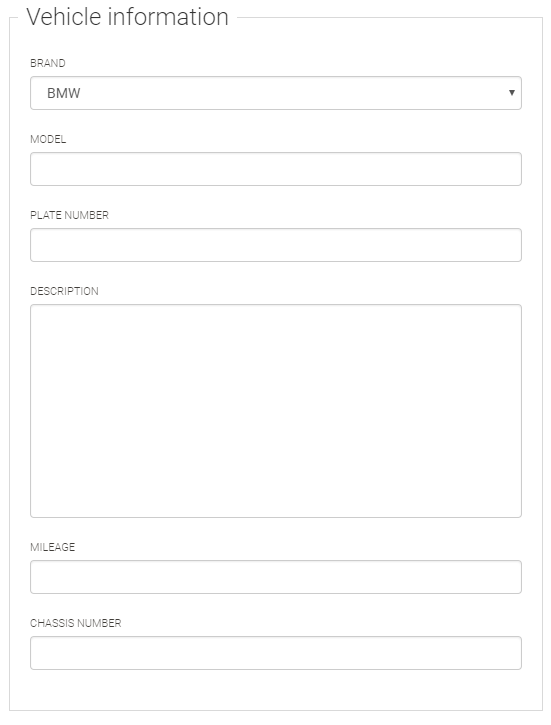
Vehicle information
In addition, for logistical and monitoring purposes, as well as for qualitative purposes, we recommend that you complete all of the intervention's fields.
Media
The media related to the intervention are displayed in the "Media" box.
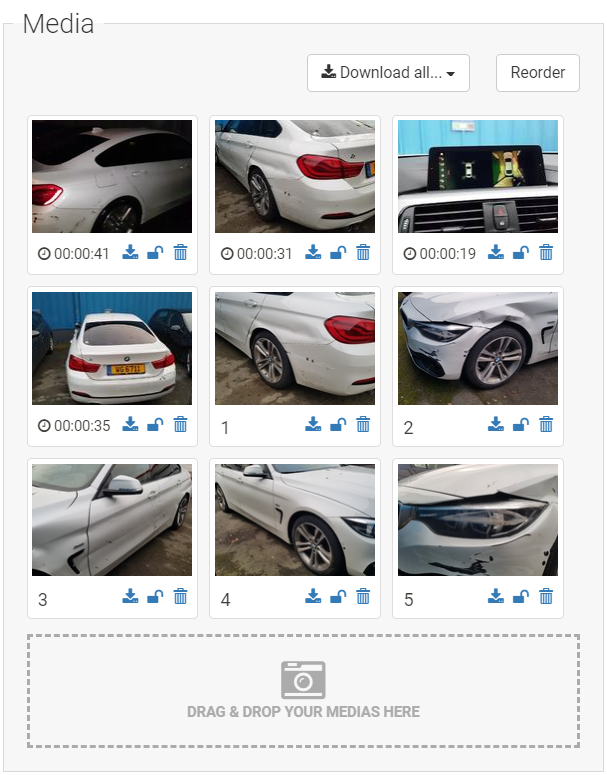
You can:
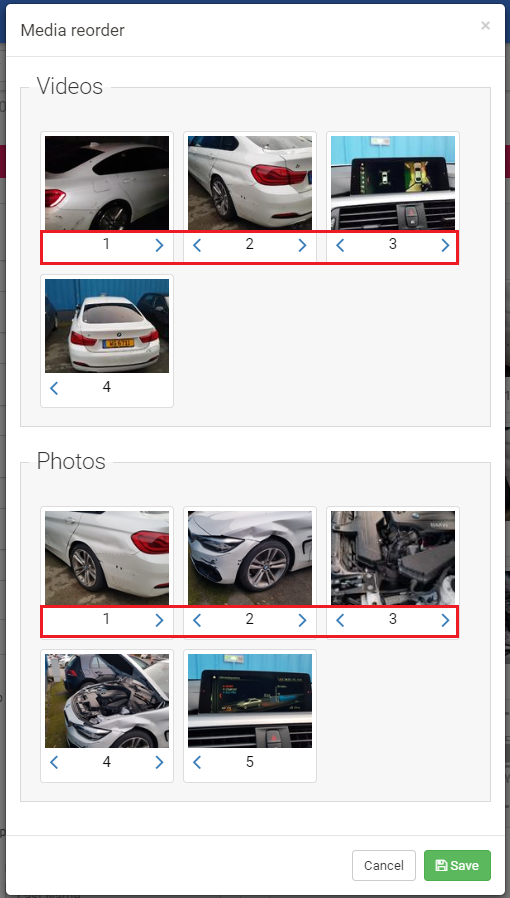
- edit them by clicking on the relevant item
- rearrange the display order
- download all media in different formats
- add new media by importing them ("drag and drop your media here")
More details on media options can be found in the dedicated section: Web App> Media
Contact information
Contact information is used to identify and contact the customer. You can also use it to find the file.
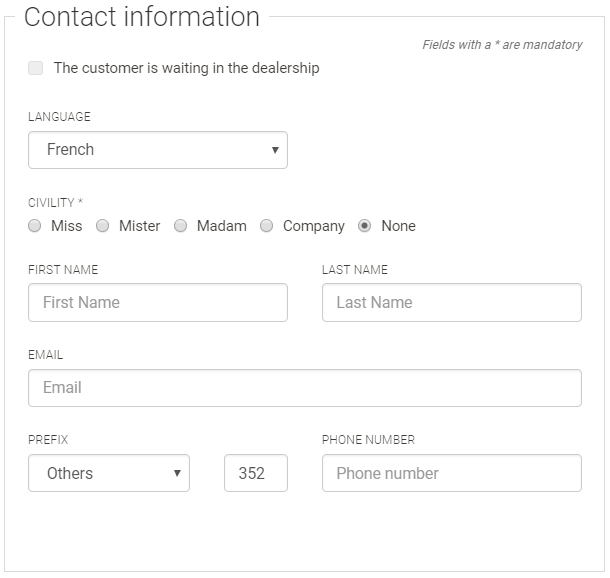
Before sending an intervention, make sure to enter all the required fields:
- "Title"
- "Last name"
- "Email" or "Phone number."
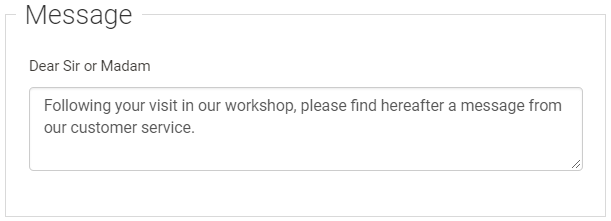
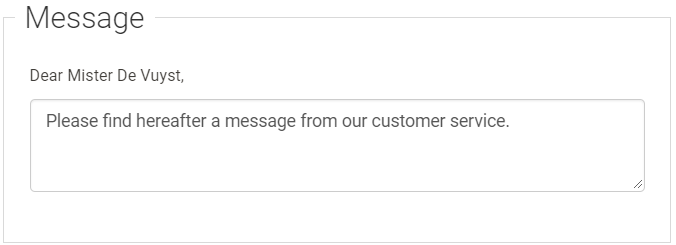
Message
A default message will be displayed depending on the intervention mode (sales / after-sales). You can complete or edit it in the "Message" box.
Work to be done
Here, it is possible to add an expected response time range, in order to notify the customer that if he/she responds to the proposed work before the specified time, his/her vehicle can be delivered to him/her on the originally scheduled dates and times.
Work completed
You can enter the work that has already been done on the vehicle.
Attach a document
It is possible to add a quote, a description sheet, or any other document in the "Quotes and other attached files" box. To do this, click on the button "Quotes and other attached files" and choose the file of your choice. Popular file formats (such as PDF, Excel, Word, JPG, etc.) are supported.

Works list (checklist)
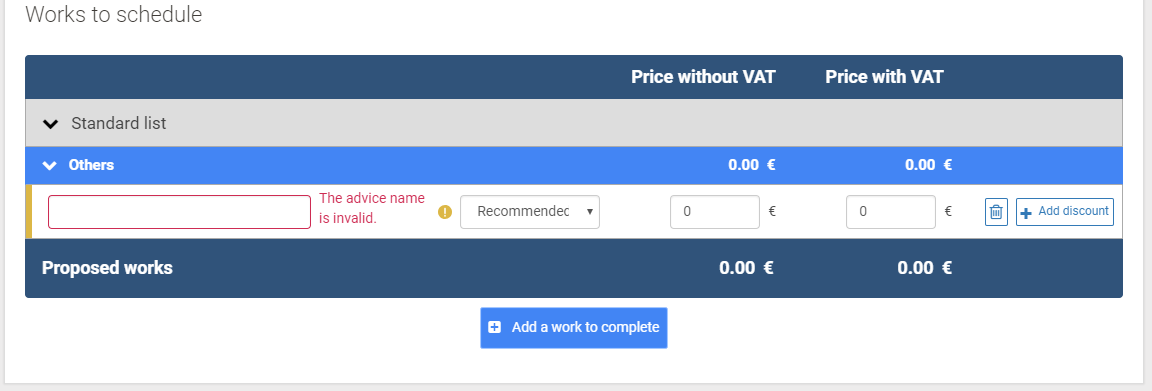
In the "Works List" box, you will view the works that have been recommended to the customer. They have been selected by the upstream technician or they will need to be selected if the intervention has just been created.
If the proposed checklist does not contain the desired work items, click the "Add a work to be performed" button at the bottom of the works list. You can then enter a brief description of the work to be done.
To the left of the price, the drop-down menu displays the urgency level of the recommended work. "OK" means that the work is not to be performed, "Offered without charge" means that the work has been done but it will not be billed. The other available levels are "Advised" and "Urgent."
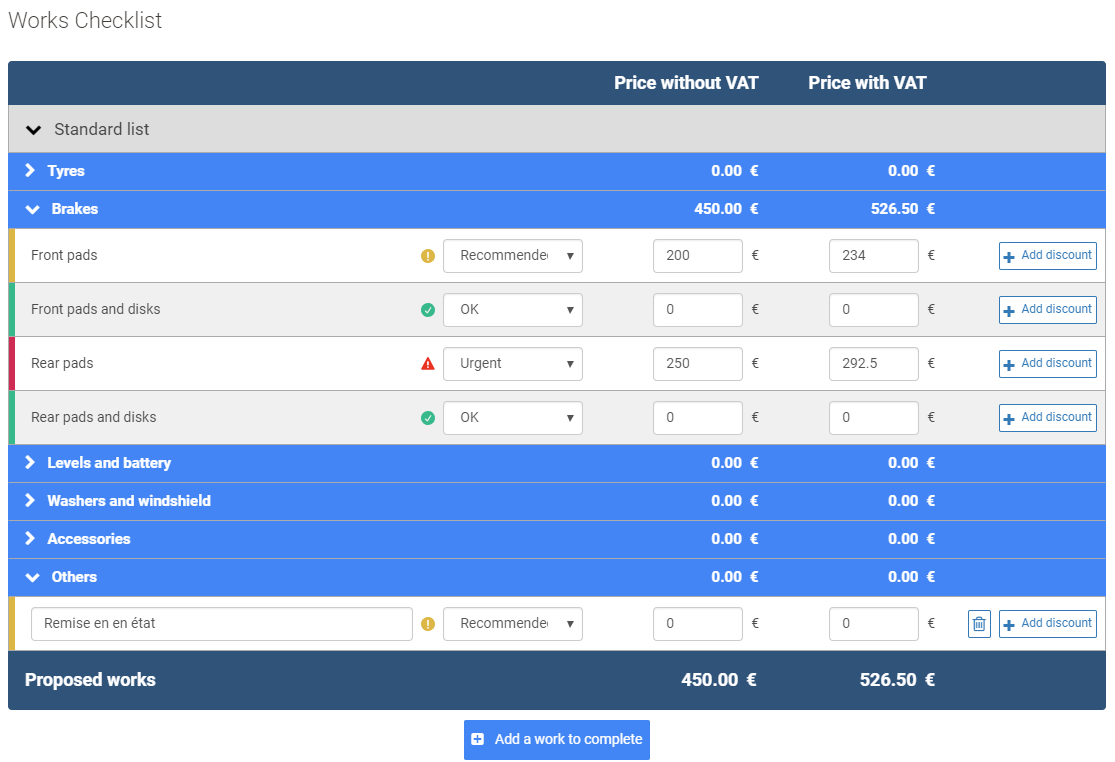
You can then price these works, directly with VAT included, or Excluding Tax. You can also add a discount amount or percentage.
Attention: it is strongly recommended that you add the price, otherwise the customer cannot accept the work and demand it be performed free of charge.
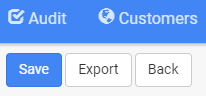
File options (available only when the required fields have been completed)

Save
Once the required fields are filled in (title and last name), click on "Save" at the top of the page.
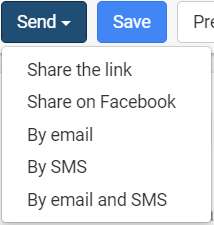
Send
Once the file has been saved, the "Send" button is displayed. By clicking on it, you have the option to "Share the link" of the customer sheet (via WhatsApp, Messenger, or other applications), to send the intervention "By email," "By SMS," or "By email and SMS," using the customer's contact information that you have entered.

Import
The "Import" button offers you the options to "Link audits to the intervention" or "Import a T-Scan report."
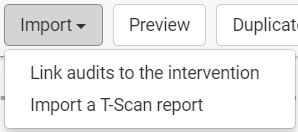
Audit (this feature requires a Fleetback Oditoo license).
An audit with the same identifier as your Fleetback intervention will be automatically searched for and offered if available.
Otherwise, you can search for an audit by entering its identification number in the search bar. Once you have found the desired Audit, click on "Confirm." The additional work items identified during the Audit will then automatically be added to the list of works of your intervention.
T-scan (this function requires a T-Scan license.)
If your dealership uses the T-Scan system, you can import a report by clicking on "Import T-Scan Report." Search for your report by entering a vehicle registration number and/or VIN number.
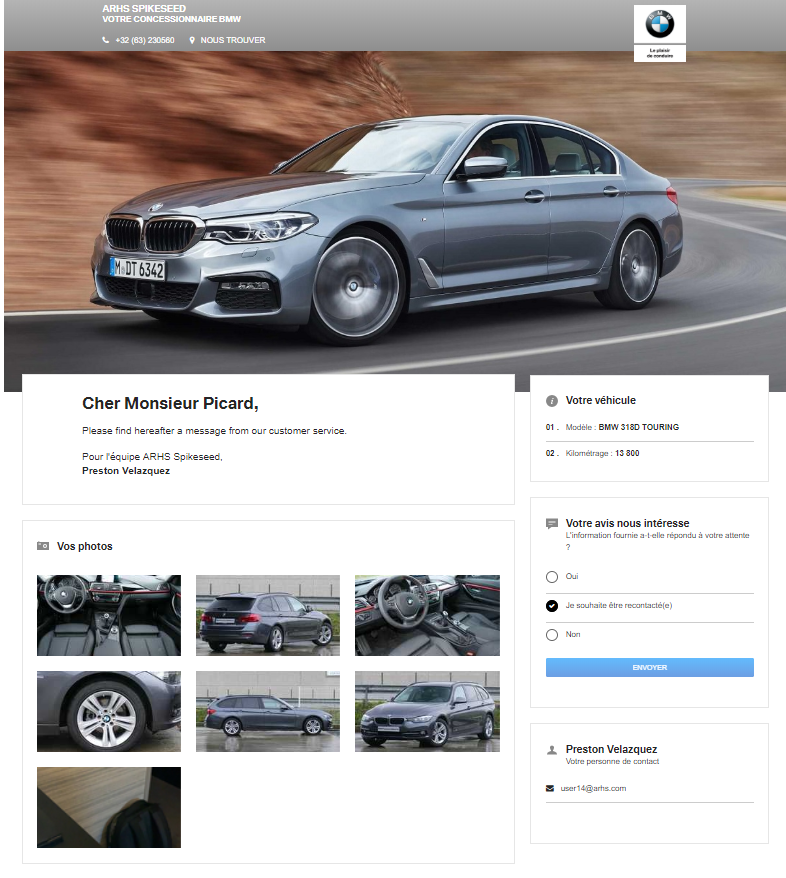
Preview (only when the required fields are entered)
The "Preview" button lets you preview the "customer sheet" that will be sent to the customer to ensure that it meets your expectations. (and otherwise edit it).
Duplicate
The "Duplicate" button lets you use the information of an existing intervention to create a new similar one. You must then enter a new reference and choose the brand and the type of intervention.
For example, you can create a "Bodywork" intervention from a "Mechanics" intervention.
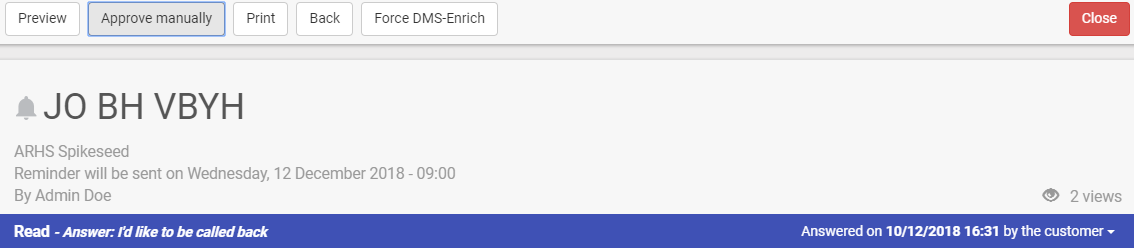
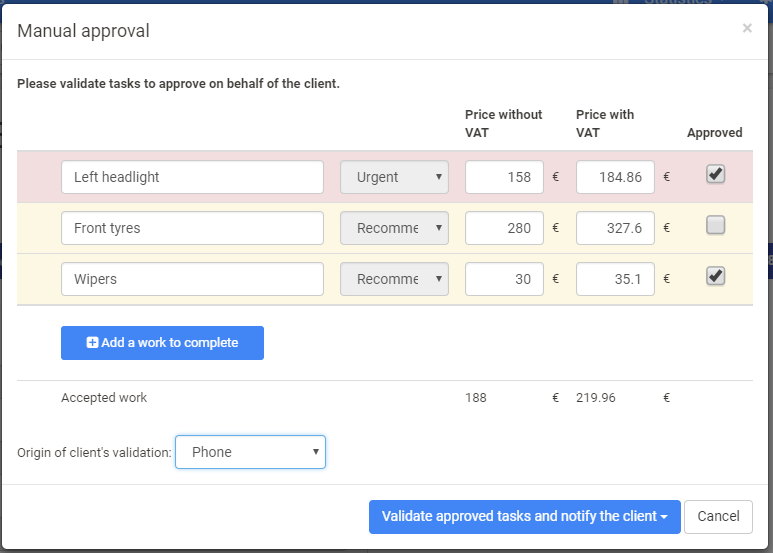
Accept manually
When the customer has accepted or refused the work through a telephone conversation, the "Accept manually" button lets you enter this agreement or refusal in the corresponding Fleetback intervention.
Select the proposed works and check "Accepted" if they have been accepted or leave the box blank if the customer has declined them. Under the latter, select the origin of the customer approval.
You can then confirm the work and notify the customer by email, SMS, or both. It is possible not to notify the customer of the status of the file.
The "Print" button lets you print the complete summary of the intervention.
Back
The "Back" button will take you to the previous screen, namely, the intervention history page.
Close / delete
If you no longer want to display an intervention in your dashboard / results, click on the "Close" button. The intervention will then only be visible if you select the filter "show closed interventions." Once an intervention is closed, the "Delete" button appears and you have the option to delete it.
Attention: deleting a Fleetback intervention is irreversible.
Create / edit a work report#
This is a new intervention type in aftersales called « work report ». This feature needs to be enabled by your "dealer manager".
Works done#
In your aftersales interventions, you can list the works done on the car as well as their price and urgency level.
They will be automatically generated based on the accepted works by the customer. You can also add some manually.
You can import multiple « answered » interventions (manually or automatically)
Your customer will have a complete view and written report of all the works done on his car.
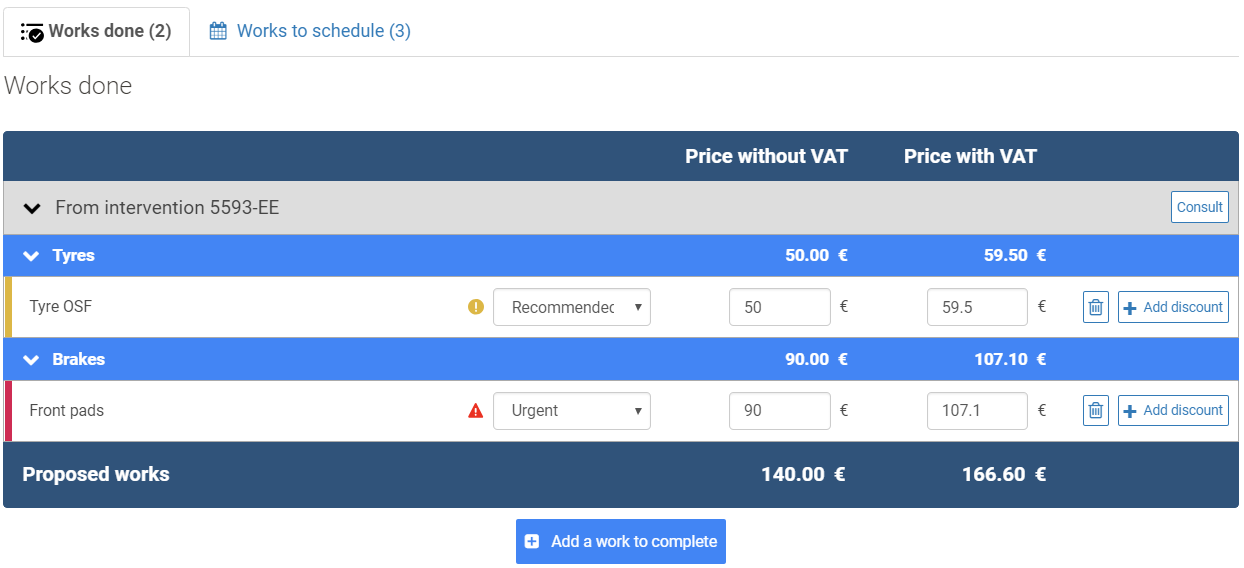
Works to plan#
In your aftersales interventions, the works refused by the customer will be listed in the « works to plan » according to their urgency level.
You can add a deadline in terms of date (mandatory) or kilometers.
This will enable to send automatic reminders* to your customers in order to remind them of the works they need to schedule and their deadline.
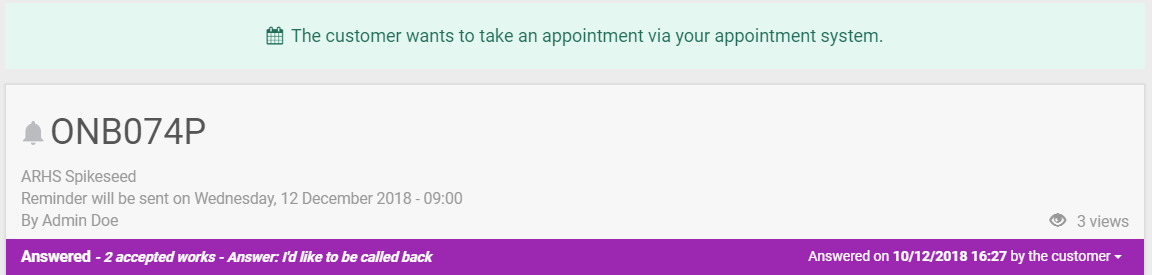
When receiving a work report, the customer can ask to be contacted or take an appointment on your dealership’s website.

Managing reminders#
Reminders in Fleetback allow you to easily keep track of planned works for your customers. They can be automatically generated from work reports and sent interventions or manually created, and are fully customizable to your dealership needs. Sending a reminder message to the customer can also be automatized or manually done.
Configuration#
To use reminders in your dealership, your dealer manager first needs to activate it.
Reminders interface#
Access to the reminders interface is made via the after-sales menu > reminders:
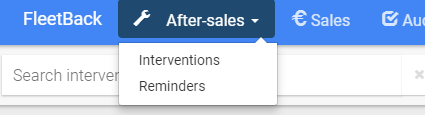
Reminder list is displayed. It is possible to filter reminders by date using the option in the top of the page. It is also possible to change displayed order by using arrows next to the column’s title.
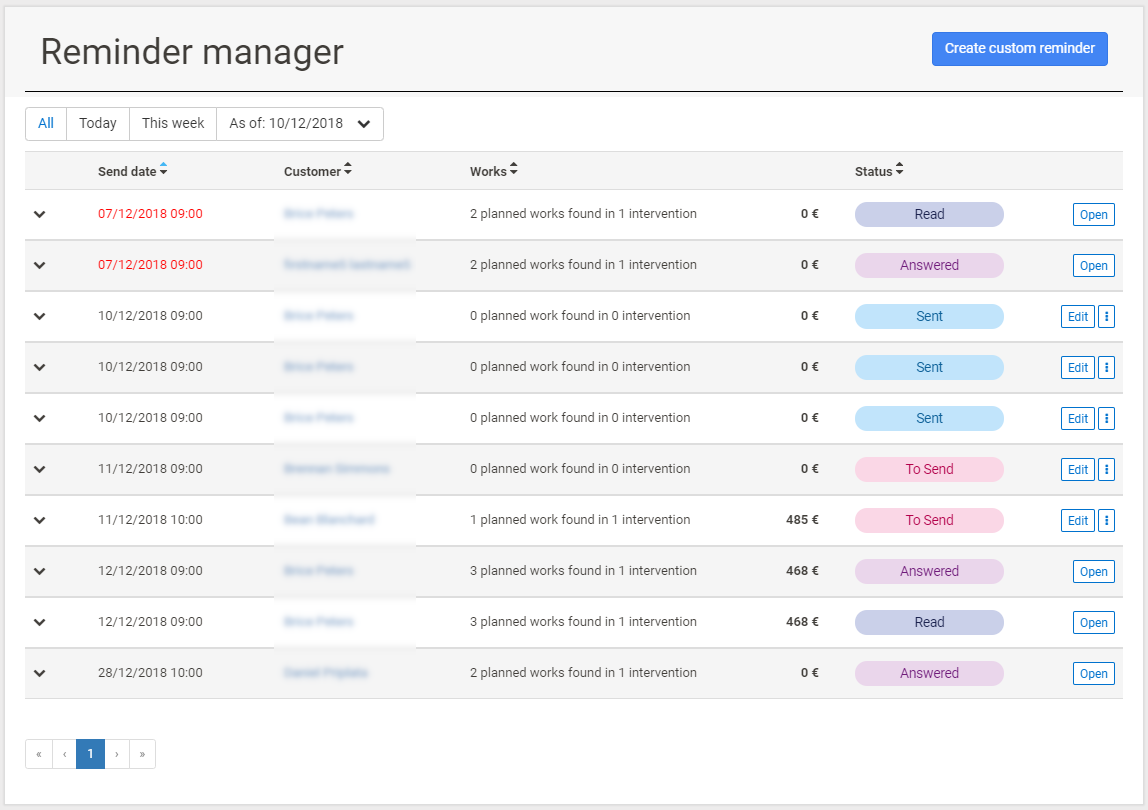
Every reminder displays the following information:
- “ Send date ”: date planned to send the reminder message. It is displayed in red if the date is passed and the message is not sent.
- " Customer ": customer related to the reminder.
- “ Works ”: number of works planned in the reminder as well as number of interventions linked.
- “ Status ”: reminder’s status. Like an intervention, reminder’s status are: “To send”, “Sent”, “Read” and “Answered”.
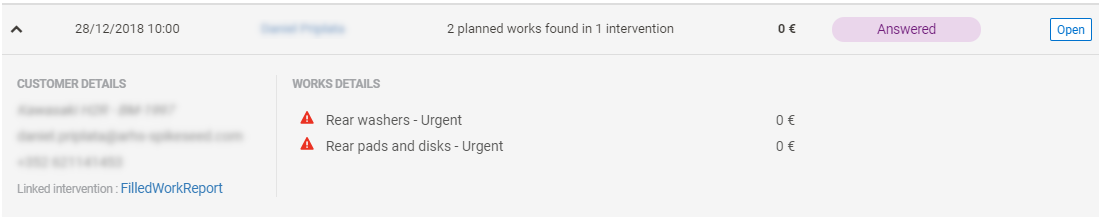
You can extend a reminder’s view to display additional information such as data regarding customer, linked interventions and works details.
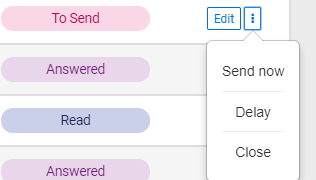
The button “Edit” allows to access to reminder’s data and to modify it. Please remember that it is not possible to modify a reminder if the message was read by the client (“Status” = read).
The information button, available until the reminder was read by the customer, allows you 3 different actions:
- “ Send now ”: send the reminder message immediately. The send date is updated after this action.
- “ Delay ”: modify the sending date. This action is only available if the reminder message is not already sent.
- “ Close ”: remove the reminder.
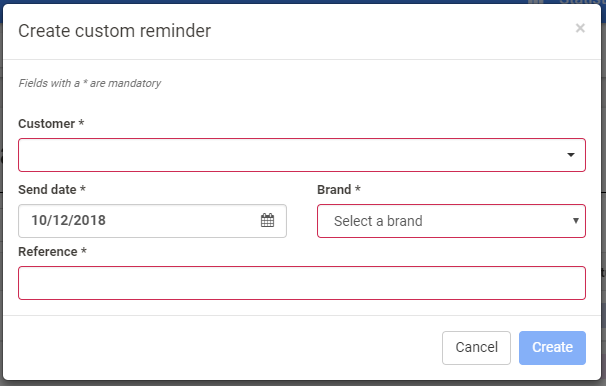
Create a reminder#
In addition to the automated generation from work reports and interventions, it is also possible to manually create reminders. To do so, it is mandatory to fill out the customer related to the reminder, the send date, the car brand and a reference for the file.
The reminder is created with client data automatically filled. Like with an intervention, you can add media and attachments that will be sent with the reminder message.
The last step is to add planned works to the reminder. For every work filled, you can provide the severity and a price.
You can also generate this works list by importing an audit or a T-scan report.

Send a reminder#
If the option is activated, a reminder will be automatically sent when the send date will be reached. It is also possible to send the reminder manually.
The message received by the customer contains planned works from the reminder. 3 actions are available:
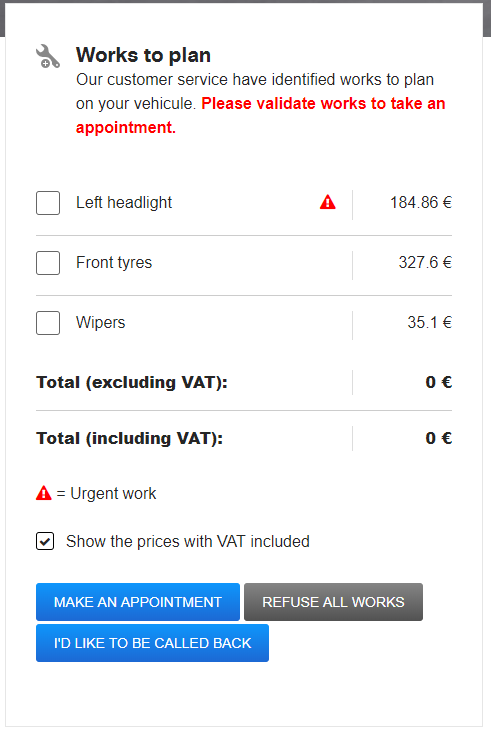
- “ Make an appointment ”: this option is only available if your dealership has provided the link to make appointment in the Fleetback configuration (configuration > general). When the customer selects this option, he is redirected to your dealership solution to make appointments. Reminder’s status is set to “Answered”. If the customer selects works in the message, they will be marked as accepted in the reminder.
Once this option is chosen, it is not possible for the customer to change selected works. However, he can still indicate that he wants to be called back (a message is displayed in the reminder’s interface).
- “ Refuse all works ”: all works marked as refused in the reminder’s interface. The status is set to “Answered”.
Like the option to make an appointment, the customer cannot change his choice after this action. He can however indicate that he wants to be called back (a message is displayed in the reminder’s interface).
- “ I’d like to be called back ”: the reminder’s status stays at “Read”, but a message is displayed in the reminder’s interface.
In this status, a dealership employee can manually approve works to do after reaching the customer. The reminder’s status is set to “Answered” after that.
Sales#
Create / edit a "direct message" intervention#
Create a New Intervention#
Click on "new intervention" at the top right of the white bar.

Fill in the fields:
Dealership (if access)
If you're using Fleetback in a group of multiple dealerships, select yours from the drop-down list.
Brand (required)
Select the vehicle's brand, or by default, the main brand of the dealership from the drop-down list.
Module (required)
When you use the Fleetback App in the "Sales" mode, you can access two modules once a new intervention is created. For a direct message intervention, select "direct message"
- The "Direct message" module is intended for marketing use, aiming to highlight a vehicle for a particular prospect, as part of a personalized and direct communication with the customer.
Reference / identification (required)
Next, enter an identification number for the file (e.g.: license plate or customer name).
Or edit an intervention#
You can only edit an existing intervention if it has the status "Waiting to be sent."
- Select the intervention to edit
- Edit the relevant fields
File status
The file status is displayed in the changing color bar.

It will appear respectively as red, light blue, dark blue, or gray depending on the status:
- Waiting to be sent: the file has been created but it has not been sent to the customer yet
- Sent: the file has been sent to the customer but has not been read yet
- Read: the customer has read the file but he/she has not yet responded
- Answered: the customer replied regarding the file
- Closed: the file has been archived and no further action is possible. It will be hidden from the dashboard (unless you have checked the "show closed interventions" option) but it remains in the intervention history.
History
To the right of this colored bar is the intervention's history - that is, the users who created, edited, or sent it, the customer's actions, and the date and time of the actions. The most recent action is displayed at the top of the list.
Vehicle information
In addition, for logistical and monitoring purposes, as well as for qualitative purposes, we recommend that you complete all of the intervention's fields.
Media
The media related to the intervention are displayed in the "Media" box.
You can:
- edit them by clicking on the relevant item
- rearrange the display order
- download all media in different formats
- add new media by importing them ("drag and drop your media here")
More details on media options can be found in the dedicated section: Web App> Media
Contact information
Contact information is used to identify and contact the customer. You can also use it to find the file.
Before sending an intervention, make sure to enter all the required fields:
- "Title"
- "Last name"
- "Email" or "Phone number."
Message
A default message will be displayed depending on the intervention mode (sales / after-sales). You can complete or edit it in the "Message" box.
Attach a document
It is possible to add a price offer, a brochure, a description sheet, or any other document in the "Quotes and other attached files" box. To do this, click on the button "Quotes and other attached files" and choose the desired file. Popular file formats (such as PDF, Excel, Word, JPG, etc.) are supported.
File options (available only when the required fields have been completed)

Save
Once the required fields are filled in (title and last name), click on "Save" at the top of the page.
Send
Once the file has been saved, the "Send" button is displayed. By clicking on it, you have the option to "Share the link" of the customer sheet (via WhatsApp, Messenger, or other applications), to send the intervention "By email," "By SMS," or "By email and SMS," using the customer's contact information that you have entered.
Preview (only when the required fields are entered)
The "Preview" button lets you preview the "customer sheet" that will be sent to the customer to make sure that it meets your expectations or to edit it otherwise.
Duplicate
The "Duplicate" button lets you use the information of an existing intervention to create a new similar one. You must then enter a new reference and choose the brand and the type of intervention.
For example, you can create a "Message Direct" intervention from a "UC Stock" intervention.
This feature lets you, for example, not to use videos or photos of a same car that you want to advertise to different customers.
The "Print" button lets you print the complete summary of the intervention.
Back
The "Back" button will take you to the previous screen, namely, the intervention history page.
Close / delete
If you no longer want to display an intervention in your dashboard / results, click on the "Close" button. The intervention will then only be visible if you select the filter "show closed interventions." Once an intervention is closed, the "Delete" button appears and you have the option to delete it.
Attention: deleting a Fleetback intervention is irreversible.
Create / edit a "UC Stock" intervention#
Create a New Intervention#
Click on "new intervention" at the top right of the white bar.

Fill in the fields:
Dealership (if access)
If you're using Fleetback in a group of multiple dealerships, select yours from the drop-down list.
Brand (required)
Select the vehicle's brand, or by default, the main brand of the dealership from the drop-down list.
Module (required)
When you use the Fleetback App in the "Sales" mode, you can access two modules once a new intervention is created. In the case of a UC Stock intervention, select "UC Stock"
- The "UC Stock" module is intended, among other things, to create "generic" files that can be used by different salespeople in your group. These may include tutorials, vehicle presentations, event invitations, and more. To send a file to a customer, simply duplicate it and convert it to a "direct message."
Reference / identification (required)
Next, enter an identification number for the file (e.g.: license plate or customer name).
Or edit an intervention#
You can only edit an existing intervention if it has the status "Waiting to be sent."
- Select the intervention to edit
- Edit the relevant fields
File status
The file status is displayed in the changing color bar.
It will appear respectively as red, light blue, dark blue, or gray depending on the status:
- Waiting to be sent: the file has been created but it has not been sent to the customer yet
- Sent: the file has been sent to the customer but has not been read yet
- Read: the customer has read the file but he/she has not yet responded
- Answered: the customer replied regarding the file
- Closed: the file has been archived and no further action is possible. It will be hidden from the dashboard (unless you have checked the "show closed interventions" option) but it remains in the intervention history.
History
To the right of this colored bar is the intervention's history - that is, the users who created, edited, or sent it, the customer's actions, and the date and time of the actions. The most recent action is displayed at the top of the list.
Vehicle information
In addition, for logistical and monitoring purposes, as well as for qualitative purposes, we recommend that you complete all of the intervention's fields.
Media
The media related to the intervention are displayed in the "Media" box.
You can:
- edit them by clicking on the relevant item
- rearrange the display order
- download all media in different formats
- add new media by importing them ("drag and drop your media here")
More details on media options can be found in the dedicated section: Web App> Media
Contact information
Contact information is used to identify and contact the customer. You can also use it to find the file.
Before sending an intervention, make sure to enter all the required fields:
- "Title"
- "Last name"
- "Email" or "Phone number."
Message
A default message will be displayed depending on the intervention mode (sales / after-sales). You can complete or edit it in the "Message" box.
Attach a document
It is possible to add a price offer, a brochure, a description sheet, or any other document in the "Quotes and other attached files" box. To do this, click on the button "Quotes and other attached files" and choose the desired file. Popular file formats (such as PDF, Excel, Word, JPG, etc.) are supported.
File options (available only when the required fields have been completed)
Save
Once the required fields are filled in (title and last name), click on "Save" at the top of the page.
Send as message
This lets you duplicate the file converting it into a "direct message" intervention that can be sent to the client.
Send
Once the file has been saved, the "Send" button is displayed. By clicking on it, you have the option to "Share the link" of the customer sheet (via WhatsApp, Messenger, or other applications), to send the intervention "By email," "By SMS," or "By email and SMS," using the customer's contact information that you have entered.
Preview (only when the required fields are entered)
The "Preview" button lets you preview the final visual aspect that is intended for the customer to ensure that your intervention meets your expectations and to edit it otherwise.
Duplicate
The "Duplicate" button lets you use the information of an existing intervention to create a new similar one. You must then enter a new reference and choose the brand and the type of intervention.
For example, you can create a "Message Direct" intervention from a "UC Stock" intervention.
This feature lets you, for example, not to use videos or photos of a same car that you want to advertise to different customers.
The "Print" button lets you print the complete summary of the intervention.
Back
The "Back" button will take you to the previous screen, namely, the intervention history page.
Close / delete
If you no longer want to display an intervention in your dashboard / results, click on the "Close" button. The intervention will then only be visible if you select the filter "show closed interventions." Once an intervention is closed, the "Delete" button appears and you have the option to delete it.
Attention: deleting a Fleetback intervention is irreversible.
Management#
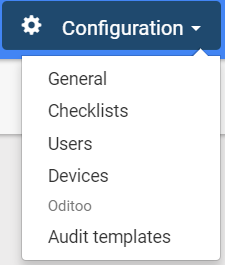
Configuration (only for the dealer manager profile)#
The dealership administrator has access to the "Configuration" menu, at the top right of the blue bar, in which he/she can consult and edit information about the dealership (e.g., the official website, address, etc.) as well as add new users and mobile devices or create and edit checklists.
General: dealership information and modules#
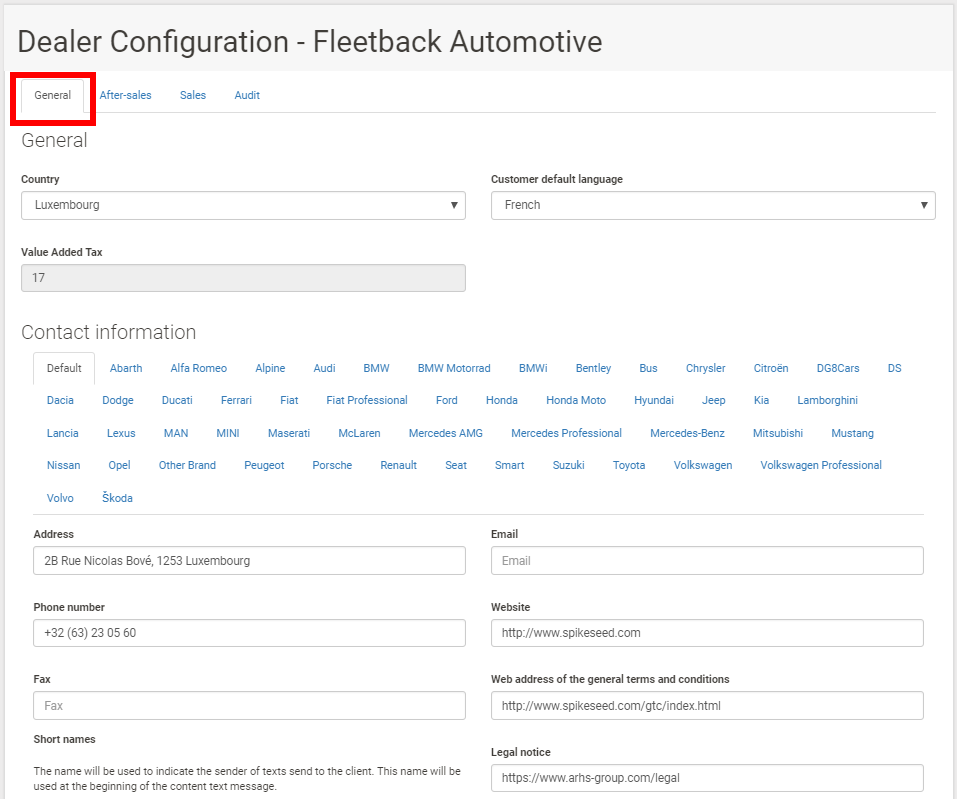
In the configuration menu, click on "General."

Default / General
The dealership's basic information and contact details are displayed here, such as the country, the default customer language, the dealership address and website, and so on.
The respective fields are all editable. After each change, make sure you click the "Save" button at the top of the page.
If you are using Fleetback within a group with multiple dealerships, under general information, the "Statistics" box lets you share your dealership's statistics with the Group. You can check the box "Share my dealership's statistics with the Group" or leave it unchecked.
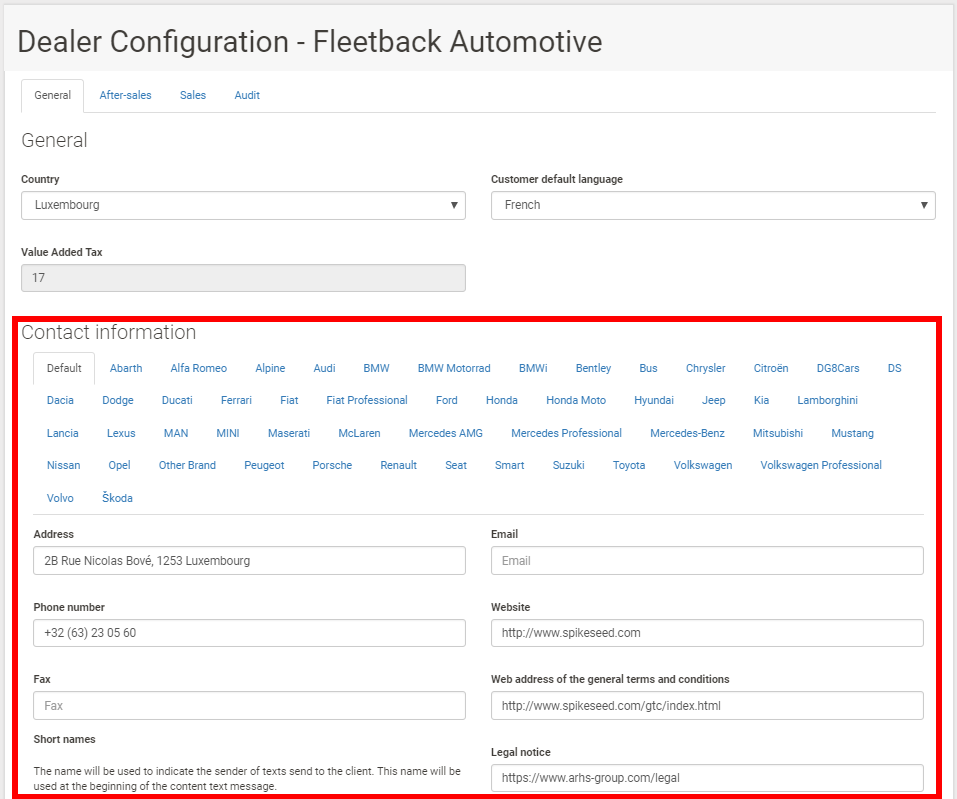
Brands
The previously described features are also available for each specific brand, if your dealership is a multi-brand one.
For example, you can indicate a specif website for each of two different brands. You can also share only the statistics of one brand without sharing those linked to another brand.
To access and edit the information for a particular brand, select it under "Contact Information."
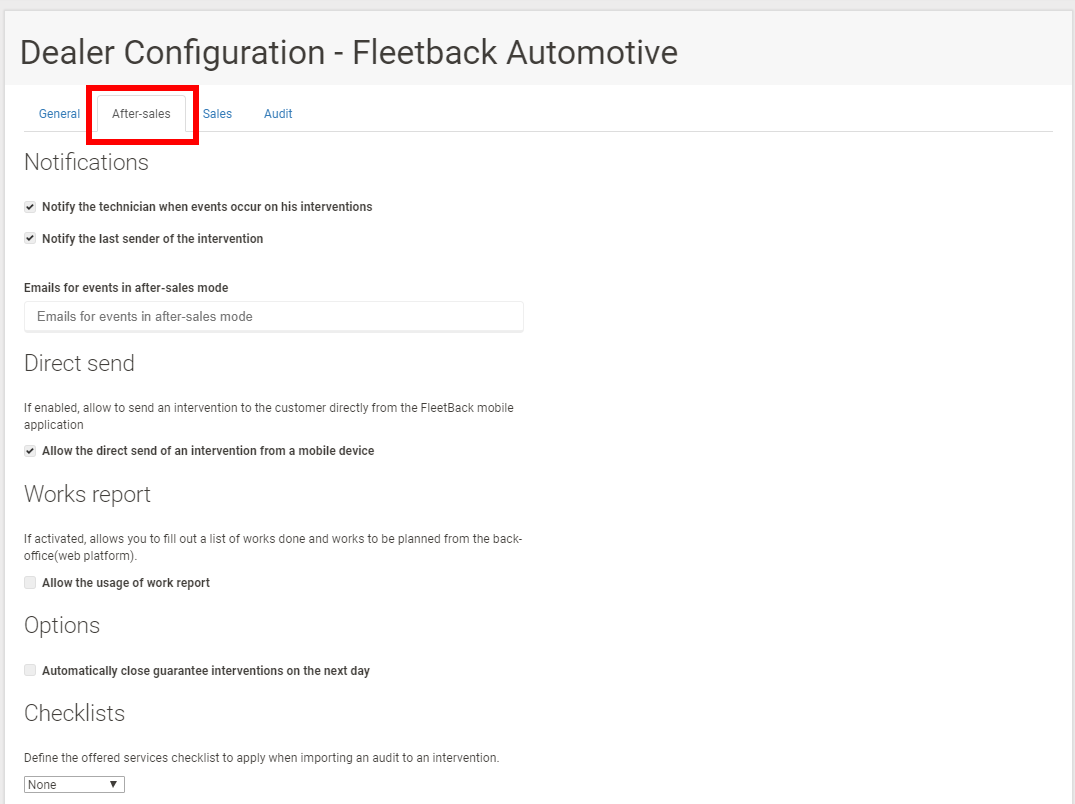
The "After-Sales" module
Under the "Dealership Configuration" menu, select the "After-Sales" tab to change the Fleetback usage settings for the "After-Sales" mode.
Under the "Notifications" menu, you can set the desired notification settings.
You can also enter "Emails for events in the after-sales mode." Emails entered here will receive notification emails for all after-sales interventions created in the dealership.
You can also authorize the direct sending of an intervention from a mobile device, by checking the respective box, or define the default checklists that will be proposed when creating an "After-Sales" intervention, for each of your dealership's brands.
Managing reminders
Reminders in Fleetback allow you to easily keep track of planned works for your customers. They can be automatically generated from work reports and sent interventions or manually created, and are fully customizable to your dealership needs. Sending a reminder message to the customer can also be automatized or manually done.
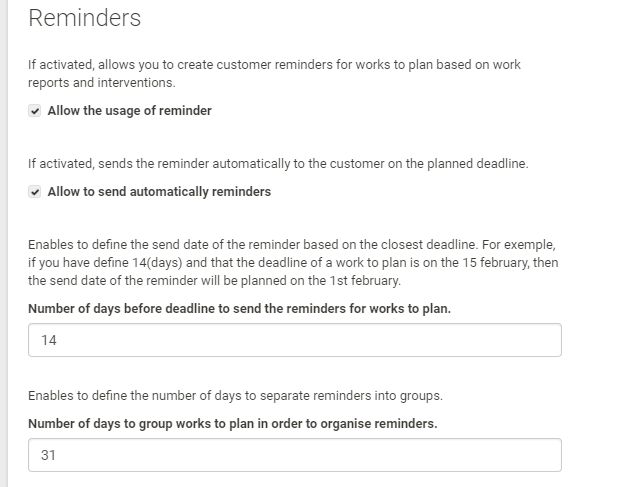
4 options are available to configure the reminders:
- “ Allow the usage of reminder ”: activate or not the feature for your dealership. By default, the feature is disabled.
- “ Allow to send automatically reminders ”: if activated, reminder messages will be automatically sent to your customers when sending date is reached. By default, this feature is disabled.
- “ Number of days before deadline to send the reminders for works to plan ”: det up the date before sending a reminder’s message. For instance, if the deadline for works used to generate a reminder is the 30 June 2019 and you have configured this option to 10 days, the reminder’s sending date will be the 20 June 2019.
- “ Number of days to group works to plan in order to organize reminders ”: defines the range to group planned works in reminders from a work report. For instance, if your work report contains an A work with a deadline the 5 August 2019, a B work with a deadline the 13 August 2019 and a C work with a deadline the 06 September 2019, with this option set to 31 days, 2 reminders will be generated: a first one with work A and B, a second one with work C.
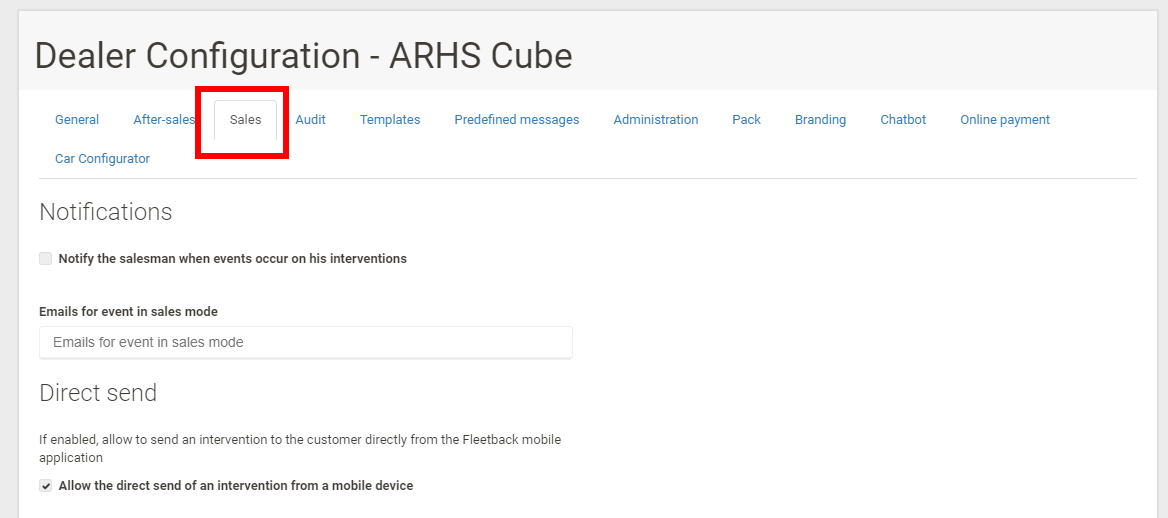
"Sales" module
Under the "Dealership configuration" menu, select the "Sales" tab to change the Fleetback usage settings for the "Sales" mode.
Here you can authorize the direct sending of an intervention from a mobile device, checking the respective box, or decide to notify or not the salesperson when events occur regarding their interventions.
You can configure the acess to the exporting photo tool on Planet VO. Fill out the mandatory fields. You can ask for the necessary elements to your dealer manager or your Planet VO contact.
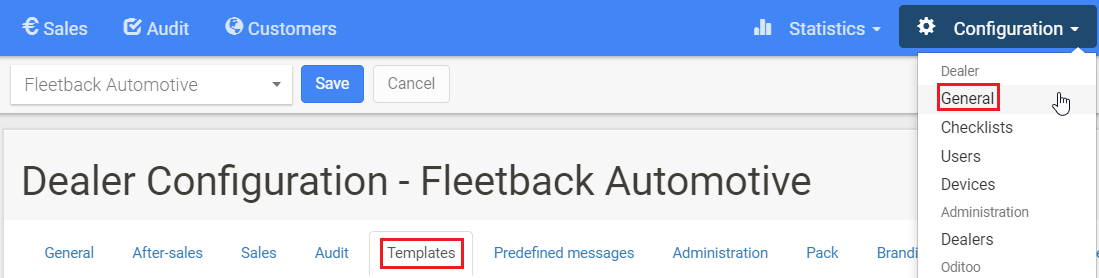
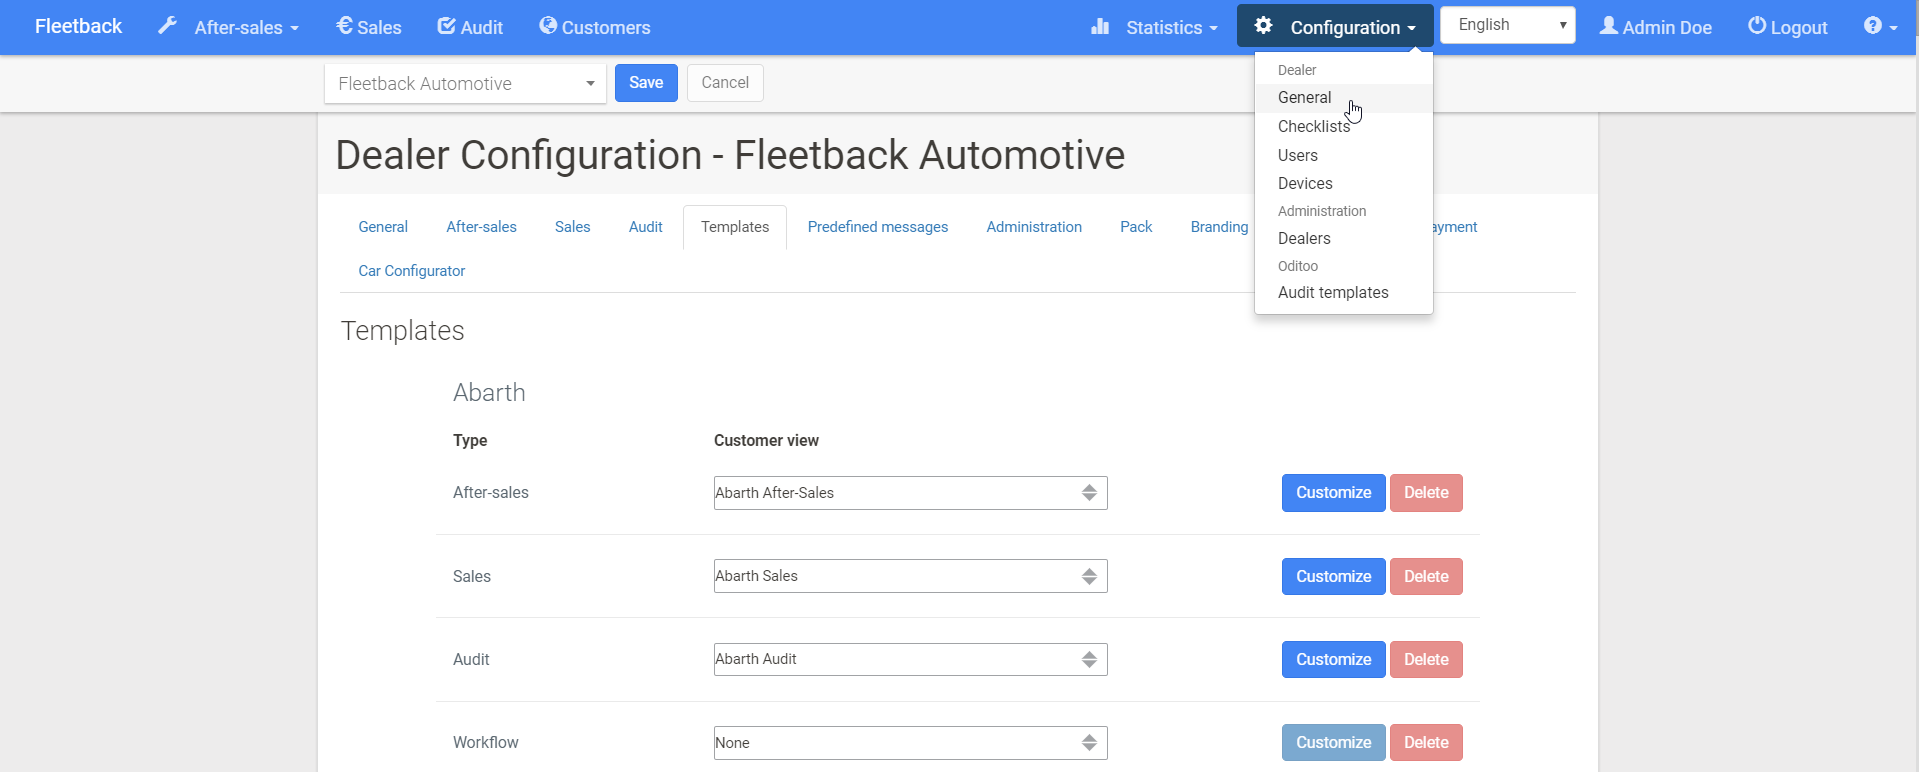
Templates
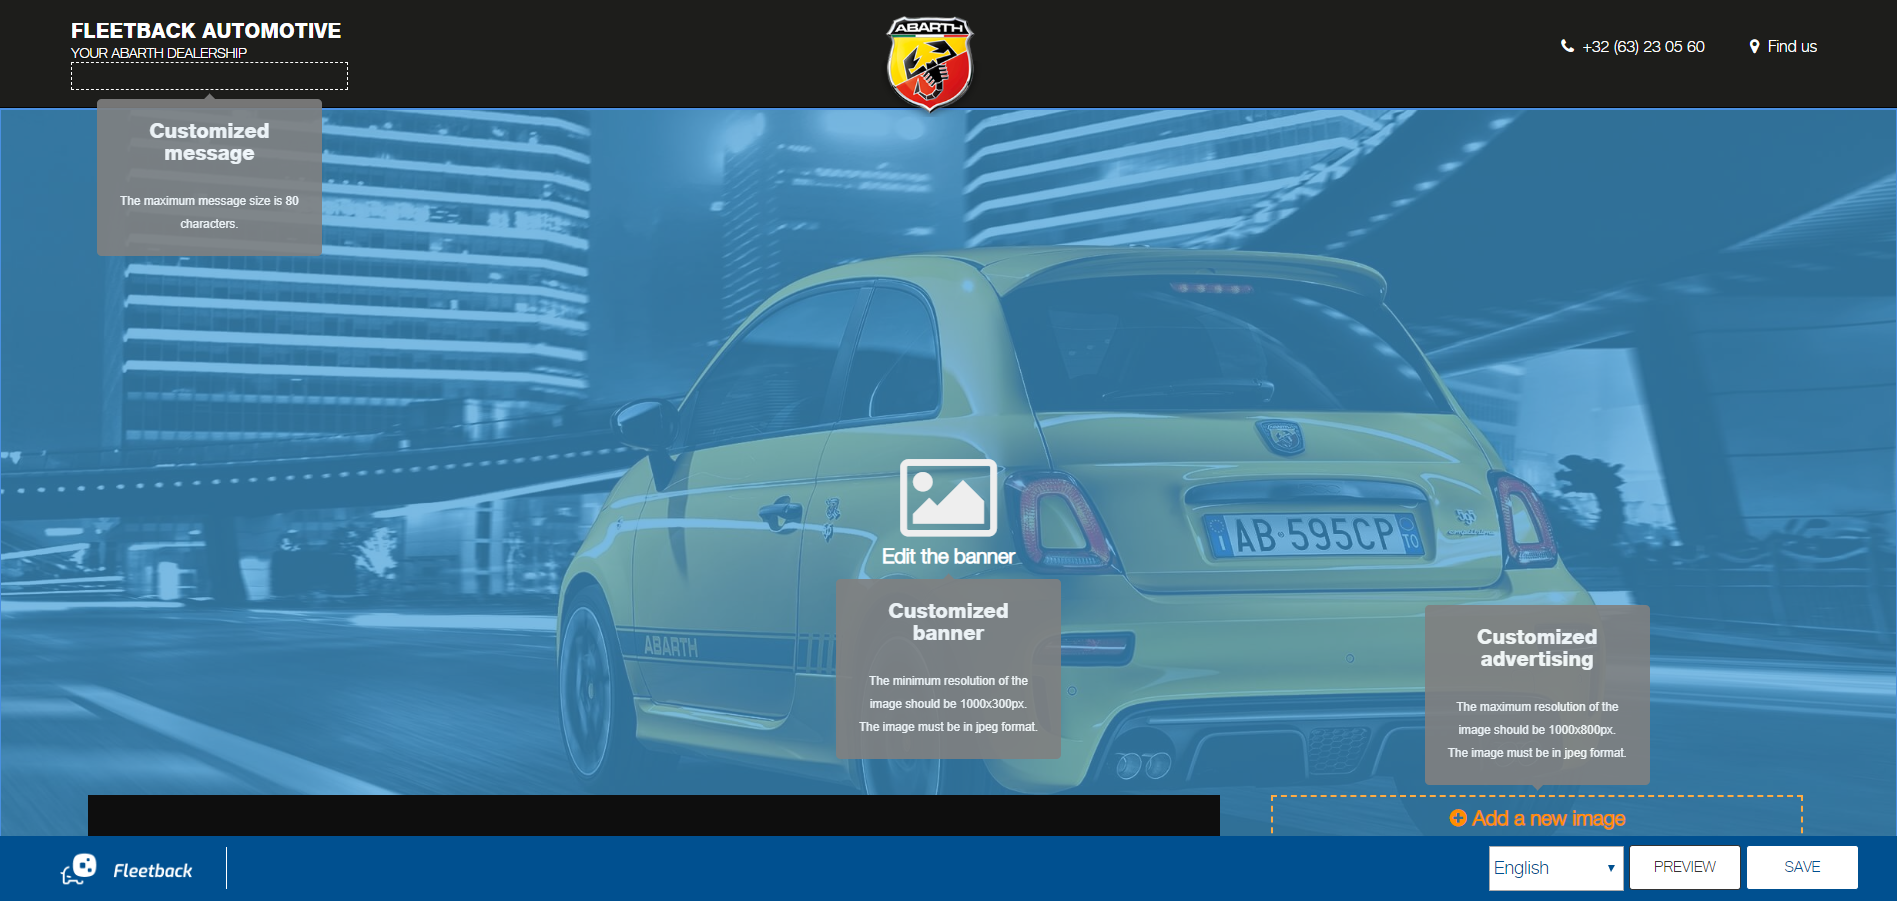
In order to personalize your communication even more and adapt them throughout time, you can now create and edit your own templates.
You can edit the banner, add a text and add a commercial image (like your current campaign.)
You can create multiple templates and customize them in every language
This can be done for every brand and module you have in the "general" configuration (dealer manager role only).
Select the brand and module you want to create a template for and click on "customize". You'll automatically be in preview mode. Click on "edit" on the bottom right corner. Customize your template and click on "preview". Once you're satisfied, "save" your template and name it.
If you manage a group of several dealerships you can create templates that will apply to all the dealerships of your group. In order to do this, you'll need the "group manager" role, Please contact us if you're interested.
Predefined messages
In the same way that you can customize your "work checklist", you can now create a list of predefined messages adapted for every type of situation.
You can create a list of messages for every type of intervention you send to your customers. This will help you save time and personalize your message in just a click.
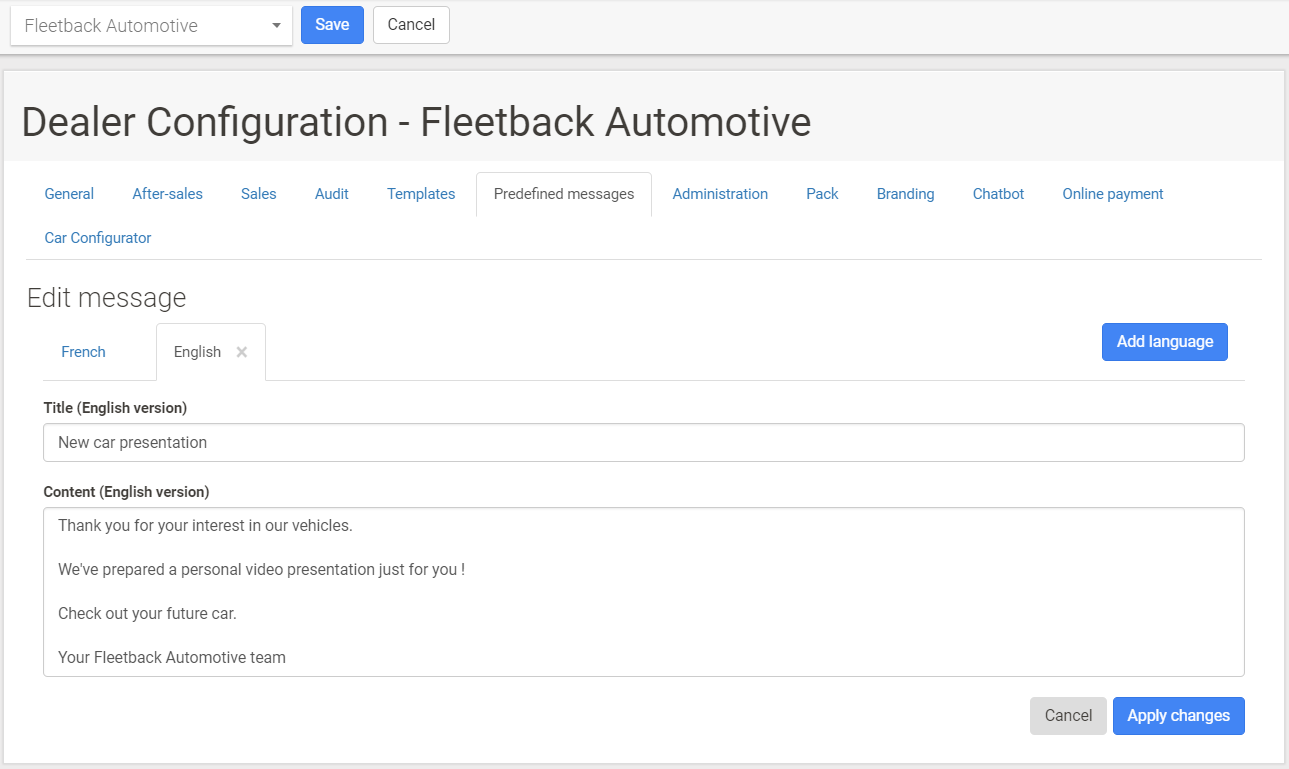
Go to the "general" configuration, select the "predefined message tab", select a language, name the message and type the message.
You can add translations in all languages available on Fleetback for each predefined message and create an unlimited number of messages.
You can preview the message to see what your customers will receive.
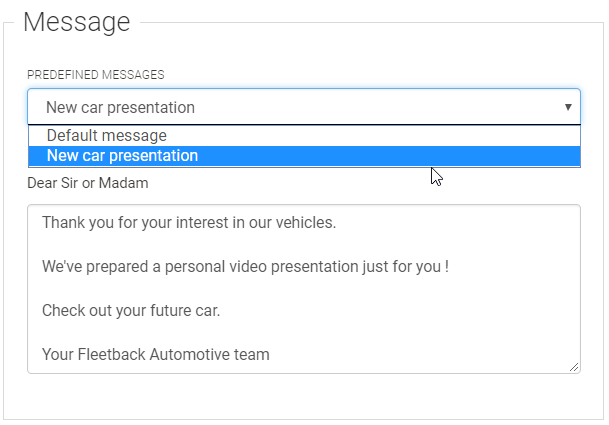
Once you're in an intervention, all you have to do is click on the drop down in the message section and select the predefined message that corresponds to your intervention.
If you change the customer's language, the predefined message will adapt (if the translation has been configured for that message). You can then edit the message if needed.
Checklist#
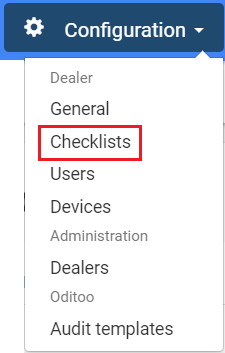
In the configuration menu, click on "Checklist" to edit the (default) lists of works to propose.
Select the checklist to view, based on the brand or a custom list.
The "default manufacturer" lists can be consulted but they cannot be modified directly. However, you can duplicate them.
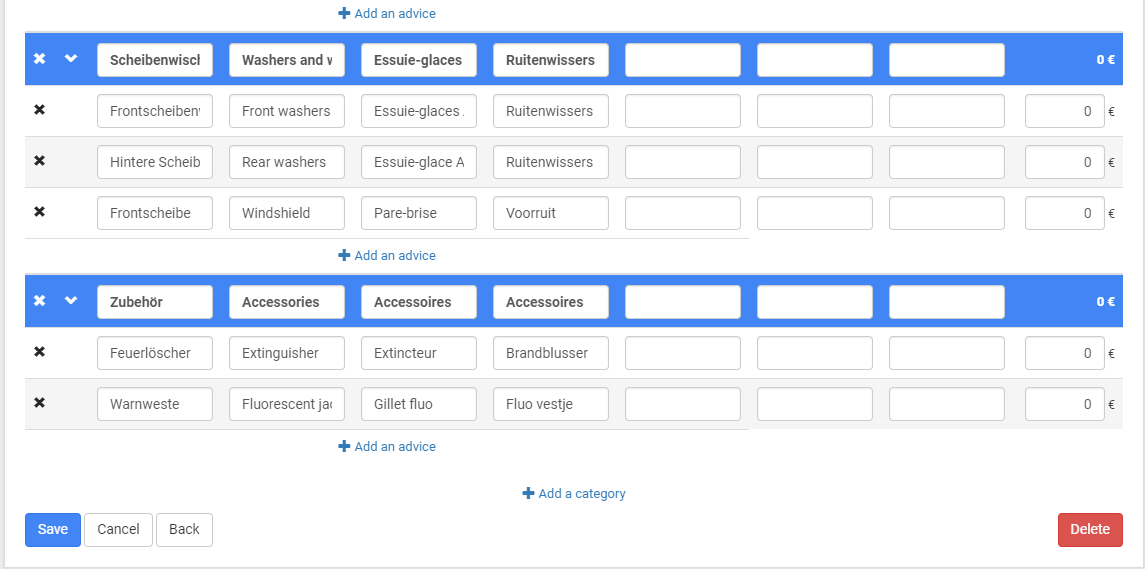
To do this, enter the desired name at the top right of the white bar and click on "Duplicate." A fully editable checklist is created with the specified name.
You can add lines by clicking on "Create a control" at the bottom of the page or even add a category by clicking on the button with this name.
The buttons "Save," "Cancel," "Back," and "Delete" let you carry out the corresponding actions.
Translations are optional, complete the checklist in the language(s) you will use with your customers.
Managing users#
Adding a user
- Click on "Users" in the "Configuration" submenu
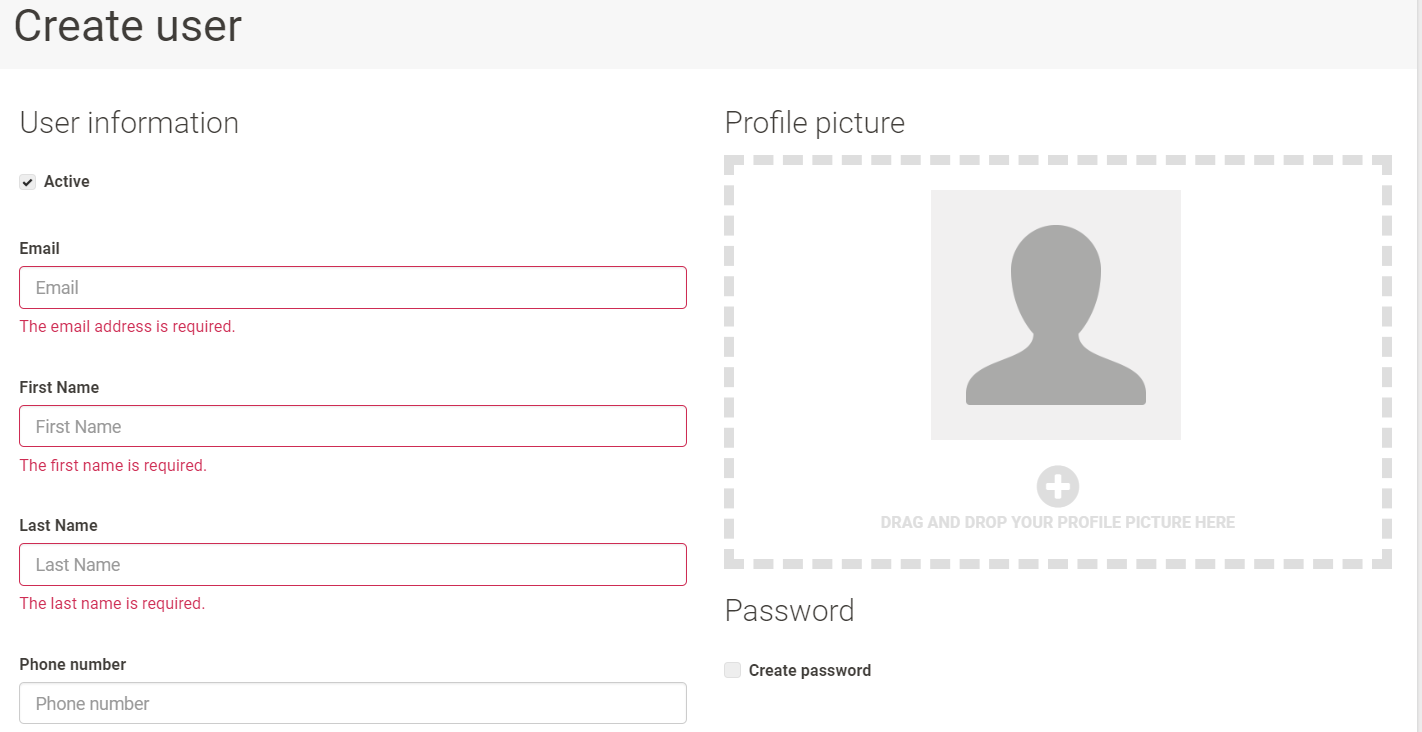
- Click on the "Add a User" button
- Enter the user's personal information (last name, first name, email, phone, and potentially a photo) and the user's rights
- Select the dealership(s) concerned
- Create a password if the user assumes a role other than technician or auditor. The password must contain at least a capital letter, a number, and a special character (example: "/").
- Click on "Save"
Editing a user
- Click on "Users" in the "Configuration" submenu
- Click on the user concerned
- Edit the relevant fields
- Click on "Save"
User roles and rights
The various user roles and respective user rights are as follows:
Dealer Manager
- Accesses the various configuration menus of the application
- Accesses the various statistics menus of the application
Back Office
- Logs in to https://www.fleetback.com
- Creates a new intervention
- Sends an intervention created on the mobile app
- Views the intervention history
- Accesses the CRM / Customer functionality
Salesperson
- Logs in to https://www.fleetback.com
- Creates a new intervention in Sales mode
- Sends an intervention created on the mobile app
- Views the intervention history in sales mode
- Uses the app in sales mode
Technician
- Uses the app in after-sales mode
Auditor
- Use the Fleetback Oditoo app
Audit Manager
- Logs in to https://www.fleetback.com
- Consults completed Audits
- Creates new audit templates
- Views audit statistics
Adding a device#
In the configuration menu, click on "Devices" to link a device.
Here you can also view the list of mobile devices already linked to the dealership. If you are using Fleetback in a group with multiple dealerships, be sure to select the desired dealership.
Select the "Add Device" button to link a device. By default, the device will be created to be used by the Fleetback App. -If you want to use Fleetback Oditoo, select it.
Then name your device without inserting spaces between characters.
A QR code will be generated and displayed on the screen. It is this QR code that must be scanned at the very first launch of the Fleetback application on the mobile device.
Statistics#
The dealership administrator has access to the "Statistics" menu where he/she will be able to consult numerous statistics related to the use of Fleetback.
Filters#
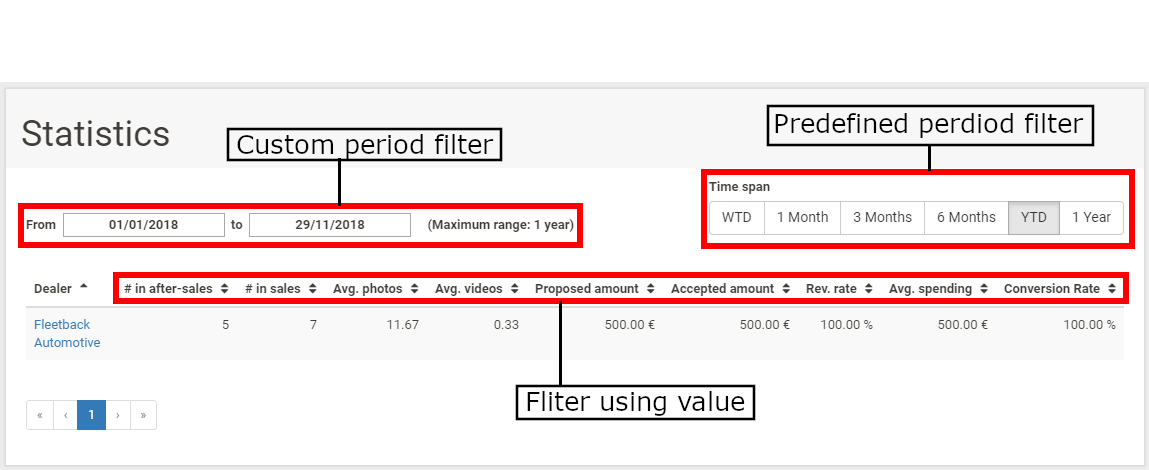
Period
You can filter the statistics by a custom or predefined period.
Amount
If you have access to the statistics of several dealerships, you can also filter by amount. Click the amount based on which you want to rank the statistics. For example, "Average shopping cart." You can also click on the corresponding arrows to sort in ascending or descending order.
General
By clicking on the name of a particular dealership, you will access its detailed statistics. These can be filtered according to the following filters:
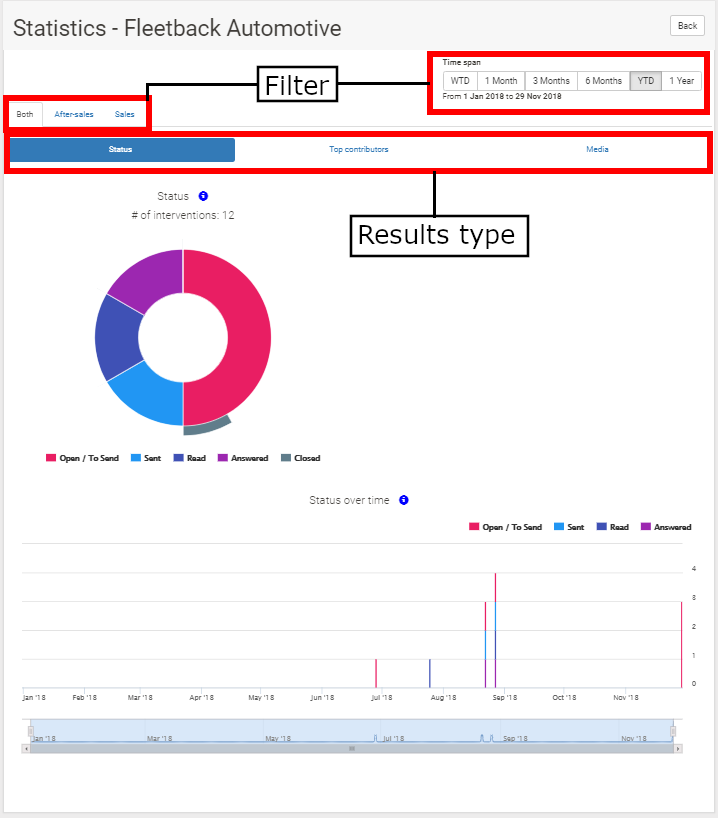
Predefined period
"WTD" means "week-to-date": from Monday to today and "YTD" means "year-to-date", that is, from January 1st of the current year to today.
Mode ("All," "After-Sales," or "Sales")
You can filter the results by mode of intervention (sales / after-sales) or without any filters (all)
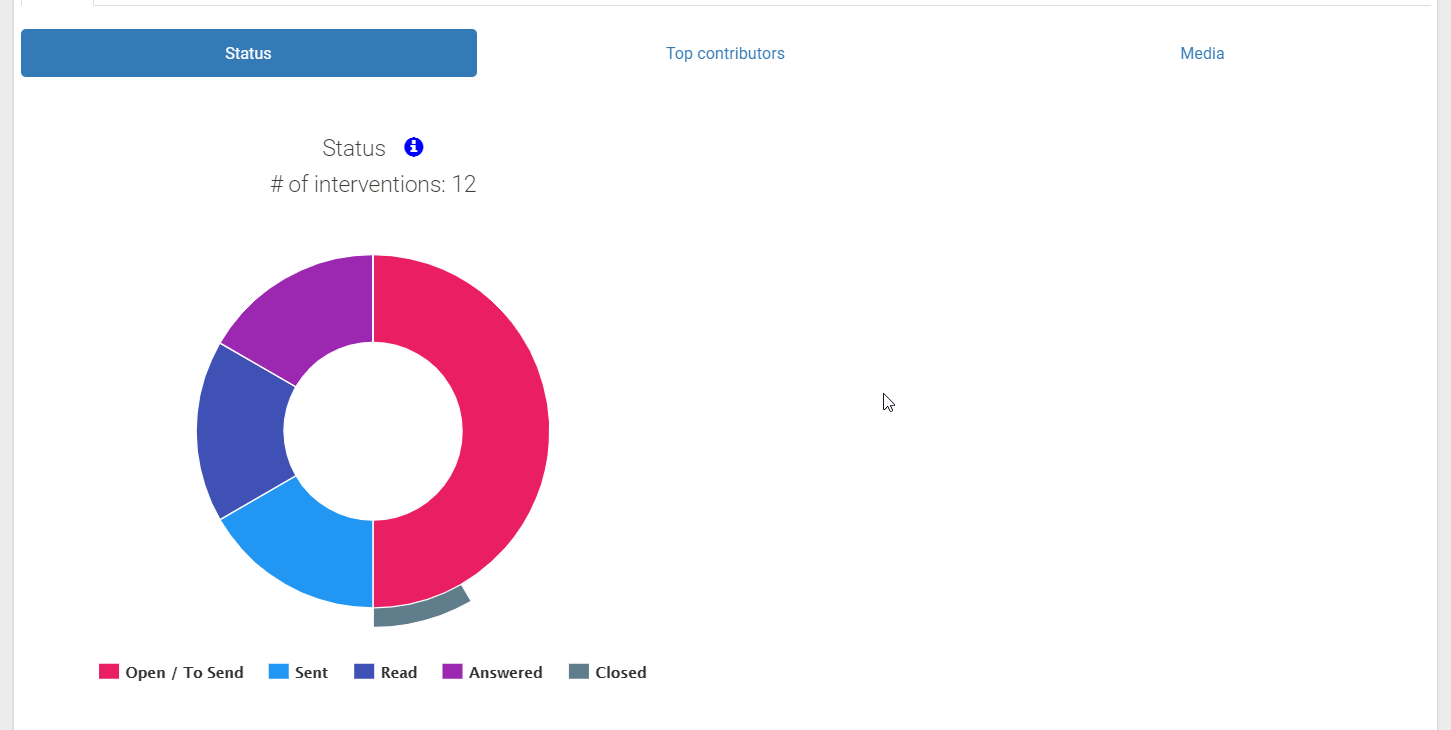
Status
Based on the status of the intervention ("Waiting to be sent," "Sent," "Read," "Answered," "Closed").
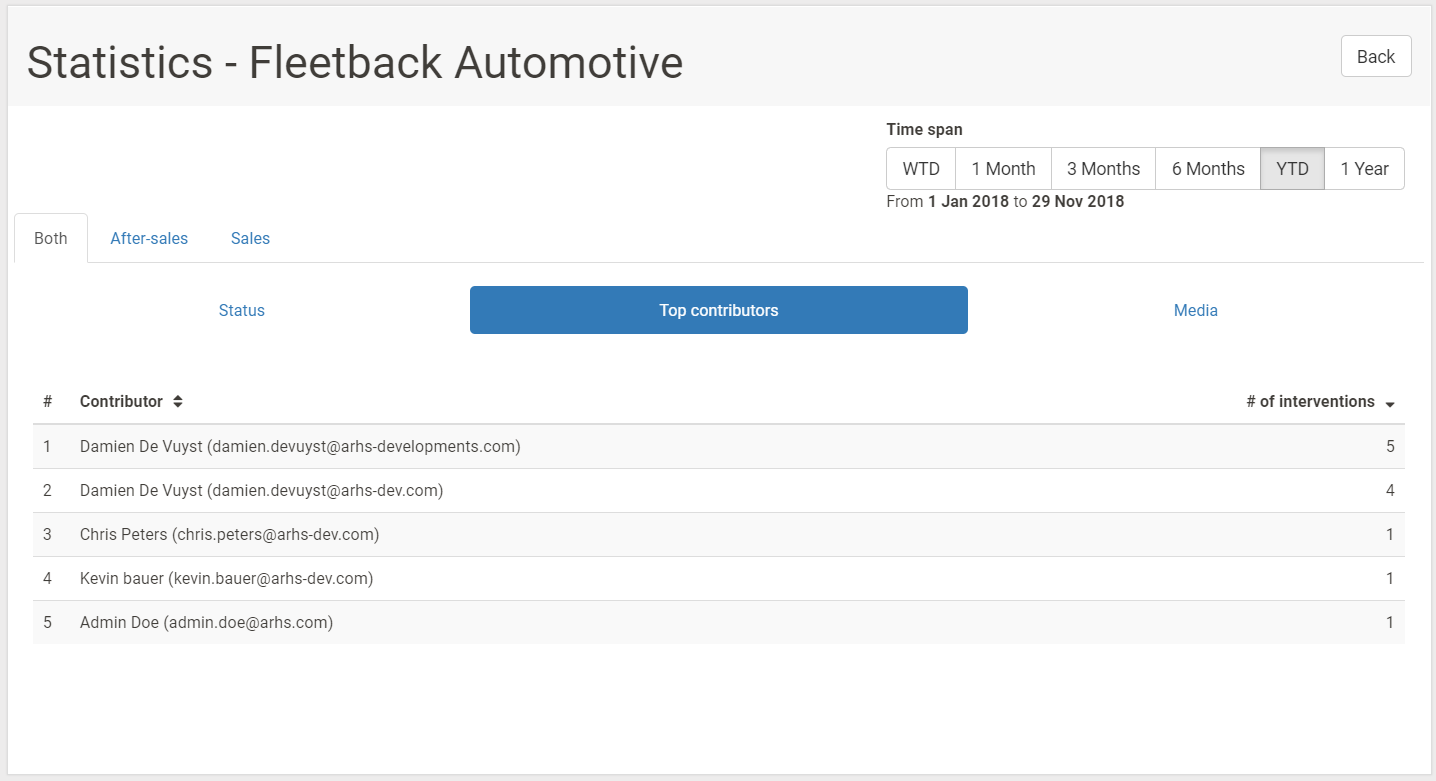
Top contributors
Here you can classify the interventions based on the user who did them.
Media
Here you can classify the interventions based on the number of media they contain.
Revenues
Only with the "after-sales" filter
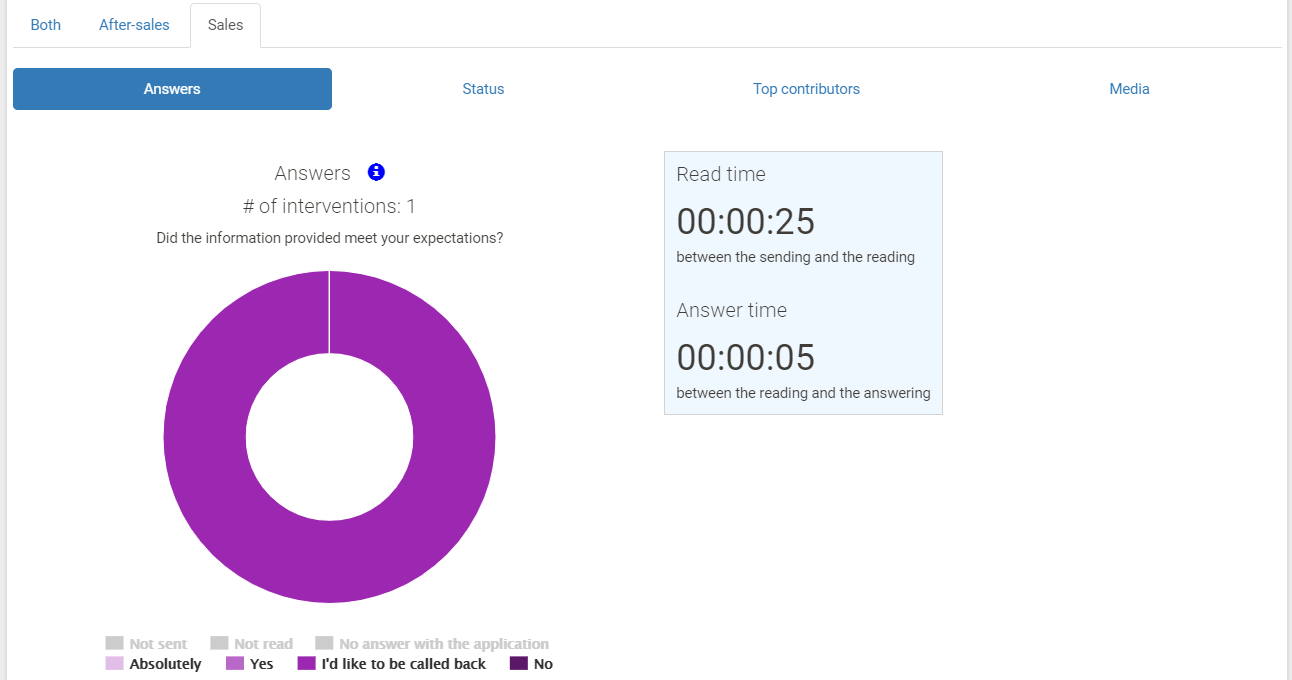
Replies
Only with the "sales" filter
Online payment#
In order to ease your payments for the intervention made by your dealership, it is possible to activate the online payment option. Once configured, it allows you to offer to your clients the option to pay online when they receive Fleetback interventions (bodywork, guarantee and mechanic) and work reports.

Initial setup#
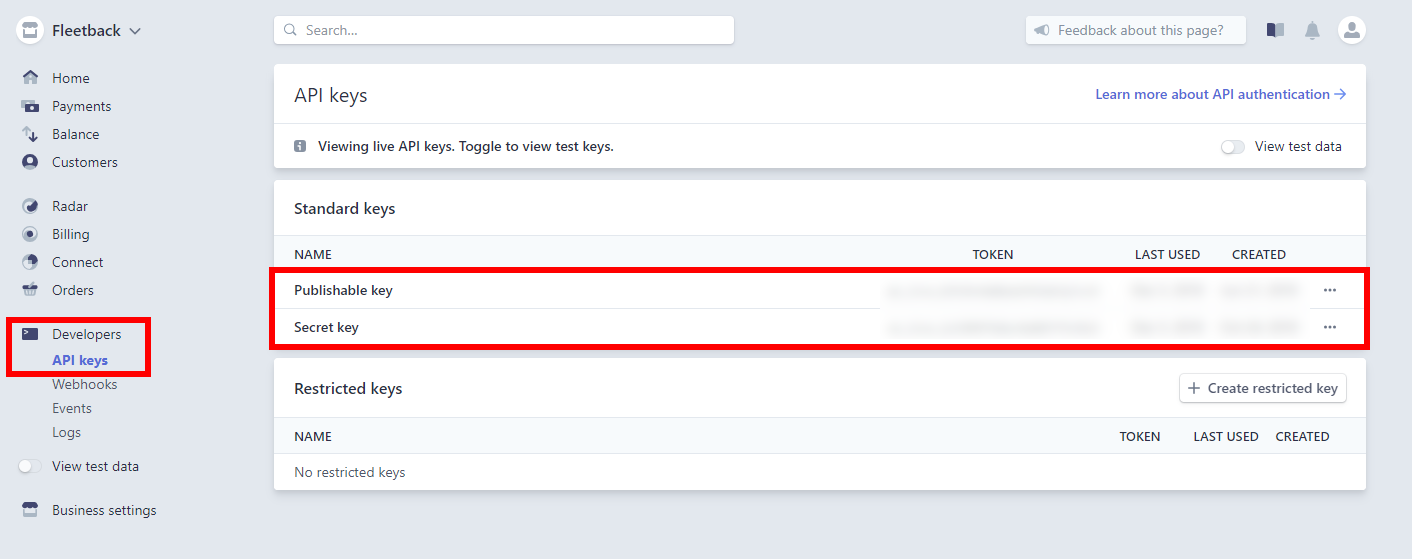
Online payment is managed by an external partner, Stripe ( https://stripe.com/ ). They oversee the transaction with the client and send the payments to your bank account. A dashboard is also available to follow-up transactions.
During the activation of the online payment, two fields are mandatory: the private / public Stripe’s keys. These keys are used to connect payments made by your clients to your Stripe account.

If you already have a Stripe account, you can find these two keys in your dashboard, under Developers > Api keys. You just have to copy paste them into the corresponding fields in Fleetback.
If you don’t already have a Stripe account, we will create it and link it to Fleetback for you. Just send us an email telling that you are interested by the online payment and we will call you back.
It may be pointed out that Stripe takes a commission on payments made (1.4% + 0.25€ per transaction).
Interface#
Once the online payment is activated and configured, it will be automatically proposed to your customers.
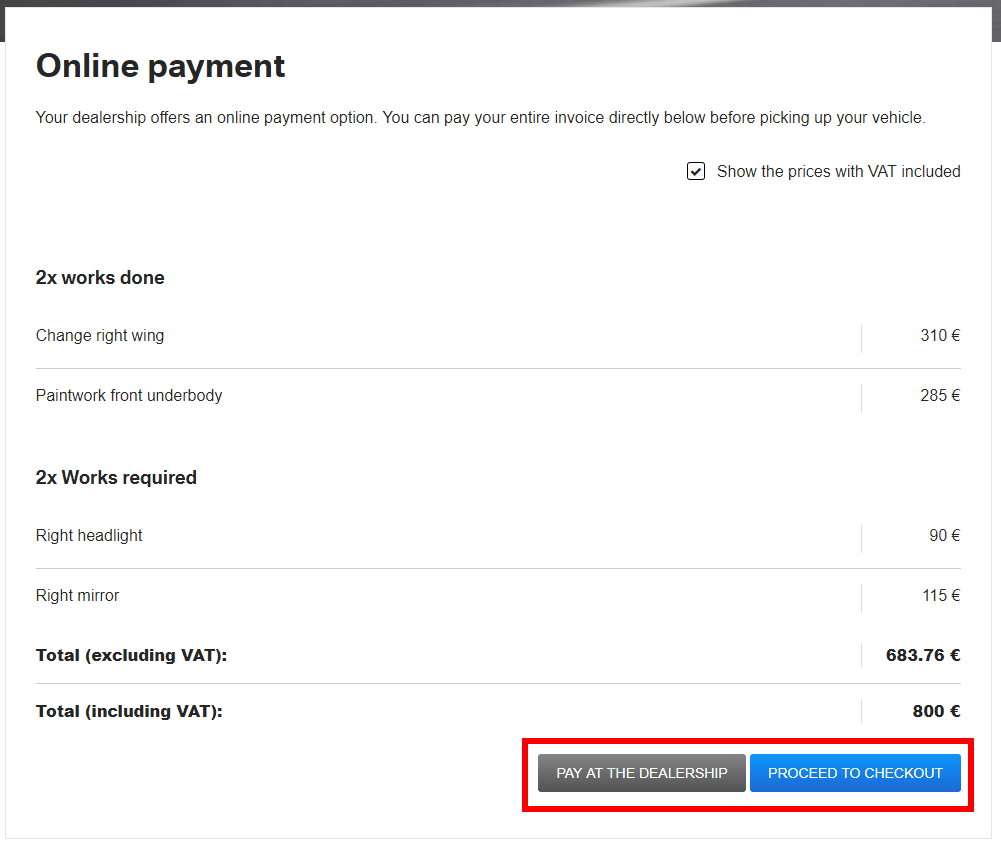
Interventions
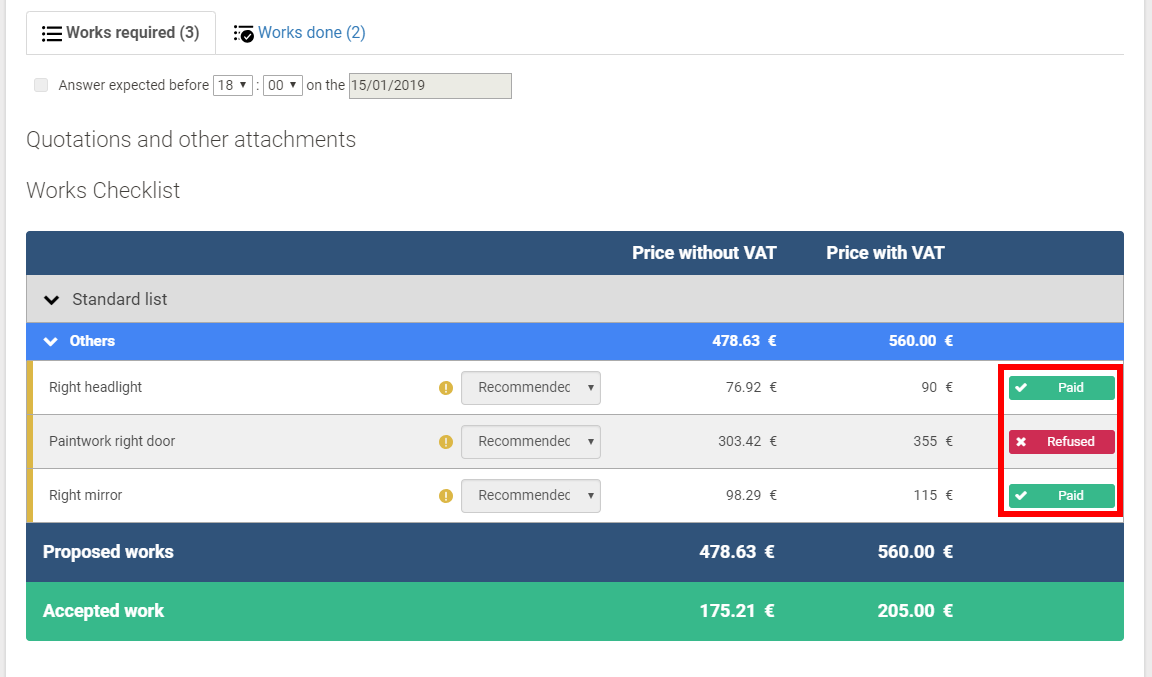
In an intervention, you have the possibility to add a list of works done and works to complete. When you send the intervention to the client, he validates the works from the list. Once this selection is complete, he can decide to pay online or at the dealership.
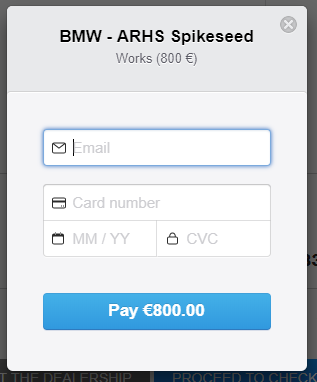
To complete the payment, he only has to enter his credit card information.
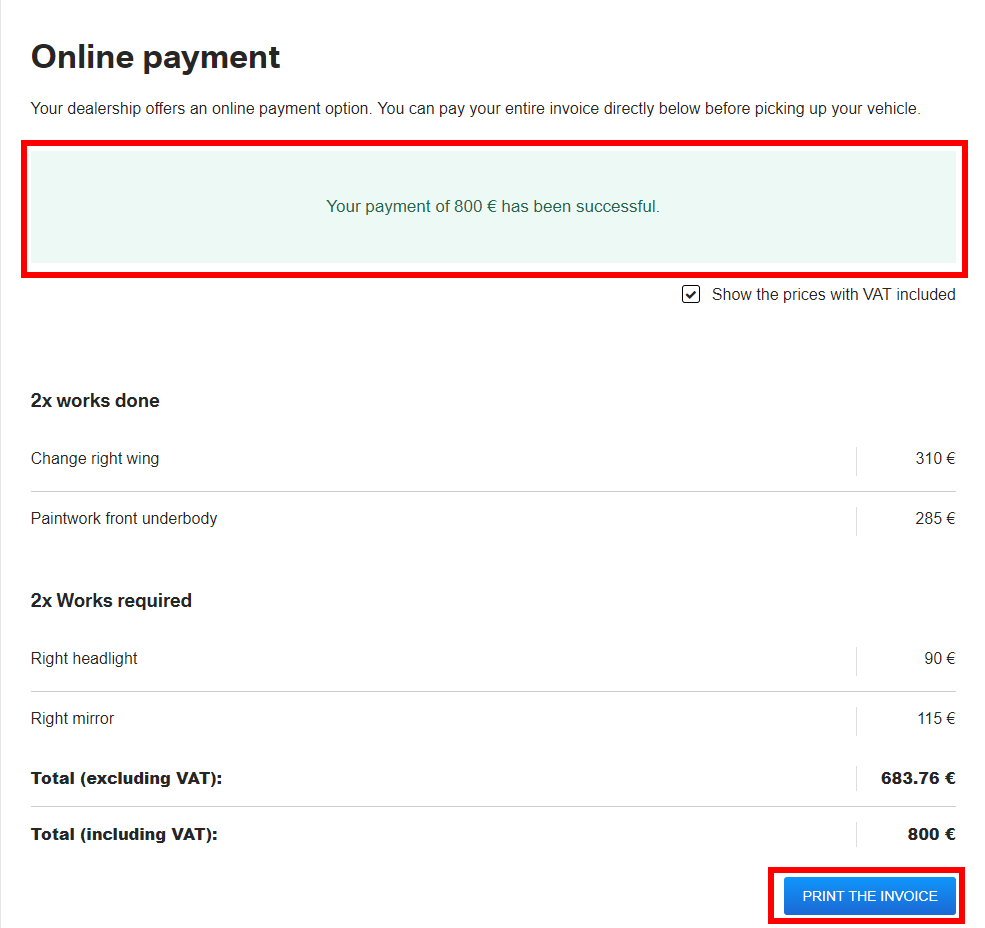
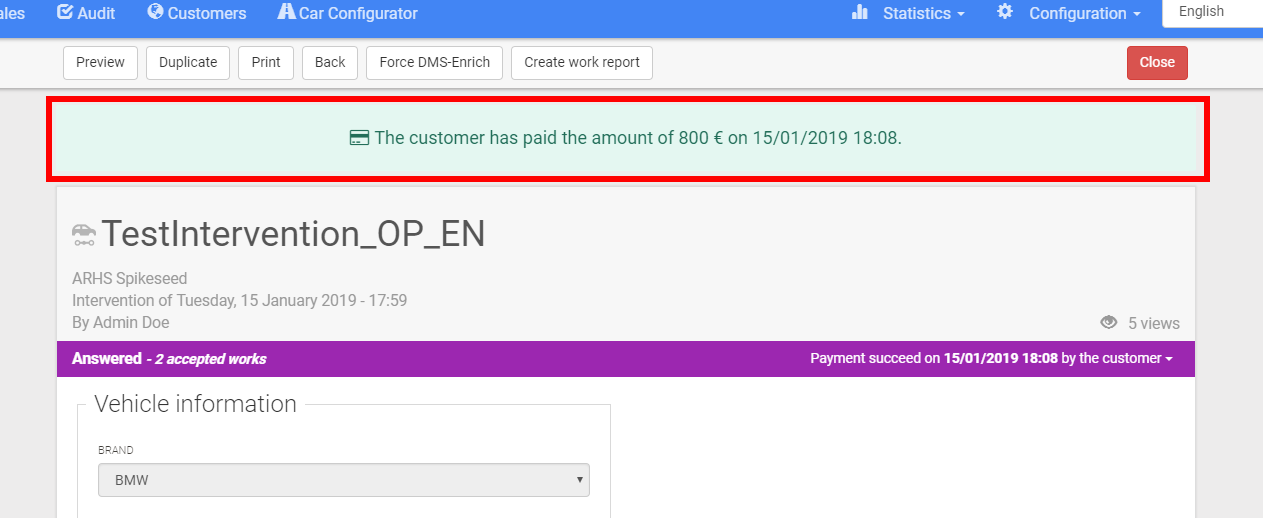
Once the payment is done, a banner will indicate so. He can also download the bill related to the payment.
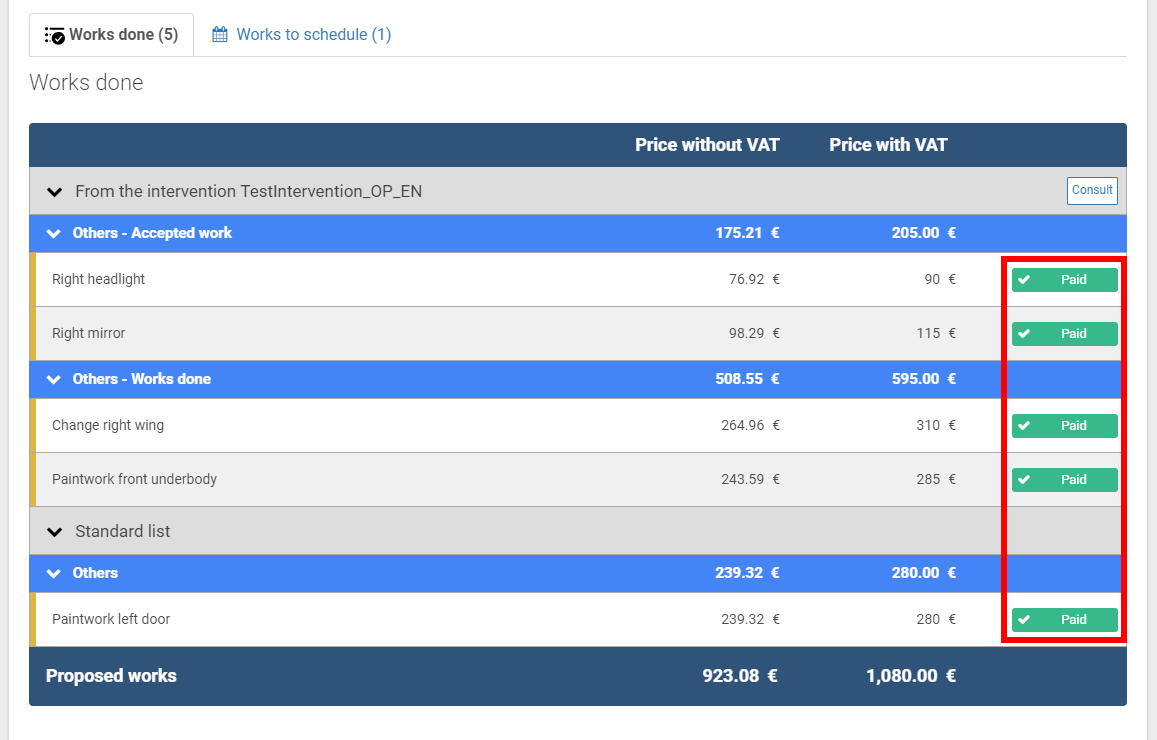
In Fleetback, the online payment is also indicated. A banner is added at the top of the intervention and a tag is put next to every work accepted by the client.
Work report
The online payment option is also available for work reports. When your client receives the report he can, like for an intervention, decide if he wants to pay online or at the dealership.
Please notice that if you import interventions in your work report, works already payed have a price set to 0€.
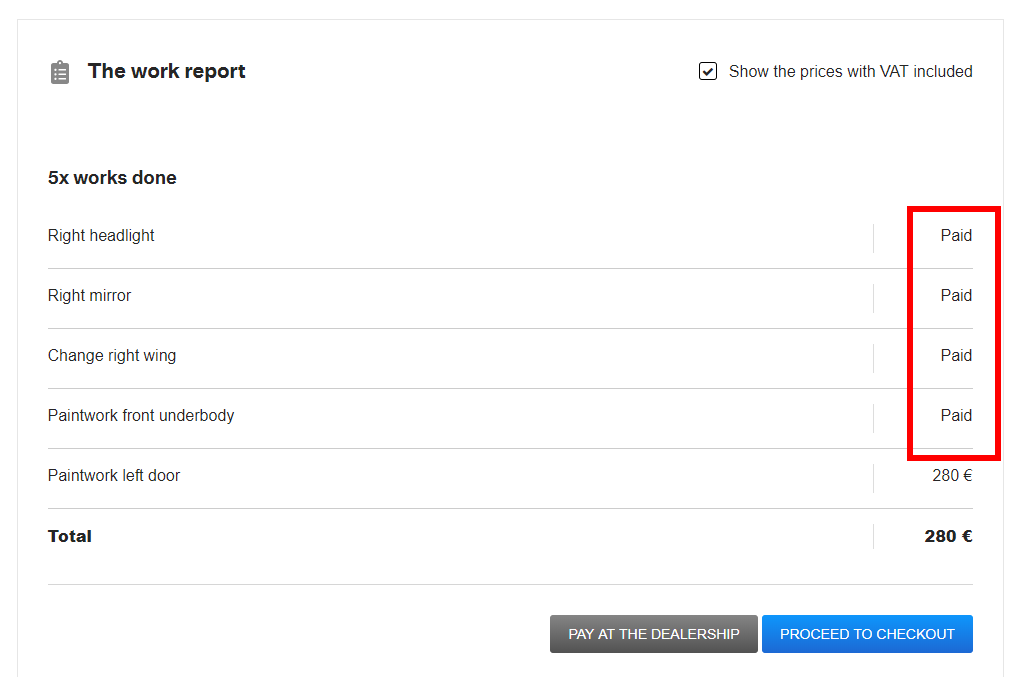
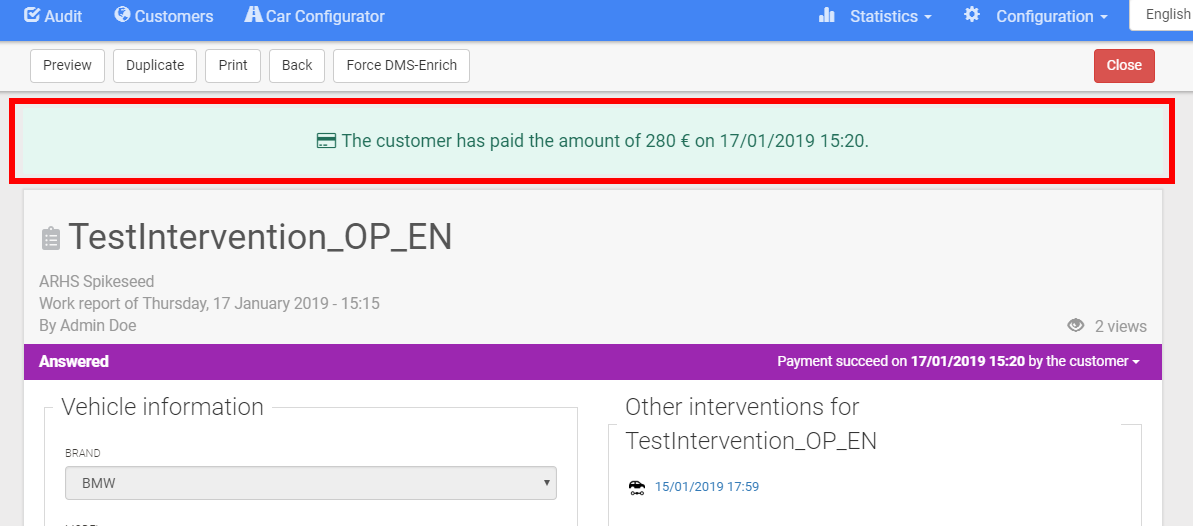
Like for interventions, the customer can download the bill related to the transaction. In Fleetback, a banner also indicates the transaction and tags are put next to payed works.
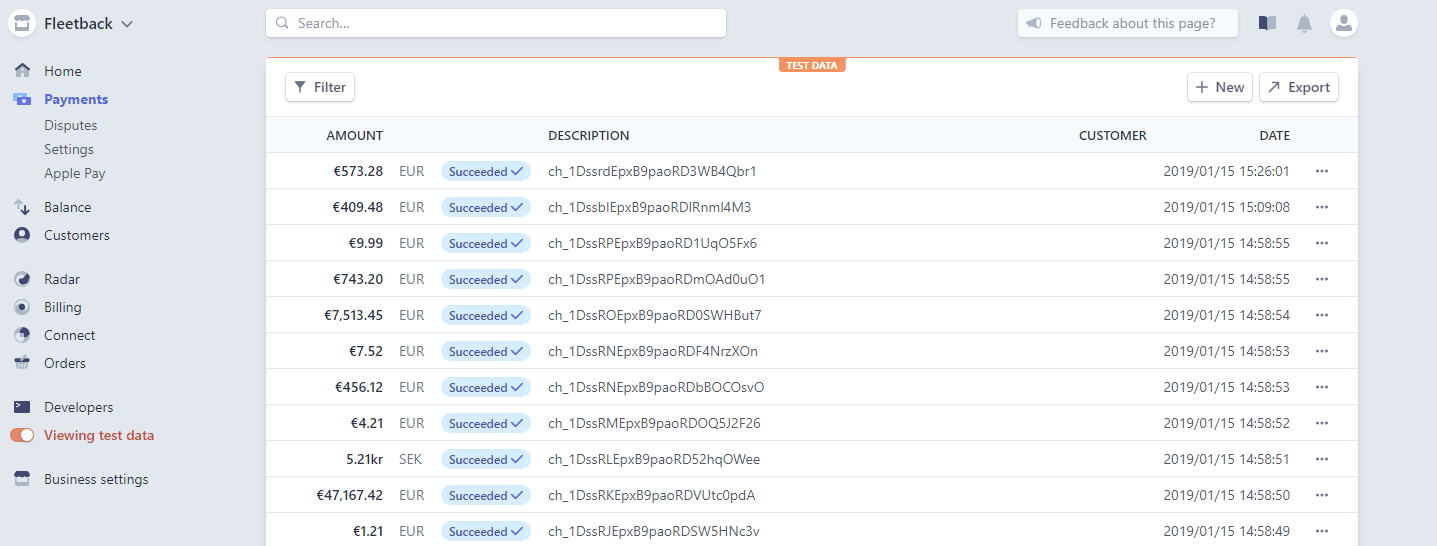
Payments follow-up#
You can follow transactions from the Stripe dashboard, using the payments tab ( https://dashboard.stripe.com/payments ).
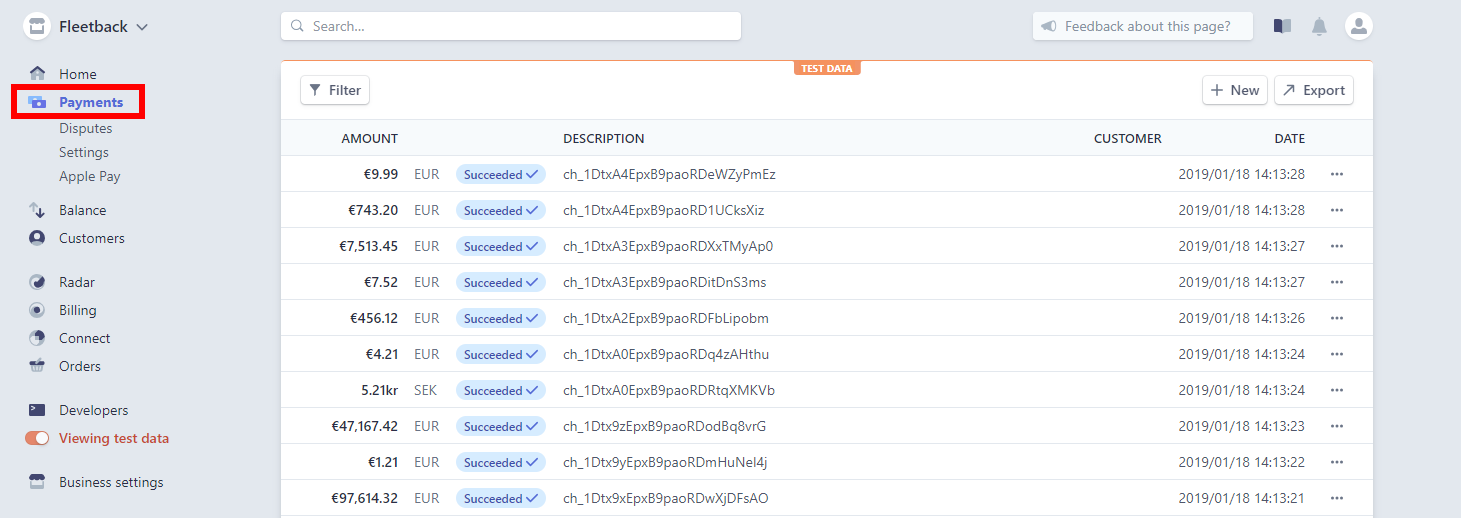
Each row corresponds to an online payment made by a client. The description field corresponds to the billing number, collected by Fleetback through your DMS. You can click on a transaction to get more details about it.
For further details about displayed information and available features in Stripe, you can consult the official documentation ( https://stripe.com/docs/dashboard ).
Payout#
The online transactions made are sent to your Stripe account and not directly into your bank account. By default, if we have set up your account, a transfer is made every day from your Strip account to your bank account. This daily transfer will regroup transactions made during the day.
You can follow your payouts under the tab Balance > Payout in your Stripe dashboard.
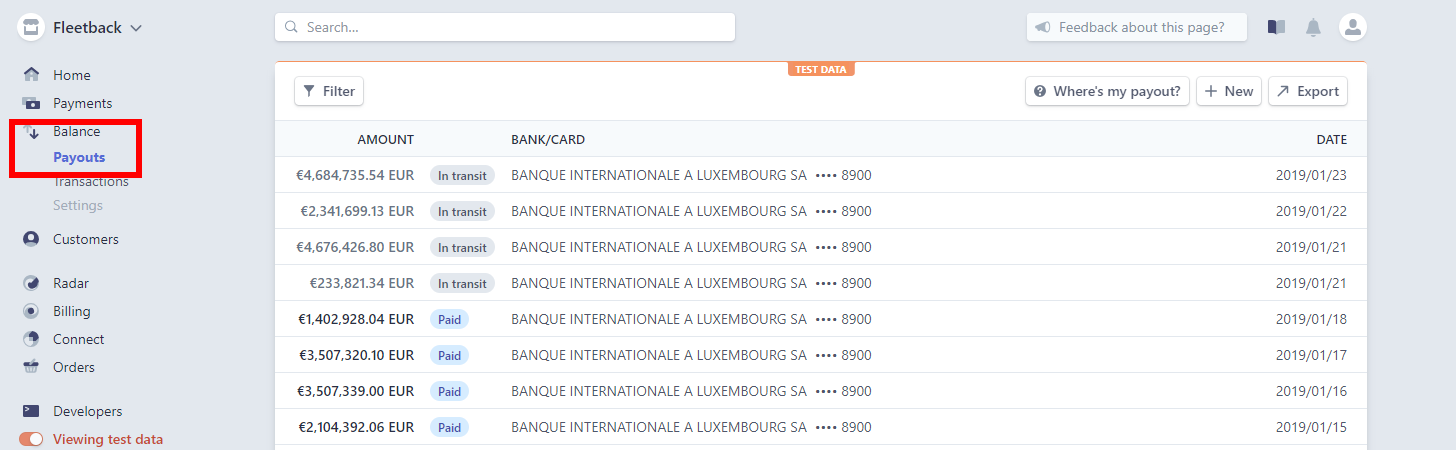
Media#
When you create or edit an intervention, you have several media options:
Importing / exporting media#
You can add new media stored on your computer by importing them (the "Drag & drop your media here" button).
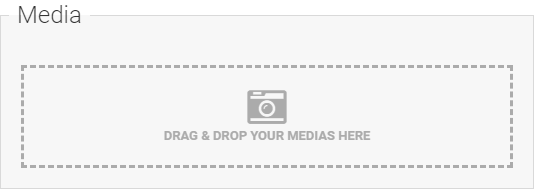
You can export all the media related to an intervention by clicking on the "download all" button and selecting the desired format.

You can export a single media item by clicking on the "Download" button, which has a downward pointing arrow and is located at the bottom of the media frame.

You can also rearrange the display order of your media by clicking reorder. You can then change the order by clicking on the arrows which will move your photo / video.